(Arduino Beginner) Tutorial 7: Finale
6 minutes to readGreeting! Welcome back to to the another Arduino tutorial for beginner. This is the last post of the series. Today we are not going for any tutorial or concept but a game instead. Before proceeding, I highly recommend you to read the following writeup.
- Tutorial 0: Introduction to Arduino
- Tutorial 1: Blinking LED
- Tutorial 2: Serial Communication
- Tutorial 3: Pulse Width Modulation (PWM)
- Tutorial 4: Push-button
- Tutorial 5: Analog-to-Digital Conversion (ADC)
- Tutorial 6: Light Dependent Resistor (LDR)
For this tutorial, you are required the following materials
- Arduino UNO - 1 unit
- Resistor (around 10 Kohm) - 2 unit
- Resistor (around 150 ohm) - 1 unit
- Breadboard - 1 unit
- LED (Red color) - 1 unit
- Tri-color LED module - 1 unit
- Push-button - 1 unit
- Potentiometer - 1 unit
Task 1: Hands-on
Task 1-1: Connection
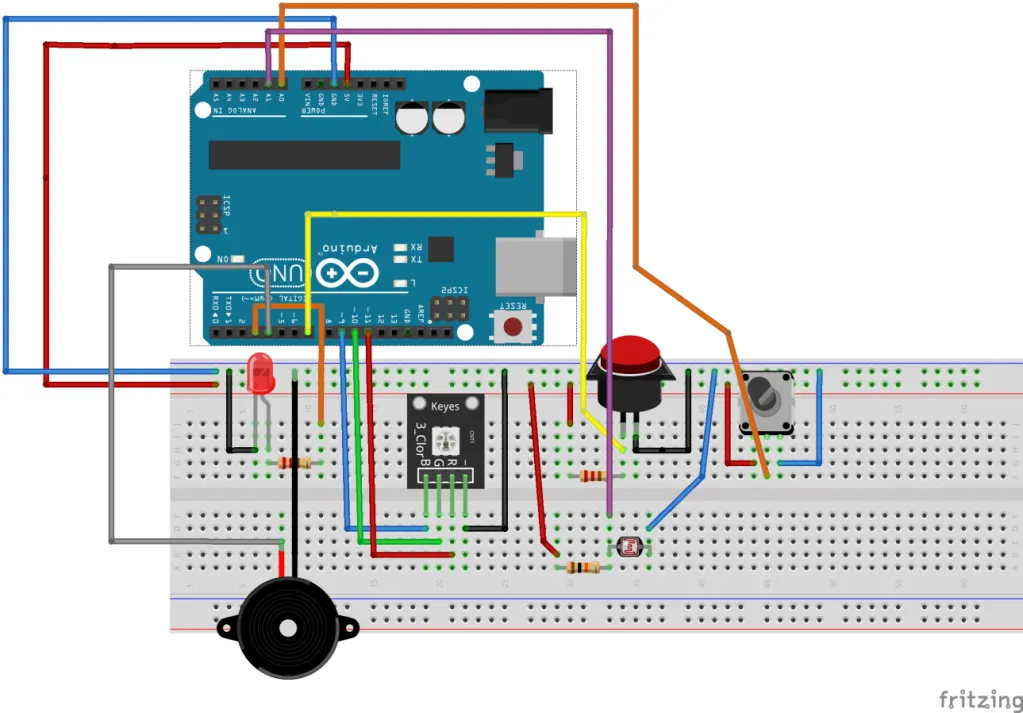
The figure above shows the circuitry of the game. Please make sure all the components and wires are connected properly before proceeding to the next task.
Task 2: How to play
1) Instruction
- Upload the following code and open the serial terminal.
- Read the on-screen instruction and press the button to start the game. The RGB LED color will change from Yellow to Red/Green.
- At this point, the user has to finish all 10 stages.
- If all stages are completed, the RGB LED will turn blue
2) Rule
- The challenges contain 10 stages.
- Turn the potentiometer’s into the right position (The RGB LED will turn green) and press the button to proceed into the next stage
- Pressing the button in the wrong position (RGB LED in red) result in 2 seconds penalty.
- The range of knob detection become smaller and smaller in higher stages.
3) code
#define R 11
#define G 10
#define B 9
#define POT A0
#define button 7

int i = 0;
int LB[11],UB[11];
float j = 0.65;
boolean ButtonState,OldButtonState;
double startTime,endTime,diffTime;

void setup()
{
  Serial.begin(9600);
  pinMode (R,OUTPUT);
  pinMode (G,OUTPUT);
  pinMode (B,OUTPUT);
  pinMode (POT,INPUT);
  pinMode (button,INPUT);
  OldButtonState = digitalRead(button);
  Serial.println("Let's the game begin");
  RGB (255,255,0);

  do
  {
    LB[0] = random(0,1023);
    UB[0] = LB[0] + ((1023-LB[0]) * j);
  }
  while (UB[0] > 1023);
  Serial.println("Press button to start");
  while (digitalRead(button) == 1);
  Serial.println("game start in");
  delay(1000);
  Serial.println("3");
  delay(500);
  Serial.println("2");
  delay(500);
  Serial.println("1");
  delay(500);
  Serial.println("start");
  startTime = millis();
}

void loop()
{
  int potVal = analogRead(POT);
  ButtonState = digitalRead(button);

  if(potVal>LB[i] && potVal<UB[i])
  {
    RGB(0,255,0);
    if(ButtonState != OldButtonState)
    {
      if(ButtonState == 0)
      {
        j = j - 0.05;
        i ++;
        getRandom(i,j);
        Serial.print("Stage ");
        Serial.print(i);
        Serial.println(" Complete");
      }
      delay(50);
    }
    OldButtonState = ButtonState;
  }

  else
  {
    RGB(255,0,0);
    if(ButtonState != OldButtonState)
    {
      if(ButtonState == 0)
      {
        Serial.println("Penalty 2s");
        delay(2000);
      }
    }
    OldButtonState = ButtonState;
  }

  if(i == 10)
  {
    endTime = millis();
    diffTime = (endTime - startTime)/1000;
    RGB(0,0,255);
    Serial.println("All stages Completed");
    Serial.println("============================================================");
    Serial.print("Finished time; ");
    Serial.print(diffTime);
    Serial.println(" s");
    while(1);
  }
}

void RGB(int r, int g, int b)
{
  analogWrite(R,r);
  analogWrite(G,g);
  analogWrite(B,b);
}

void getRandom(int k, float l)
{
  do
  {
    LB[k] = random(0,1023);
    UB[k] = LB[k] + ((1023-LB[k]) * l);
  }
  while(UB[k] > 1023);
}
Conclusion
That’s it, the last post of the Arduino beginner series. Let me know your finishing time by posting a comment. The following is my finishing time.

Thanks for reading. Follow my twitter for latest update
If you like this post, consider a small donation. Much appreciated. :)