(Arduino Beginner) Tutorial 1: Blinking LED
4 minutes to readGreeting, today we are going for an LED blinking project. But before that, you have to learn the basic operation of an LED.
For this tutorial, you are required the following materials
- Arduino UNO - 1 unit
- Resistor (around 150 ohm) - 1 unit
- Breadboard - 1 unit
- LED (Red color) - 1 unit
Task 1: Understand the theory
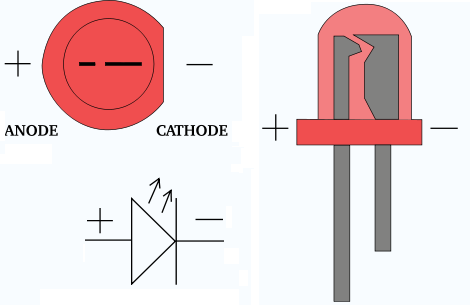
Task 1-1: What is an LED?
The light-emitting diode (LED) consists of two junctions with different polarity. Basically the ‘longer’ pin known as the anode (+) while the ‘shorter’ pin known as the cathode (-).
Task 1-2: The LED connection
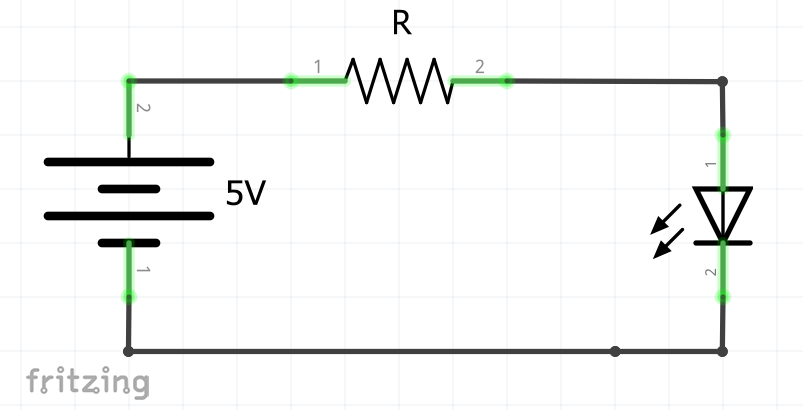
The figure above shows the proper connection for an LED. The anode pin should be connected to the positive terminal of the source and cathode to the negative terminal of the source. In addition, a resistor which serves as a voltage limiter is connected in between the source and the LED. This is because LED work in different voltage drop based on its color.
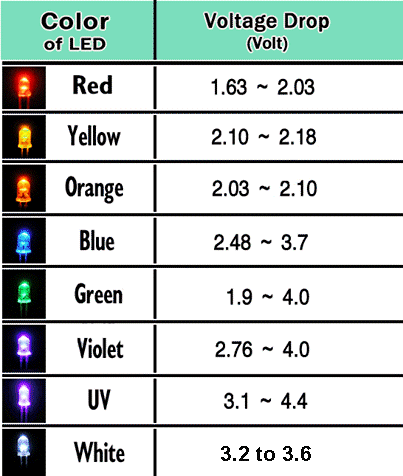
The above figure shows the voltage drop of each LED based on its color.
Task 1-3: Calculate the resistor value
We are going to take the Red LED as an example
Step 1: Identify the maximum voltage drop of the LED
V(LED) = 2.03 V
Step 2: Identify the source voltage
V(Source) = 5 V
Step 3: Calculate the voltage difference across the resistor
V(diff) = V(Source) - V(LED) = 5 - 2.03 V = 2.97 V
Step 4: Assume the forward current, I = 20 mA. Calculate the resistor value using Ohm’s law
V(diff) = IR R = V(diff)/I = 2.97/0.02 = 148.5 ohm
That’s it, you can calculate the resistor value for an LED circuit with 4 simple steps. Hold on a second, why are we going to use a 150-ohm resistor instead of a 148.5 ohm? This is because of all the resistor available in the market are integer based number which is 100, 150, 200, 220 and so on. Using a 150-ohm resistor will only contribute 1% performance drop.
Task 2: Hands-on
It is time to get your hand dirty. Please follow the connection according to the figure below.
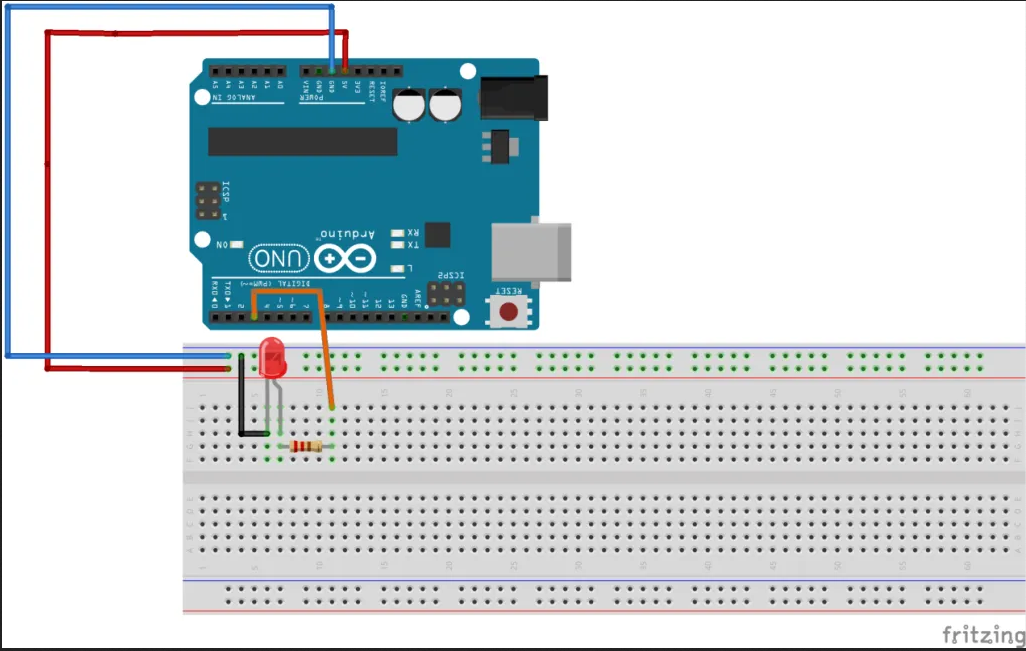
After than compile and upload the following code using Arduino IDE. Make sure the board and port settings are correct.
#define LED 3      //Declare LED pin

void setup()
{
  pinMode(LED,OUTPUT);  //Set LED pin as output
}

void loop()
{
  digitalWrite(LED, HIGH);   //LED high
  delay(1000);               //delay 1000ms or 1s
  digitalWrite(LED, LOW);    //LED low
  delay(1000);               //delay 1000ms or 1s
}
Let me explain the code line by line.
(Line 1) Define a pin constant where Arduino pin 3 is used for LED
(Line 5) Define the pin mode of the LED as output
(Line 10) Output logic HIGH for LED pin
(Line 11) Delay for 1000 ms
Task 3: What have you learned from this tutorial
- You have learned the basic concept of LED and hands-on
- Basically you have learned the following code from this tutorial:
- pinMode(A,B) - Set the pin mode either Input or output
- digitalWrite(A, B) - Set the digital output either High or Low
- delay(A) - Set the delay time in milliseconds
Conclusion
That’s all for my first hands-on tutorial write up. Hope you learn something new here. Until next time ;)
tags: arduino - beginner - tutorialThanks for reading. Follow my twitter for latest update
If you like this post, consider a small donation. Much appreciated. :)