(Arduino Beginner) Tutorial 5: Analog-to-Digital Conversion (ADC)
5 minutes to readGreeting again, welcome back to fifth Arduino tutorial for beginner. As for today project, I am going to talk about the Analog-to-Digital conversion (ADC). Without further ado, let’s get it on.
For this tutorial, you are required the following materials
- Arduino UNO - 1 unit
- Resistor (around 150 ohm) - 1 unit
- Breadboard - 1 unit
- Potentiometer - 1 unit
Task 1: Understanding the concept
1) The fundamental idea of ADC
All the data presented in the real-world is classified as analog. Analog data such as human speech, temperature, humidity, and light vary from time to time. In order to obtain the analog data surrounding us, you need a measurement device However, most of these devices operate in digital which they only understand the digital logic (0 and 1). Hence, the ADC technique is used to convert the surrounding analog value into digital form which can be understood by the digital devices. The basic of ADC starts with Nyquist sampling theorem. If you wanted to know more about ADC, you can visit the wiki.
2) ADC on the Arduino
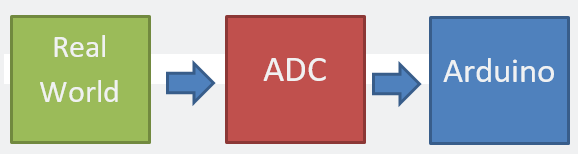
The above block diagram shows the basic process of converting real-world analog data into digital using ADC. The Arduino UNO (Atmega328) is built-in with a 10-bits ADC. What exactly is 10-bits ADC? For your information, 10-bits equivalent to 2^10 or 1024. This ‘1024’ number represents the step size of the ADC. On the other hand, the Arduino UNO can measure up to 5 VDC on its analog input pin (A0 to A5). The voltage per step size of the Arduino UNO can be calculated as 5/1024 = 0.0048828 V/step size. For example, if the Arduino measures a 465 step size, it means the input voltage is about 465*0.0048828 = 2.271 VDC. However, supply a voltage of more than 5 VDC to the Arduino UNO might result in damaging the board. Please take it as a precaution.
Task 2: hands-on
1) Basic hands-on
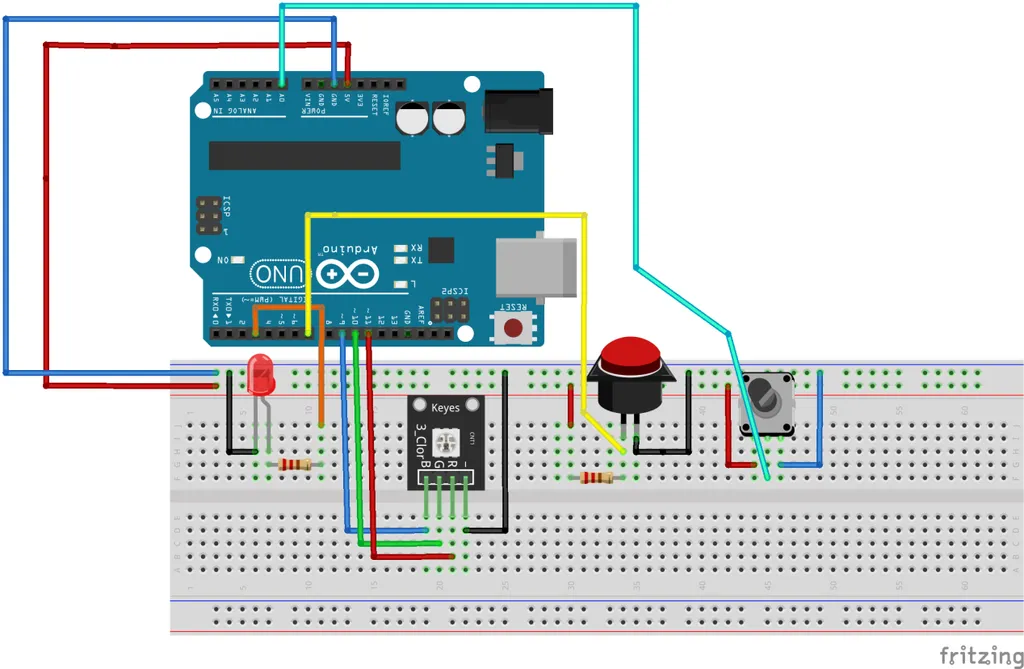
Time to get your hand dirty. If you have followed my previous post, you should know what happens in the figure. If you are new to this write-up, I can explain the reason. For your information, every project posted in this series is connected. If you are not interested in following-up this series, you just need to connect the potentiometer (with black tuner). On the other hand, if you are interested, you can follow my project 1 (blinking LED), project 2 (serial communication), project 3 (PWM) and project 4 (push-button) tutorial write-up.
If you are done with the setup, compile and upload the following code to the Arduino.
#define Pot A0 //Assign potentiometer to A0

void setup()
{
  Serial.begin(9600);
  pinMode(Pot,INPUT);
}

void loop()
{
  int val = analogRead(Pot);    //Read analog input
  float voltage = val * 0.0048828;

  Serial.print("Step size: ");
  Serial.print(val);
  Serial.print("    ");
  Serial.print("Voltage: ");
  Serial.println(voltage);
  delay(500);
}
Let me explain the code.
(Line 6) pinMode(Pot, INPUT) - We define the analog pin 0 as input
(Line 11) value = analogRead(Pot) - We are getting the step size of the analog input
(Line 12) voltage = val * 0.0048828 - Convert the analog step size into voltage form.
After that, tune your potentiometer and you will see the changes in the step size and the voltage value.
2) Control the LED using potentiometer
I leave this task as an assignment to let you figure out what is going on. If you have a question, DM me through twitter or email.
 #define LED 3
#define Pot A0

void setup()
{
  pinMode(LED,OUTPUT);
  pinMode(Pot,INPUT);
}

void loop()
{
  int val = analogRead(Pot);
  val = map(val, 0, 1023, 0, 255);
  analogWrite(LED,val);
}
Task 3: What have you learned from this tutorial
- You have learned the basic concept of ADC and ADC hands-on
- Basically you have learned the following code from this tutorial
- analogRead(A) - Read the analog step size
- map(A, B, C, D, E) - Mapping a variable A value from D and E to B and C
Conclusion
That’s all for the basic ADC tutorial. Hope you learn something today. Until next time ;)
tags: arduino - beginner - tutorialThanks for reading. Follow my twitter for latest update
If you like this post, consider a small donation. Much appreciated. :)