(Arduino Beginner) Tutorial 2: Serial Communication
6 minutes to readGreeting, welcome back to my second Arduino tutorial. Today we are going for the Arduino serial communication application. But before that, you have to learn the basic operation of the serial terminal.
For this tutorial, you are required the following materials
- Arduino UNO - 1 unit
- Resistor (around 150 ohm) - 1 unit
- Breadboard - 1 unit
- LED (Red color) - 1 unit
Task 1: Understand the theory
Task 1-1 What is serial monitor
The serial monitor is used to establish communication between your PC to the Arduino. It is a medium that let you send and receive a text message to and from the Arduino. The serial monitor tool is quite handy especially on debugging or controlling you Arduino. The serial monitor also works equivalent to ‘printf’ and ‘scanf’ in C language.
Task 2: Hand-on
Time to get your hand dirty now. This section covers 3 sections
Task 2-1: Printing your first “hello world”
Compile and upload the following code using Arduino IDE. Make sure the board and port settings are correct. After that, open the serial monitor located at the top right of the Arduino IDE.

void setup()
{
  Serial.begin(9600);              //Begin the Serial monitor at 9600 baud rate
  Serial.print("hello");           //print hello
  Serial.print("World");           //print world
  Serial.println("Hello World");   //print hello World with newline
  Serial.println("Hello Arduino");
}

void loop()
{
}
Let me explain the code line by line:
(Line 3) Initialize the communication baud rate, in our case we use 9600 bps.
(Line 4 and 5) Print ‘hello’ and ‘world’ without a follow-up newline
(Line 6) Print ‘hello world’ with a follow-up newline
(Line 7) Print ‘hello Arduino’ with a follow-up newline
Newline or ‘\n’ is C and python is a sequence of control characters that are used to signify the end of a line of text and the start of a new one.
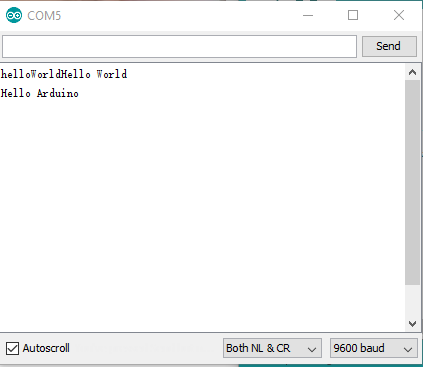
The following figure shows the output of the terminal.
Task 2-2: Input your name
In this task, we are going to generate an output based on your input. Compile and upload the following code.
void setup()
{
  Serial.begin(9600);
  Serial.println("What is your name?");
}

void loop()
{
   String Name="";           //Declare a variable to store your name

   while(Serial.available()>0)   //Check the input
   {
      Name = Serial.readString();
      Serial.print("Hi, ");
      Serial.print(Name);    //print your name
   }
}
Code explanation by line
(Line 10) A condition used to detect any incoming message for infinity time.
(Line 11) If there is an incoming message, a variable called ‘Name’ will read the message
(Line 13) Print the variable ‘Name’
You should get the following result
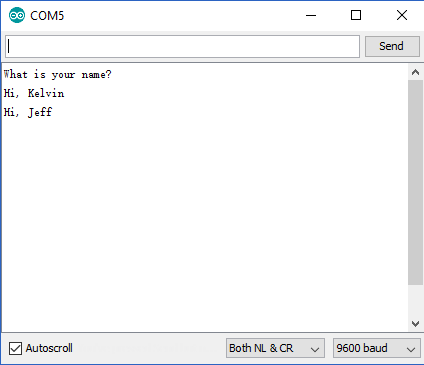
In this task, I have input the name ‘Kelvin’ followed up by ‘Jeff’. Please try it yourself. Let me ask you a question, why there is a newline appears even though we code ‘Serial.println(name)’ inline 13. The reason is we are currently using ‘NL & CR’ mode or newline and carriage return. When you send a String, it includes ‘\n’ and a null byte ‘\0’ at the end of the text. For example, the Arduino read “Kelvin\n\0” instead of “Kelvin”.
Task 2-3: Control LED using input command.
This task requires your basic understanding of Arduino with LED. You can refer to my previous write-up if you haven’t done so. Without further ado, compile and upload the following code.
#define LED 3

void setup()
{
  Serial.begin(9600);
  Serial.println("ON or OFF LED?");
  pinMode(LED,OUTPUT);
}

void loop()
{
   String LEDStatus="";

   while(Serial.available()>0)
   {
      LEDStatus = Serial.readString();
      int LengthLED = LEDStatus.length();         //remove newline and null
      LEDStatus.remove(LengthLED-2,LengthLED-1);

      if (LEDStatus == "ON")                      //ON condition
      {
         Serial.println("LED ON");
         digitalWrite(LED,HIGH);
      }

      else if (LEDStatus == "OFF")                //OFF condition
      {
         Serial.println("LED OFF");
         digitalWrite(LED,LOW);
      }
   }
}
Input “ON” to turn on the LED while “OFF” to turn off the LED.
Task 3: What have you learned from this tutorial
- You have learned the basic concept of serial monitor and hands-on.
- Basically you have learned the following code from this tutorial:
- Serial.begin(Baud rate) - Initialize the serial with baud rate.
- Serial.print(text) - Print something on the monitor.
- Serial.println(text) - Print something on the monitor follows by a newline.
- Serial.available() - Check the any incoming message or input, return 1 if detected.
Conclusion
That’s all for the serial communication hands-on tutorial write up. Hope you learn something new here. Until next time ;)
tags: arduino - beginner - tutorialThanks for reading. Follow my twitter for latest update
If you like this post, consider a small donation. Much appreciated. :)