THM write-up: RP Web Scanning
9 minutes to read
Link: https://tryhackme.com/room/rpwebscanning
Today, I going to do a tutorial write-up for two web scanning application namely Nikto and OWASP ZAP on tryhackme. This write-up is a little bit different compared to my other CTF challenge. That is why I called this write up as a tutorial instead of a walkthrough. In addition, I was surprised that some of the challenges are not able to complete the task, so far only 26 out of 86 people completed the room (about 30%). This gives me the inspiration to shout out my opinion and the need to spread the knowledge. Without further ado, let’s get it on.
Task 1: Nikto and OWASP ZAP
Both Nikto and OWASP ZAP run webserver scanning while Nikto runs in the shell and OWASP run-in GUI format. Both scanners behave in a different way. In summary, Nikto works best for reconnaissance while OWASP ZAP for webserver vulnerability analysis. As the old-timer said, two is better than one. Multiple tools always work better than a single tool.
Task 2: Nikto
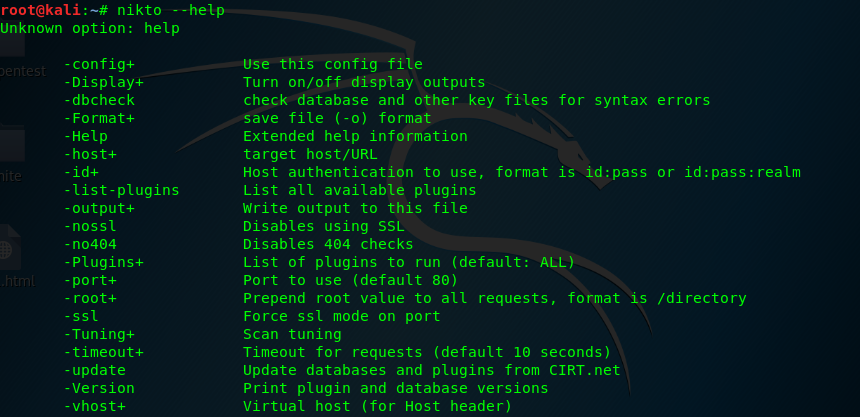
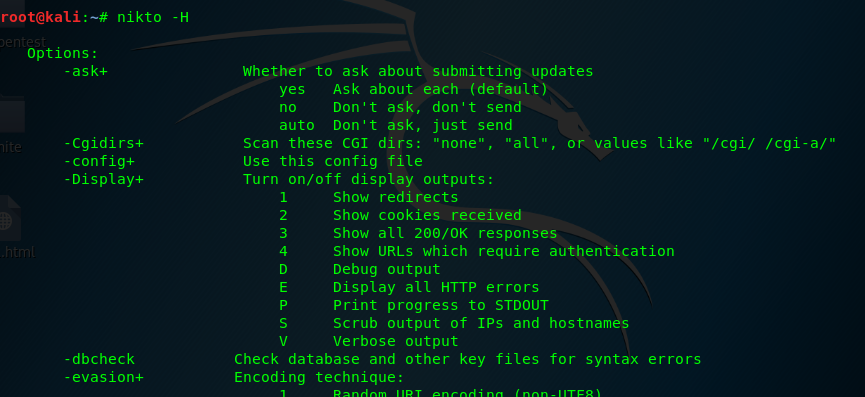
This task required the user to familiar with the use of Nikto web scanner tool. If you are unfamiliar with the flag, remember, always use -H and –help (simplified help menu) to help you up. Every answer to this task is on the help menu.
nikto -H
nikto --help
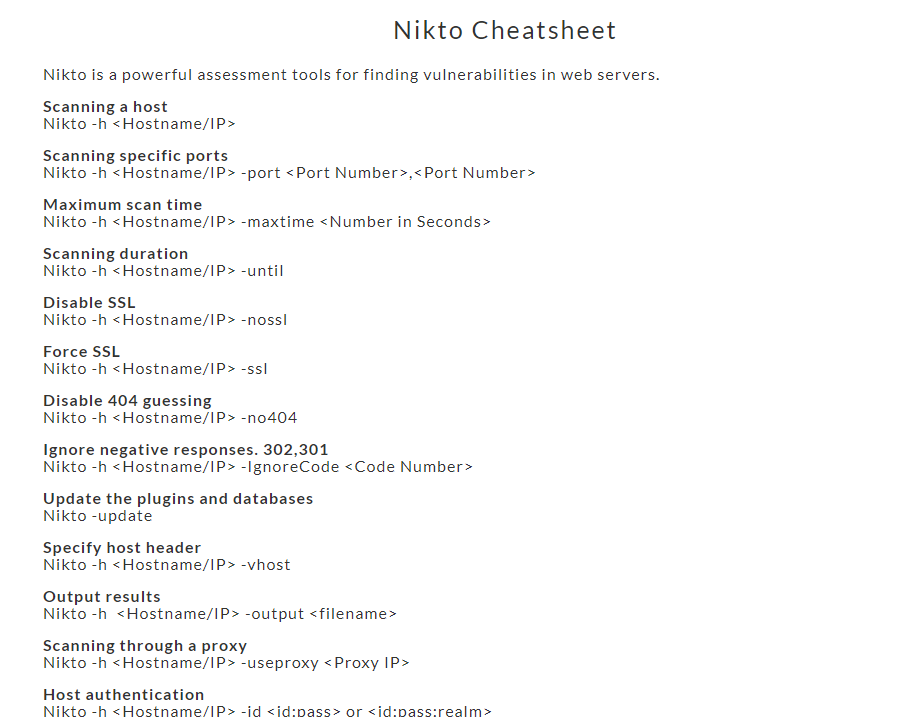
If the help menu is confused, you are welcome to use Nikto cheat sheet. This is one of the examples.
Task 2-1: Flag for scanning a host
There are two answers to this question. It can be either -h or -host. However, challenger only can input -h to the answer field. Actually, it doesn’t matter, as long as you learned it.
Task 2-2: Flag for scanning non-secure transport
The answer is on the help menu. A non-secure transport port also known as non-secure socket layer (NoSSL).

Task 2-3: Flag for scanning secure
The opposite of NoSSL is SSL, silly me.

Task 2-4: Flag for specified a port scan
Similarly, this task got two answers which are -p or -port.
Task 2-5: Flag for identifying the integrity of the vulnerable database
-dbcheck is used to identify the Nikto’s vulnerable database, Always update your Nikto database using -update.

Task 2-6: Flag used to guess and test username in APACHE
We need to use -mutate flag with option 3 for the task to enumerate usernames and files in Apache server.

Task 2-7: Flag for credential check
We can perform the credential check using -id flag follows by the username and password.

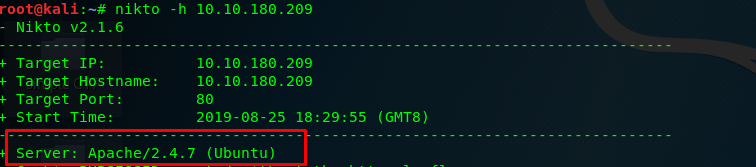
Task 2-8: Webserver version
Launch the Nikto scanner using the following command.
nikto -h <MACHINE IP>
After a few seconds, you will be prompt with the following results.
Task 2-9: Hidden directory
After that, wait a few minutes. The Nikto scanner will return a hidden directory with an OSVDB number. FYI, OSVDB was shut down on April 2016, it is replaced by VulnDB.

Task 2-10: Flag to limit the scan to end a certain time
Sometimes, Nikto can take a long time do complete a full scan. In order to limit the scanning time, we can set the desired run time with -until.

Task 2-11: Flag to list all plugins
To list all the available plugins on Nikto, simply use -list-plugins.

Task 2-12: Find outdated software on host using plugin
To find the outdated software on the target host, use -Plugins outdated.

Task 2-13: Run a standard test using a plugin
To run a series of a standard test, you are requested to use -Plugins tests.

Task 3: OWASP ZAP scanner
We just finished the basic tutorial on Nikto and let’s proceed to OWASP Zap scanner.
Task 3-1: Launch the ZAP
OWASP ZAP scanner is not designed to run using a shell. This is because the way of Zap scanner presents the scan results is far more complex and sophisticated. However, you can launch the Zap scanner using the command line. If you are using Kali Linux, the Zap scanner launching command can be found on /bin.
Task 3-2: Zap scanner GUI
After launching using the zap scanner, you will be prompt by a neat GUI. Let me explain the frame of the GUI.
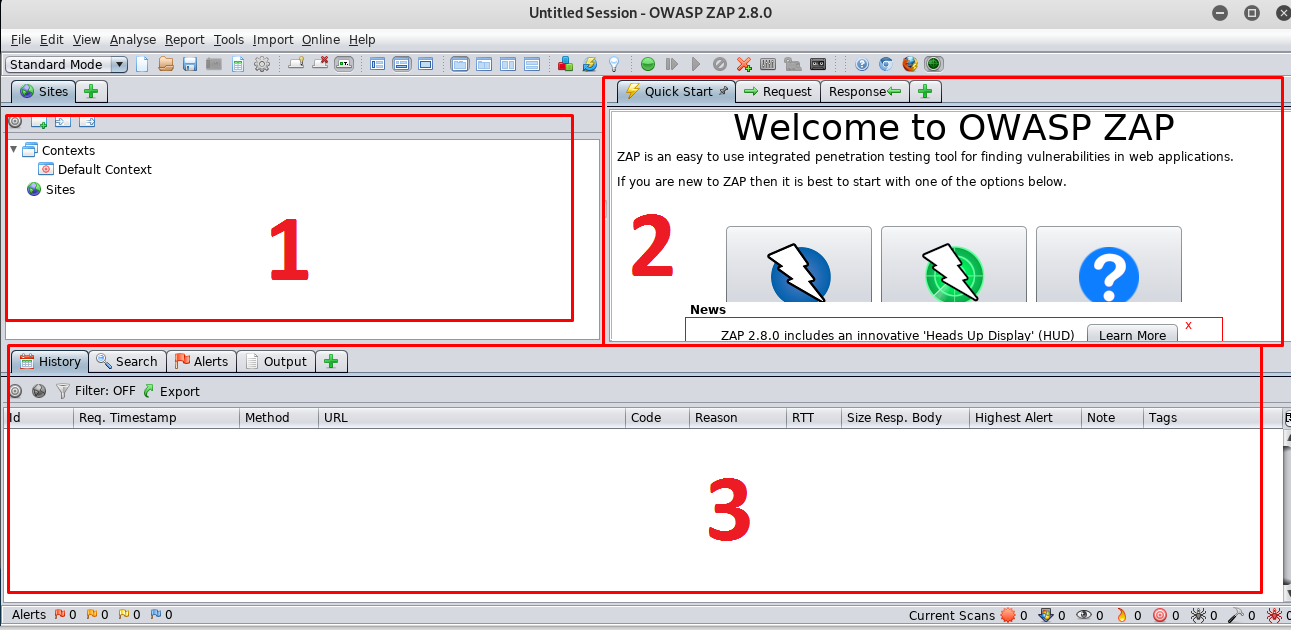
- All the scanned site will be listed in this frame
- This is a workspace window consists of a quick start (you can launch the scan right here), webserver request and website response windows.
- All the results include web server vulnerability, scanning history, spider crawl, and progress will be displayed right inside this frame
To start our first attack on the webserver, simply go to frame 2 and click on Automated scan.
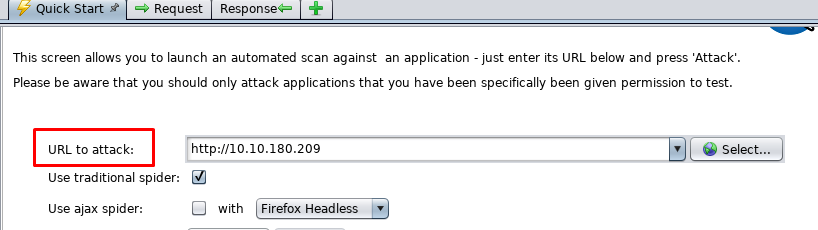
Enter the webserver URL and start the attack.
Task 3-3: Zap scanner is ‘noisy’
Running a standard Zap scanner somehow generate ‘noise’ to the webserver where the victim knows someone is scanning their web server. Rest assured, the OWASP zap scanner can run in 4 different modes.
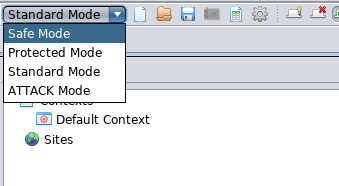
- Safe mode: A passive and quiet scan that turns off all the harmful features while scanning.
- Protected mode: Only scan the webserver with a particular scope. This is to reduce the ‘noise’.
- Standard mode: Scan anything that is relevant (default by OWASP Zap scanner).
- Attack mode: A full-scale active scanning. The noisiest one.
I highly recommend the user to use the ‘protected mode’. If you wanted to maximize the webserver visibility, go for ‘standard mode’. Bear in mind, both ‘safe mode’ and ‘protected mode’ will disable the following feature.
- Spider crawling
- Fuzzing
- Force browsing
- Breaking
- Resending requests
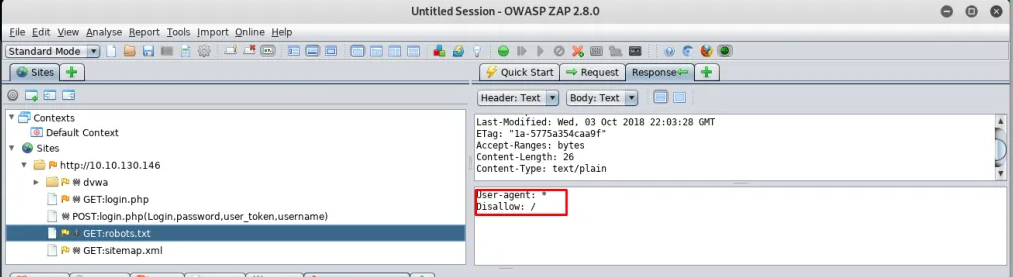
Task 3-4: File which instructs the search engine
After starts the attack, you will notice a text file called robots.txt.

Robots.txt is used to tell the search engine which directory or files shouldn’t be indexed,
Task 3-5: Which page is disallowed to be indexed
Open up the robots.txt file, you will find out disallow:/ . What does it mean? It means the robots.txt tells the search engine not to index every page on the site for all browsers.
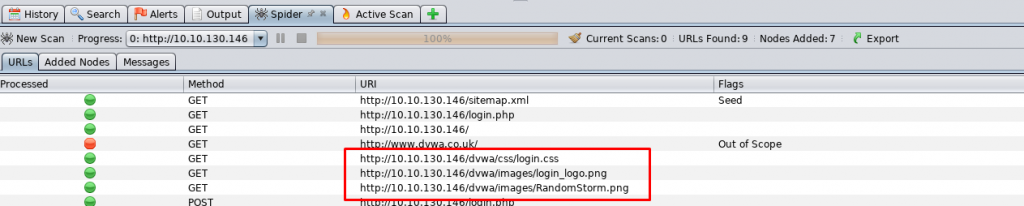
Task 3-6: The directory contains images
The answer is on the spider tab of the bottom frame.
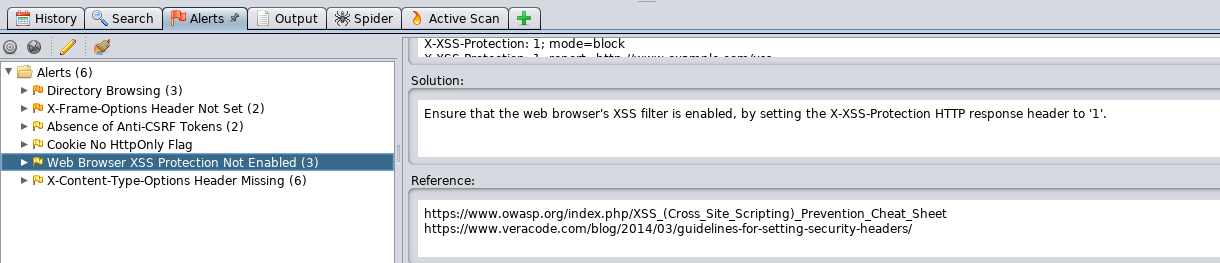
Task 3-7: Non-secure transport and cookie
Checking on the alert tab for web server vulnerability. We come across a cookie No HttpOnly flag.

Task 3-8: Cross-site scripting (XSS)
Look like the webserver is vulnerable to XSS.
Task 3-9: Which site is out of scope
The spider crawls something in the website which is found to be out of scope.

Task 3-10 and 3-11: HTTP request method
There are two types of HTTP request method which is POST and GET. This method is used to send any relevant information to the webserver such as username, password, page id, etc. The basic difference between GET and POST are
- GET request submitting a full URL with information which can be bookmarked and re-executed for later use.
- POST request submitting a URL without information which cannot be bookmarked or re-executed.
The example of GET and POST to send a page id
- (GET) http://example.com/page.php?id=2
- (POST) http://example.com/page.php
For the sake of convenience, GET request is better than POST. However, from the security point of view, GET request is less secure than POST where POST will never save the parameter on the browser history or webserver log. GET request is suitable to be used on submitting non-sensitive data such as page id while POST method should be used on sending sensitive data like username and password.
Task (extra): More on Zap scanner
You can perform a deep scan or attack on a certain site. Simply right-click the site and choose the action.

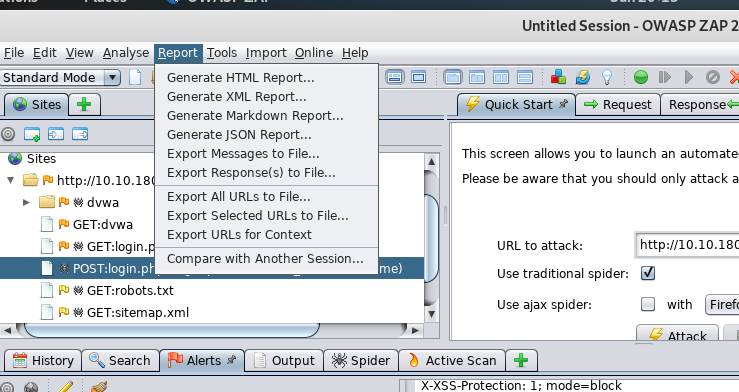
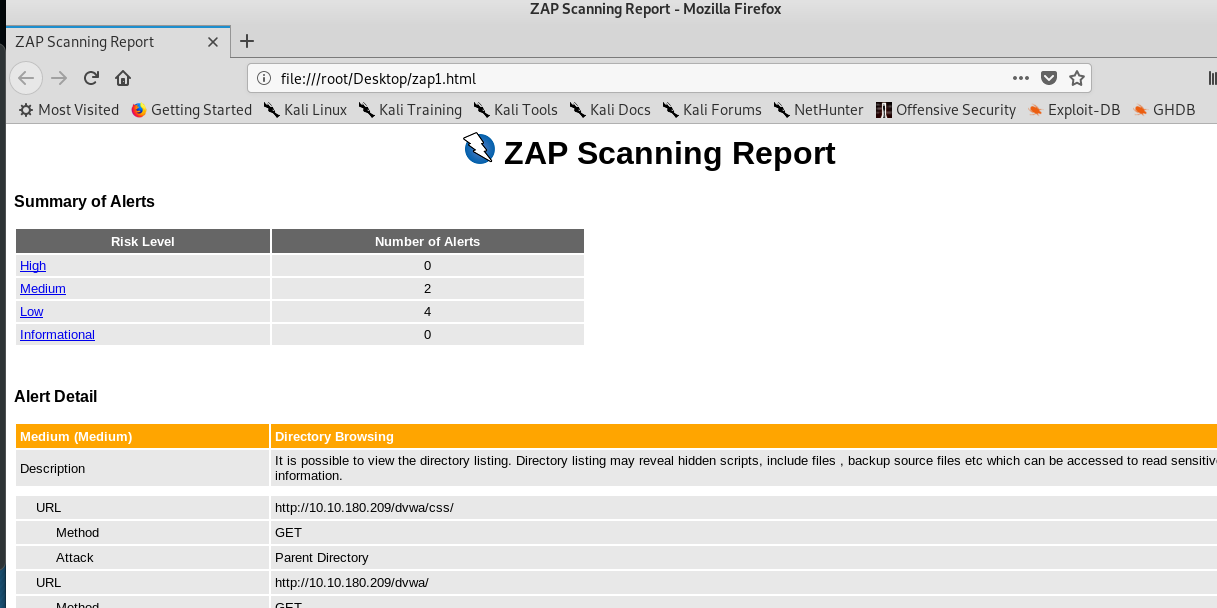
On the other, you can generate a full scan report in HTML format which served for future use especially your are a pentester.
Conclusion
That’s all for the basic tutorial on Nikto and OWASP Zap webserver scanning tool. Note that, there is another web server scanner tool worth to be discovered with, such as w3af, Arachni, Grabber and more. Hope you enjoy the tutorial and see you again ;)
tags: tryhackme - tutorial - web - OWASPThanks for reading. Follow my twitter for latest update
If you like this post, consider a small donation. Much appreciated. :)