THM write-up: Reverse Engineering
6 minutes to read
Link: https://tryhackme.com/room/reverseengineering
Another day, another THM CTF writeup. Today, we are going to walk-through one of the oldest room in the THM server, the reverse engineering room. Do not let the room difficulty fool you, the room actually quite easy even for a beginner. I managed to solve this room within 10 mins with the IDA dissembler with a debugger feature. The key to solving this room is the correct position of a breakpoint. Enough of the intro, let’s get started.
Task 1: Author note
The binary files are intended for Linux/Mac OS. If you having the windows as host machine, I highly recommend running the files on the Linux VM machine. In this entire write-up, I’m going to use the IDA dissembler as it provides a better GUI flow. The con is thing get pretty messy if the executable file contain lots of instructions.
P/S: if you referred to my last walkthrough on the ELF reversing, I have created a permanent alias named ‘ida’. Check the page for more detail.
Task 2: crackme1
First and foremost, we are going to launch the dissembler with the following command.
ida
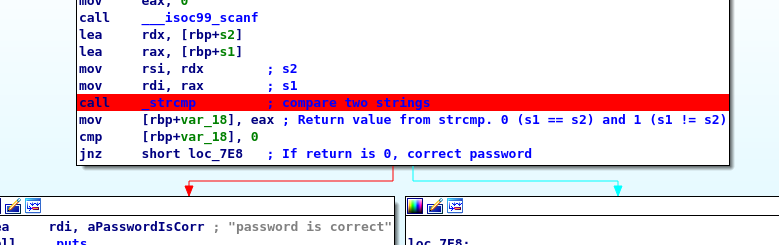
Our main goal is directing the instruction to the correct password. I have put a few comments on the instructions (You can do it by using “:” key, without the quote.). We now have s2 and s1 moved into rsi (source) and rdi (destination) index register and after that, it called for strings compare function. This function is used to compare the string and check whether the strings are equal or not. The function will return 0 if equal and 1 if not equal. The strcmp() function is the most suitable place to put our breakpoint. You can either right-click the line and add the breakpoint or simply press F2.
After everything is set, time to run the program by clicking the green play button.

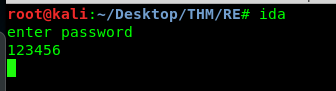
After that, visit the terminal and enter any dummy value you like. In this case, I entered 123456.
Then, check the IDA debugger. The program somehow stopped at the breakpoint. If you hover to the rax register, you will see a familiar list of letters. This is the input we just entered.
On the other hand, hovering the rdx register will give you something interesting. That is the password for the binary file.
PS: If you accidentally closed the dissembler, just go to view –> open subview –> dissembler.
Task 3: crackme2
Similar to the last task, we need to trace the flow that gives us the correct password output.
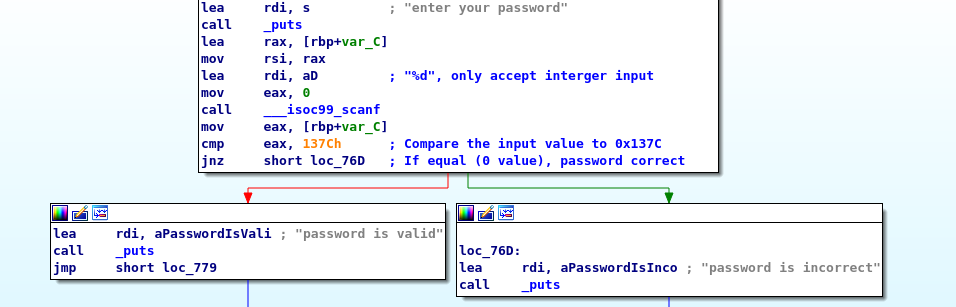
By looking at the last few lines of the assembly, the binary only accepted for integer input and this integer must equal to hex value 0x137C. Guess what, we just need to convert the hex into an integer or a base10 (decimal).
P/s: Please be note that %d is a signed integer. If the comparable value is 0xFFFFFFFF (32-bits binary), the value is -1.
Task 4: crackme3
Reversing this binary might take you some time. So, behold!
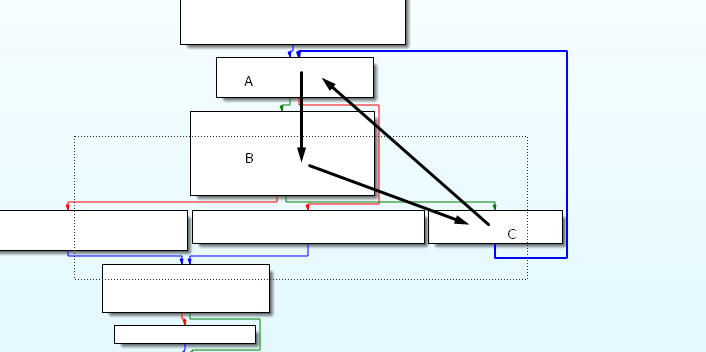
By looking at the overview of the graph, I come across with a loop (black arrow A –> B –> C –> A). We have to inspect the loop block by block.
Block A
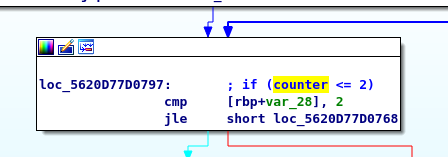
Block A might be a condition block. Why? because of a comparison instruction is used in the first block. If the counter is less than or equal to 2, the flow will go to block B. I just casually put a counter <= 2 to remind me that this block runs 3 times (As the counter is initialized as 0 at the start of the program).
On the other hand, if the counter is more than 3, the loop will break and move to correct password block. That is the block we are looking for.
Block B

On block B, we have to compare two low byte registers, al, and dl at the end of the line. If the comparison match, it will go to block C. Or else, we will get ‘wrong password’. Our main target is to make sure that the content in al and dl are the same. I will put a breakpoint on the jump instruction and check al and dl contents.
Block C
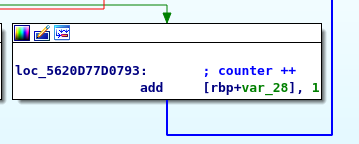
Block C just adding 1 to the counter and go back to block A. That’s it, we just fully analyze the loop. In summary, this is a condition loop. It can be for loop if loop or even while loop in the original program, depending on how you see it.
Debugging the program
Everything is set now, time to run the program. By looking at the entire flow of the loop, the program check for every single letter we just entered. Also, it only checks for the 3 letters.

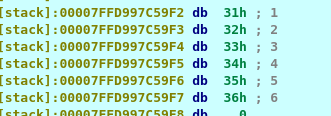
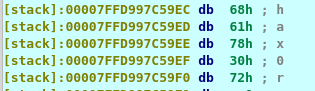
We run the program and put any dummy data on the terminal. Go back the to debugger and look at the al and dl. The dl contains the first letter of the input while al contains the letter ‘a’ or hex code 61. That is the first letter of the password. A further investigation of the stack on address [rpb+var_28] before the comparison, I come across the following.
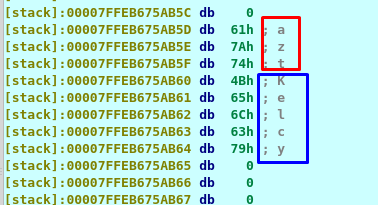
Our input value is stored in the blue box area while the red box look suspicious to us. Since the first letter of the password starts with an a, we presume the red box is the password of the binary.
Conclusion
That’s all for the simple write-up on the reverse engineering room. Hope you learn something today, until next time ;)
tags: tryhackme - reverse_engineeringThanks for reading. Follow my twitter for latest update
If you like this post, consider a small donation. Much appreciated. :)